
1: Introduction
Welcome back to the CBRX, Season 1, Episode 21! I’m Emerald, your narrator today, unless you’re on the audio narration in which case I’ve taken over Dawkinzz’ body.
The Cylinders two current warzones continue the fight while plans for world domination brew in other regions. A time of great change is upon the cylinder as the world’s population suffers from war.
Welcome back to the CBRX, Season 1, Episode 21! I’m Emerald, your narrator today, unless you’re on the audio narration in which case I’ve taken over Dawkinzz’ body.
Last part was a round of many deaths, will this part follow suit? This shows an accurate depiction of the elimination of Poor Poverty Point, colorized 2019.
DerErlenkonig’s Tile Accurate map gives us a quick recap of what the cities look like and to see at a glance any civs that have been hiding from us for a while.

ThyRefomer’s amazing SPOR continues showing us a lack of relevant wars in Asia, Africa and North America. Will any of that change this part?
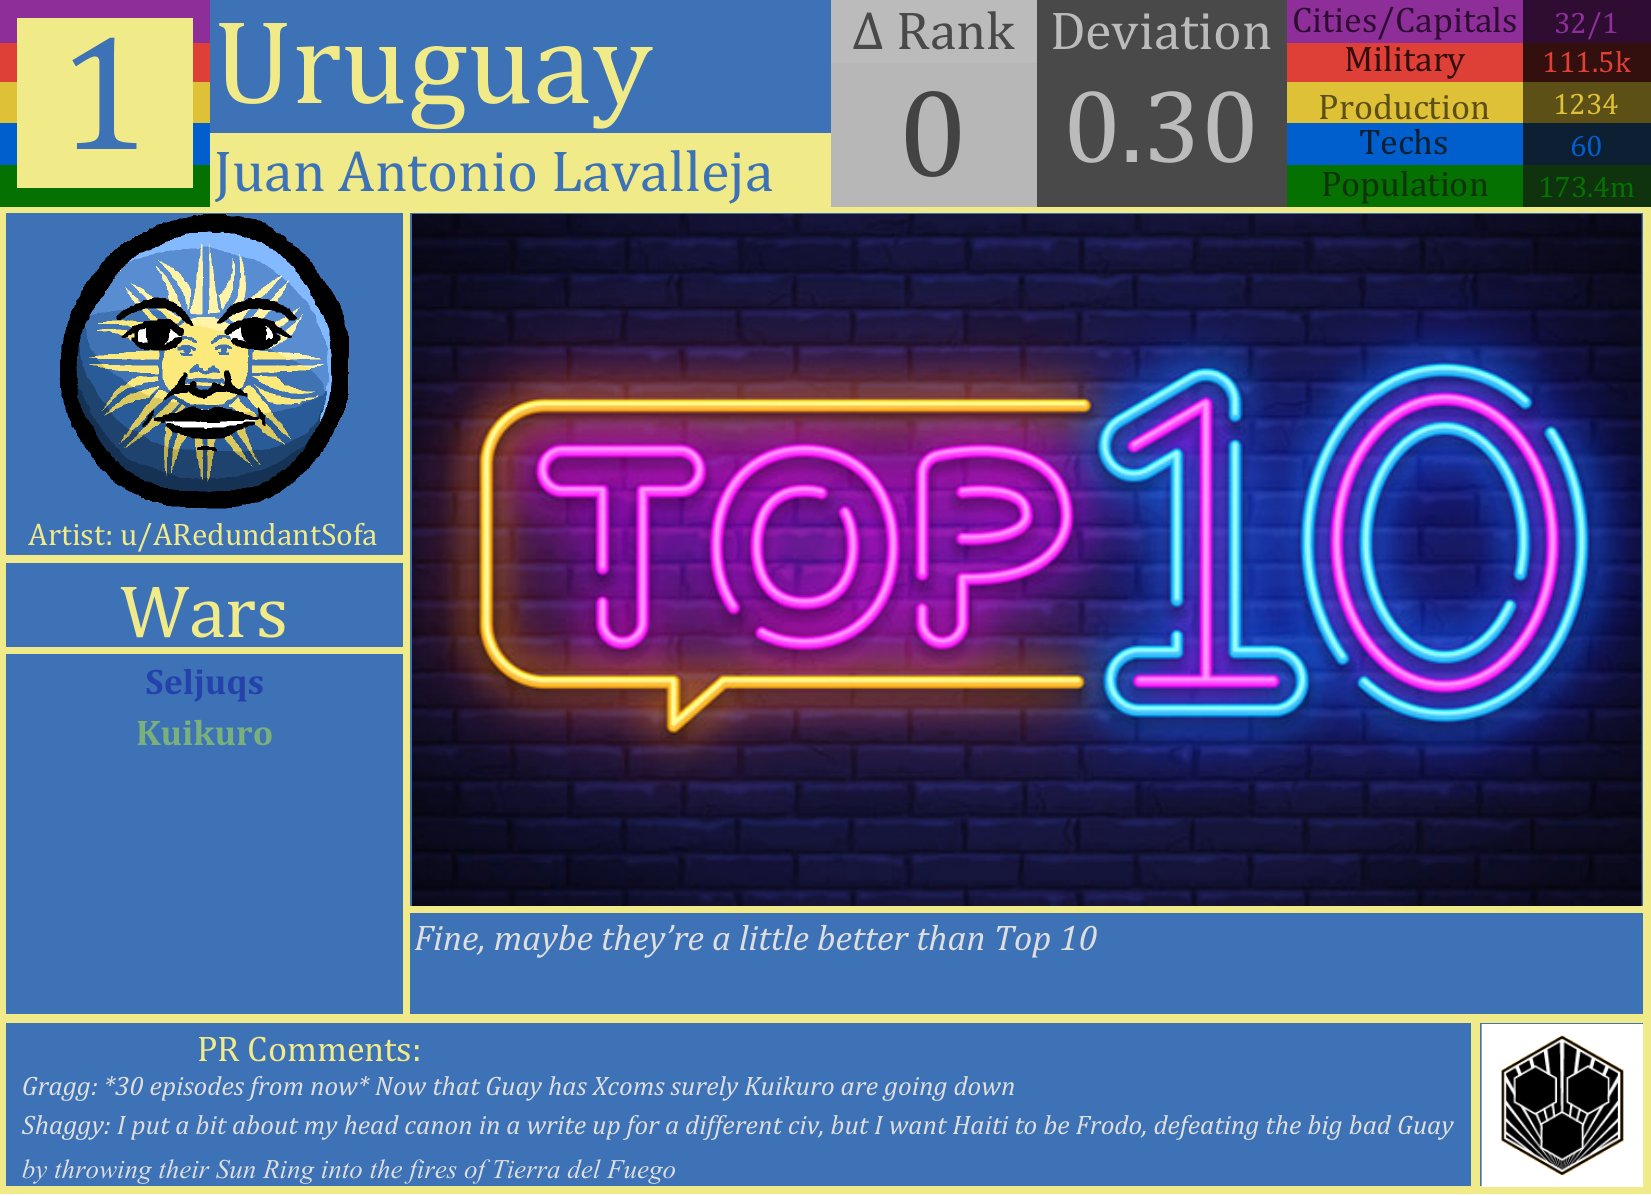
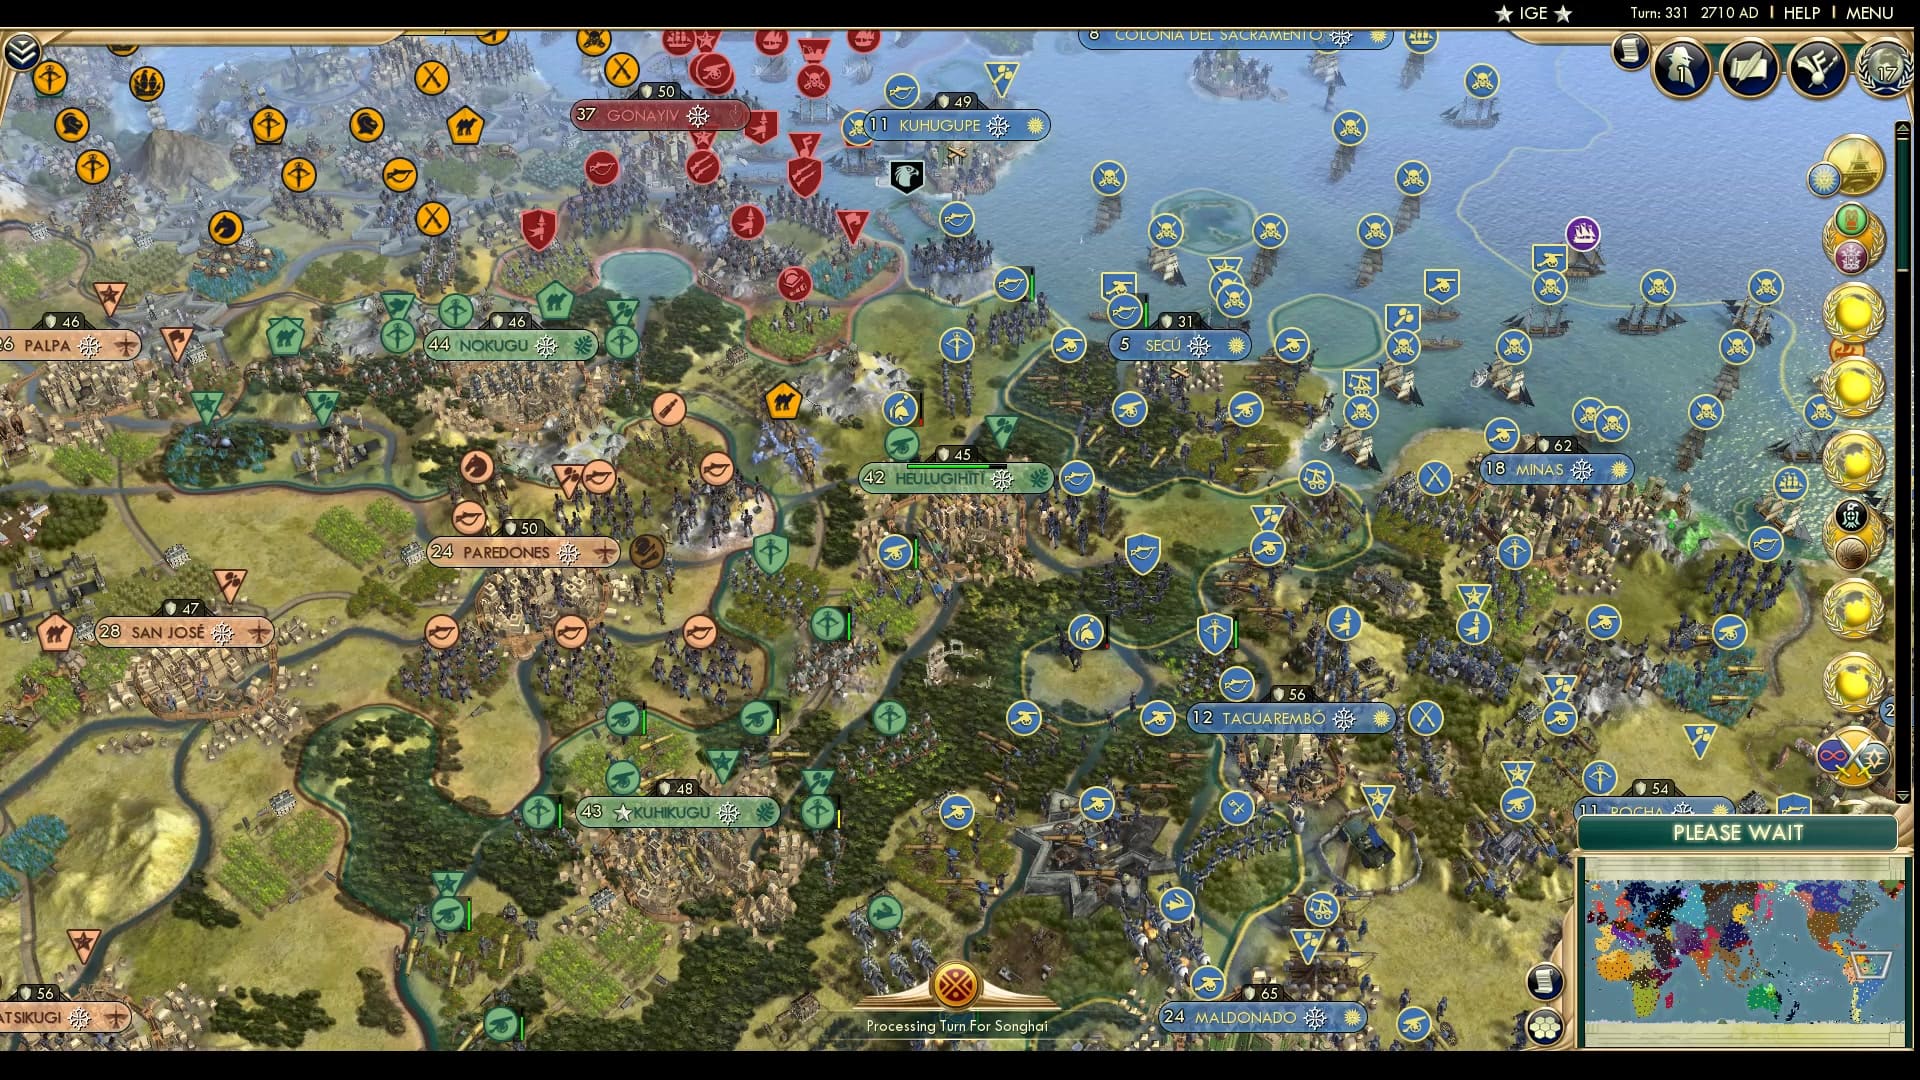
I’m projecting into the future here, but it’s entirely unlikely that we will have anybody but Uruguay especially with Zimbabwe falling off the last part. They have the lead with the score for now, but can they use it to win the game?
We resume with the Viking conquest of England, the land snipe settle of Wurzburg has been duly set aflame by the Vikings. A far more peaceful fire burns in Ballabeg as the Manx and the Vikings make peace, exchanging a city to be used as firewood for the Vikings. This sees the end to this Viking invasion with a decisive victory for the Vikings, getting a foothold in England and Ireland. Shame they’re burning their English city.
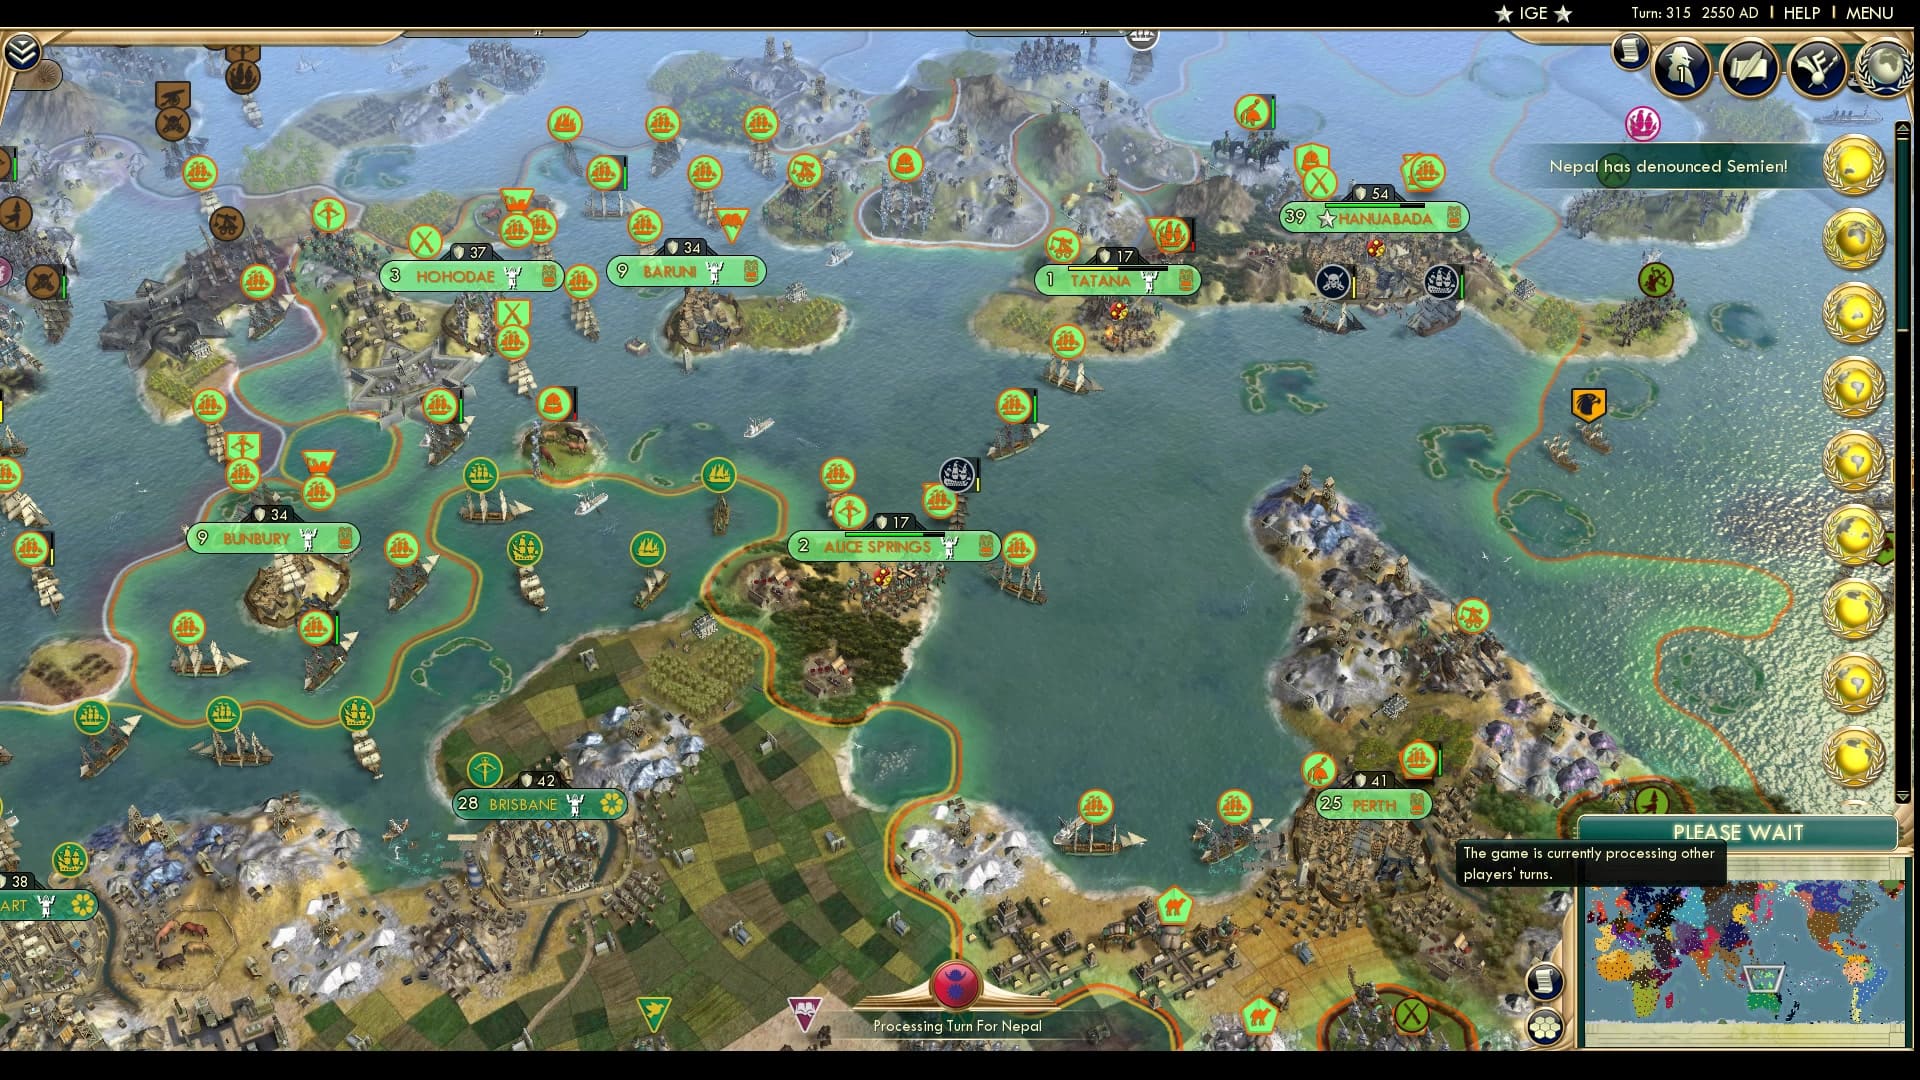
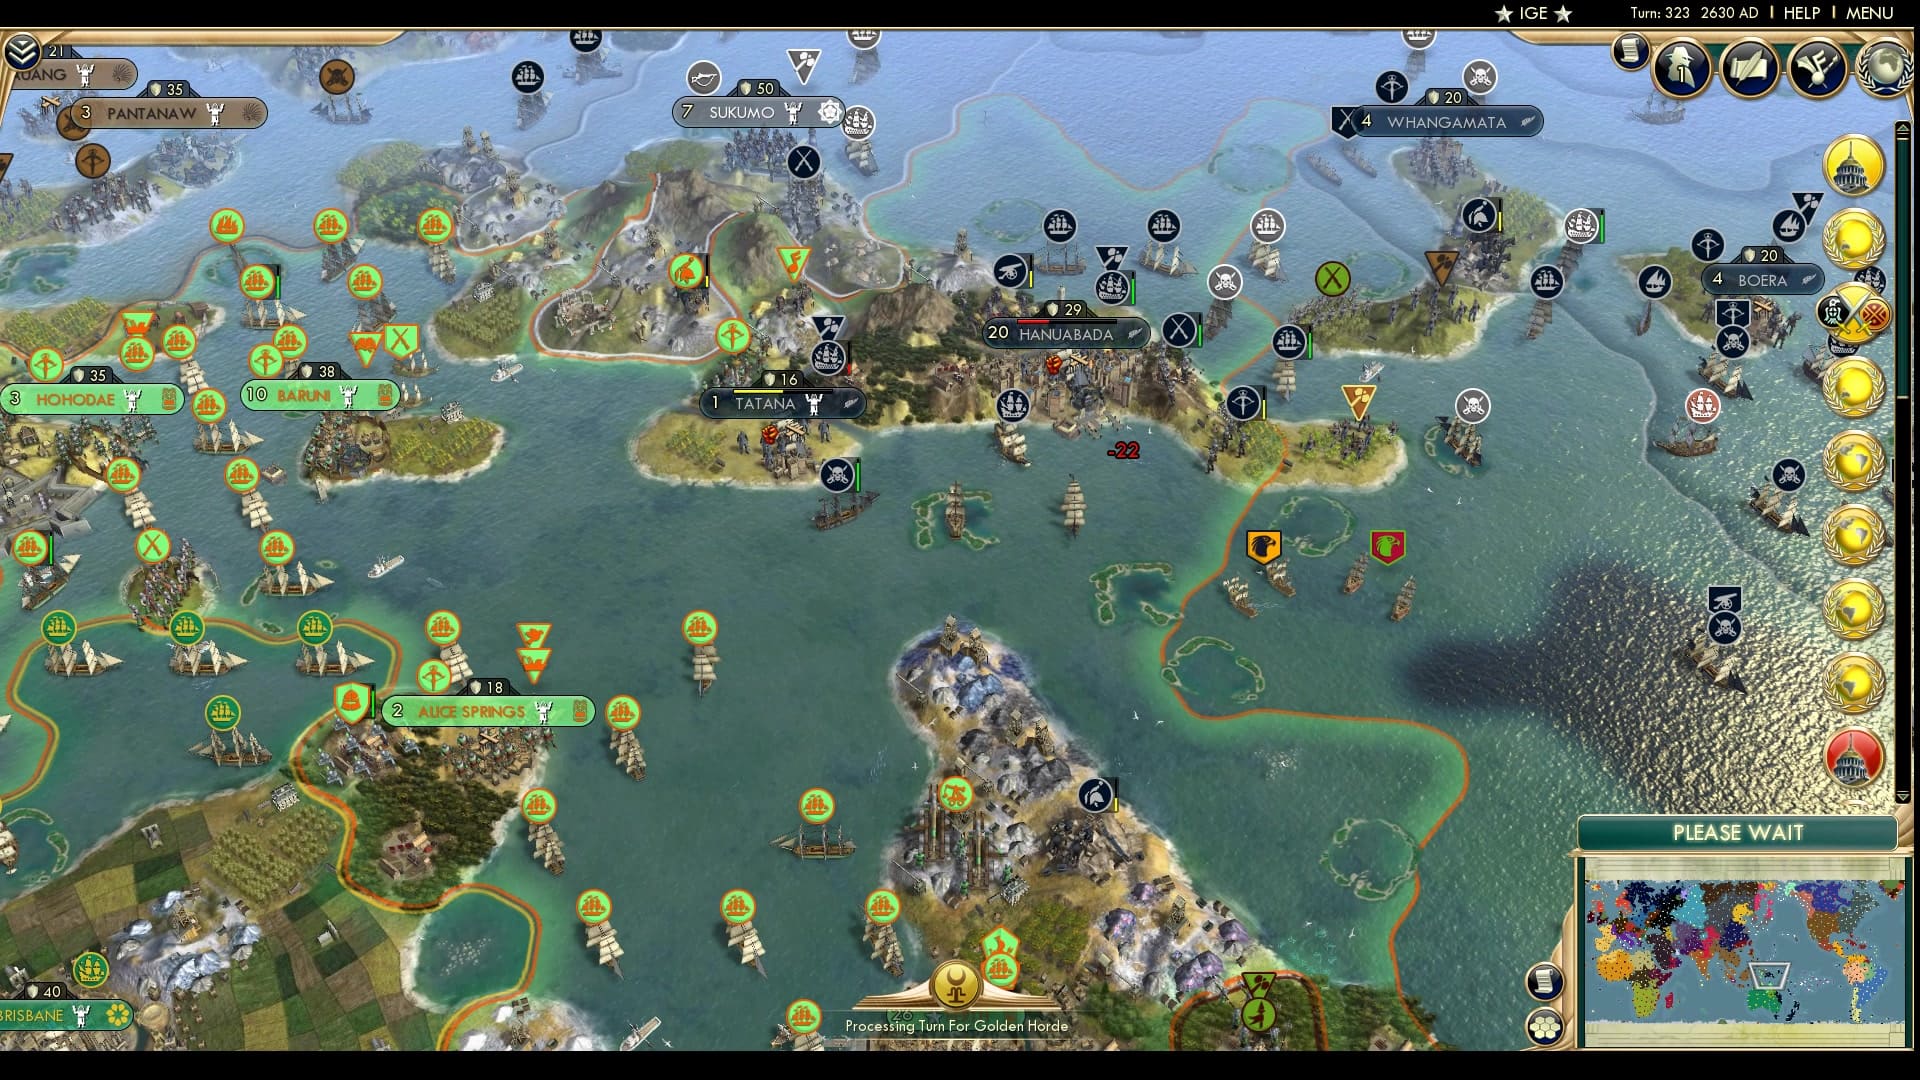
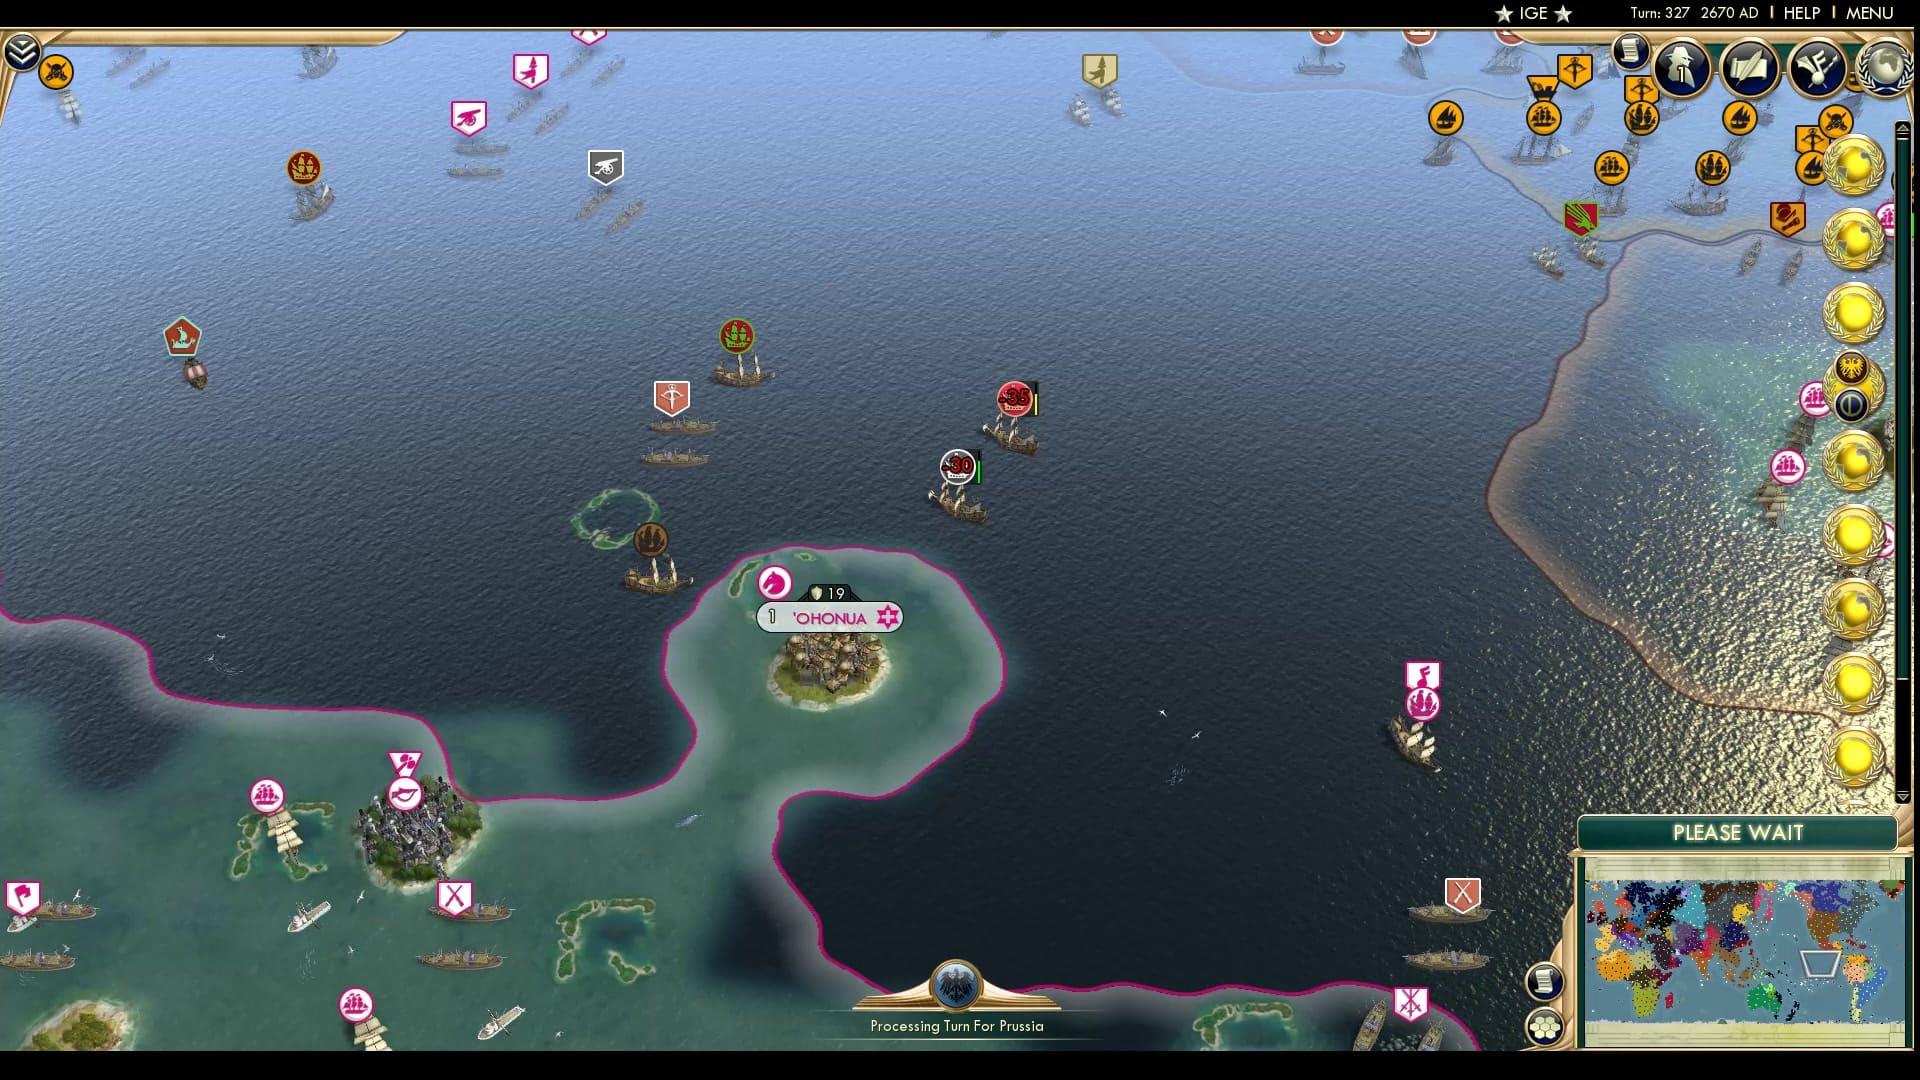
And the Pacific theatre continues on! Tatana has been recaptured by the Papua and the Kiwis seem to have thinned out. Does Seddon have any ships or any stamina left in the waters to the right? Only time will tell.
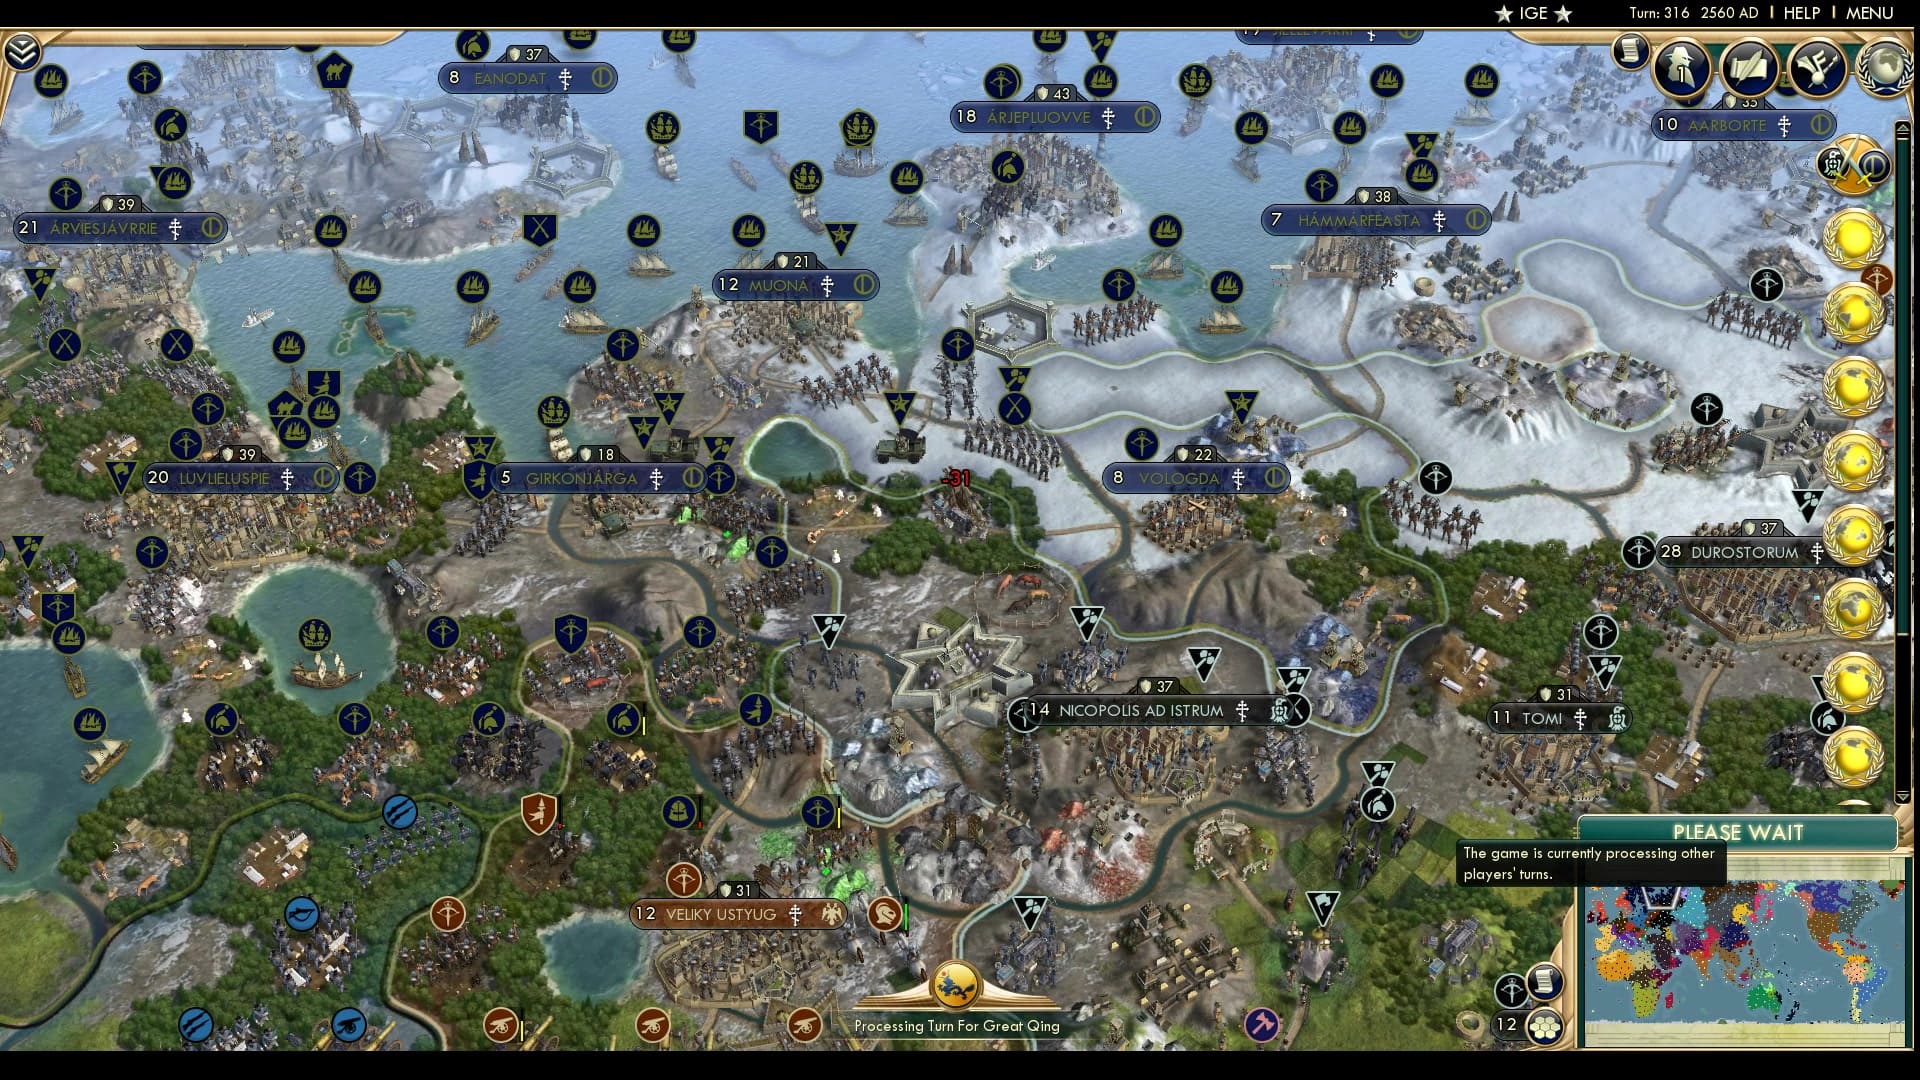
The frigid north rumbles forth as the Sami make their next play, attacking the Goths! They’ve already declared and invaded Muscovy and don’t have any units at the Gothic front. A bold and confident move, but we’ll have to see if the Goths can fortify before the army moves in.
In case you might’ve forgotten this largely irrelevant front of the Viking-HRE war, some units have taken damage. The Moors have parked a scary navy next door, but beyond that this doesn’t look like it would go anywhere.
In other news, several irrelevant wars are declared.
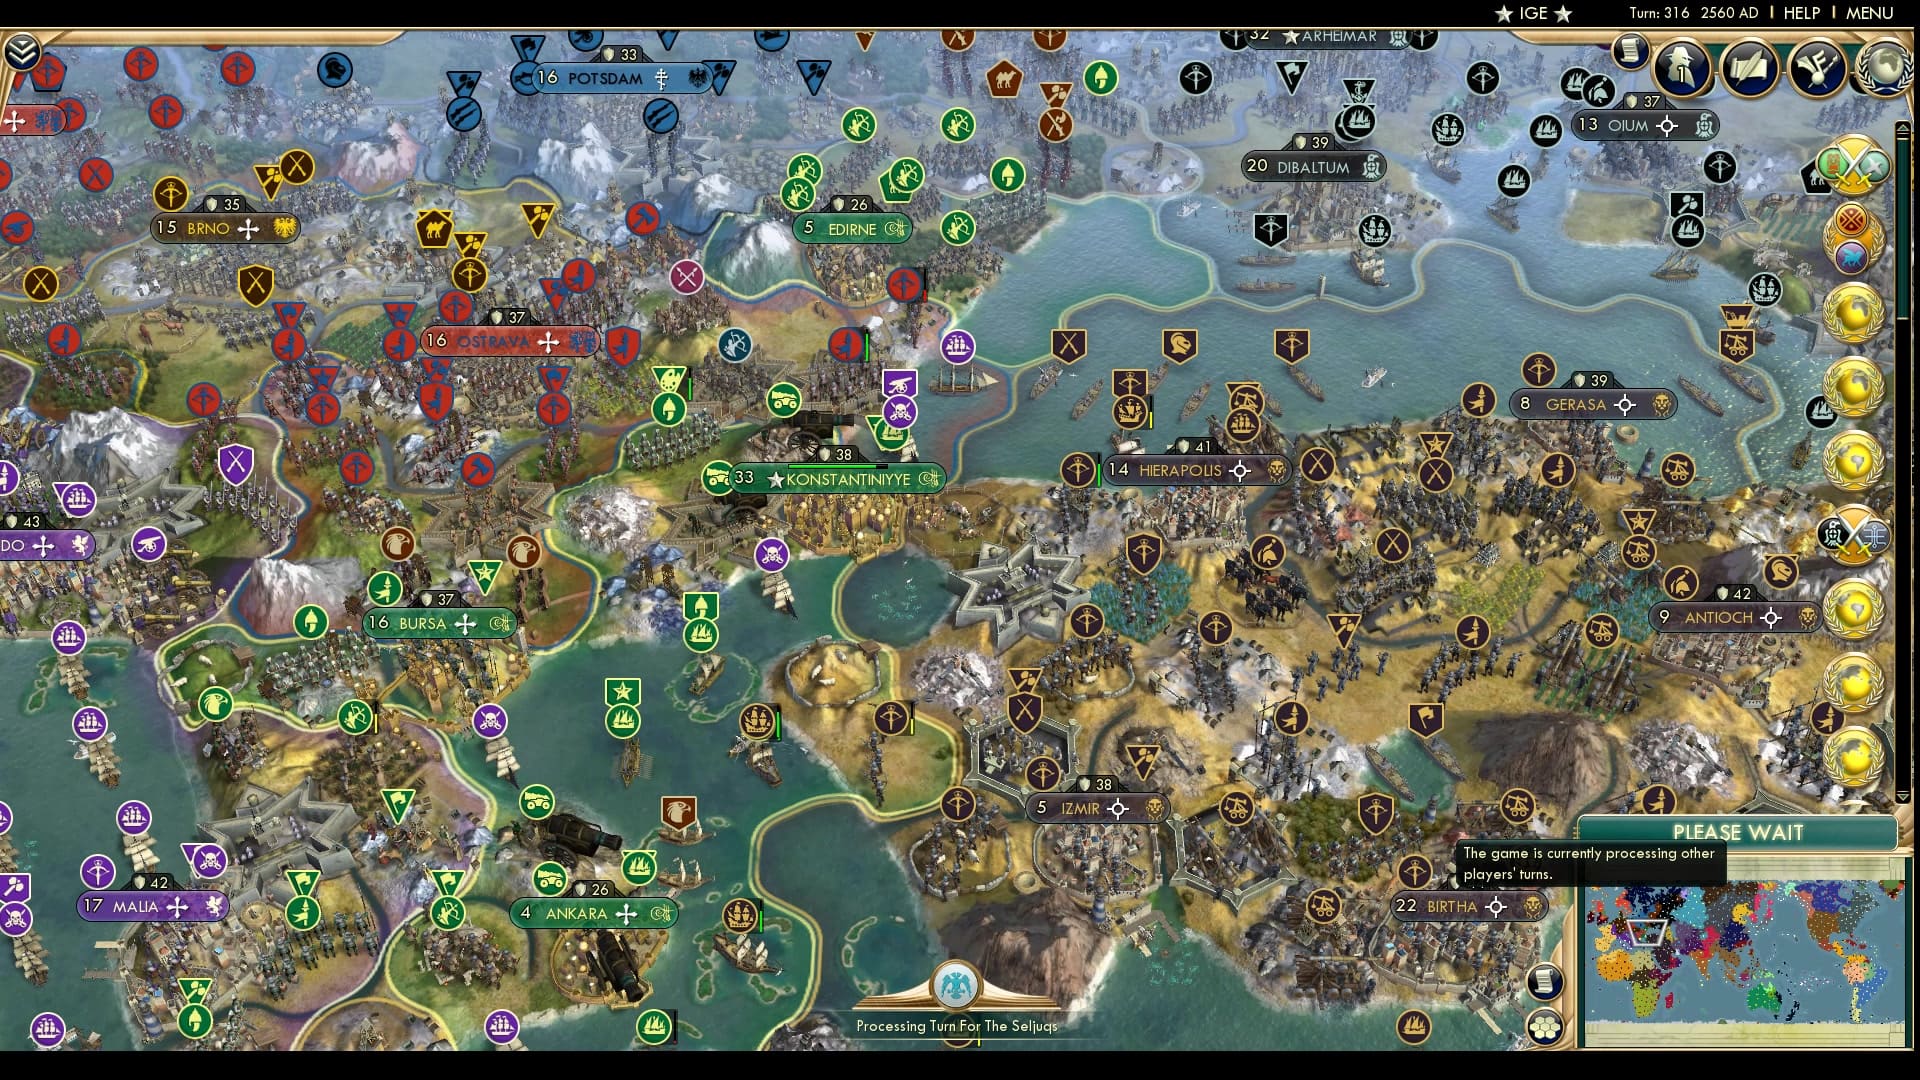
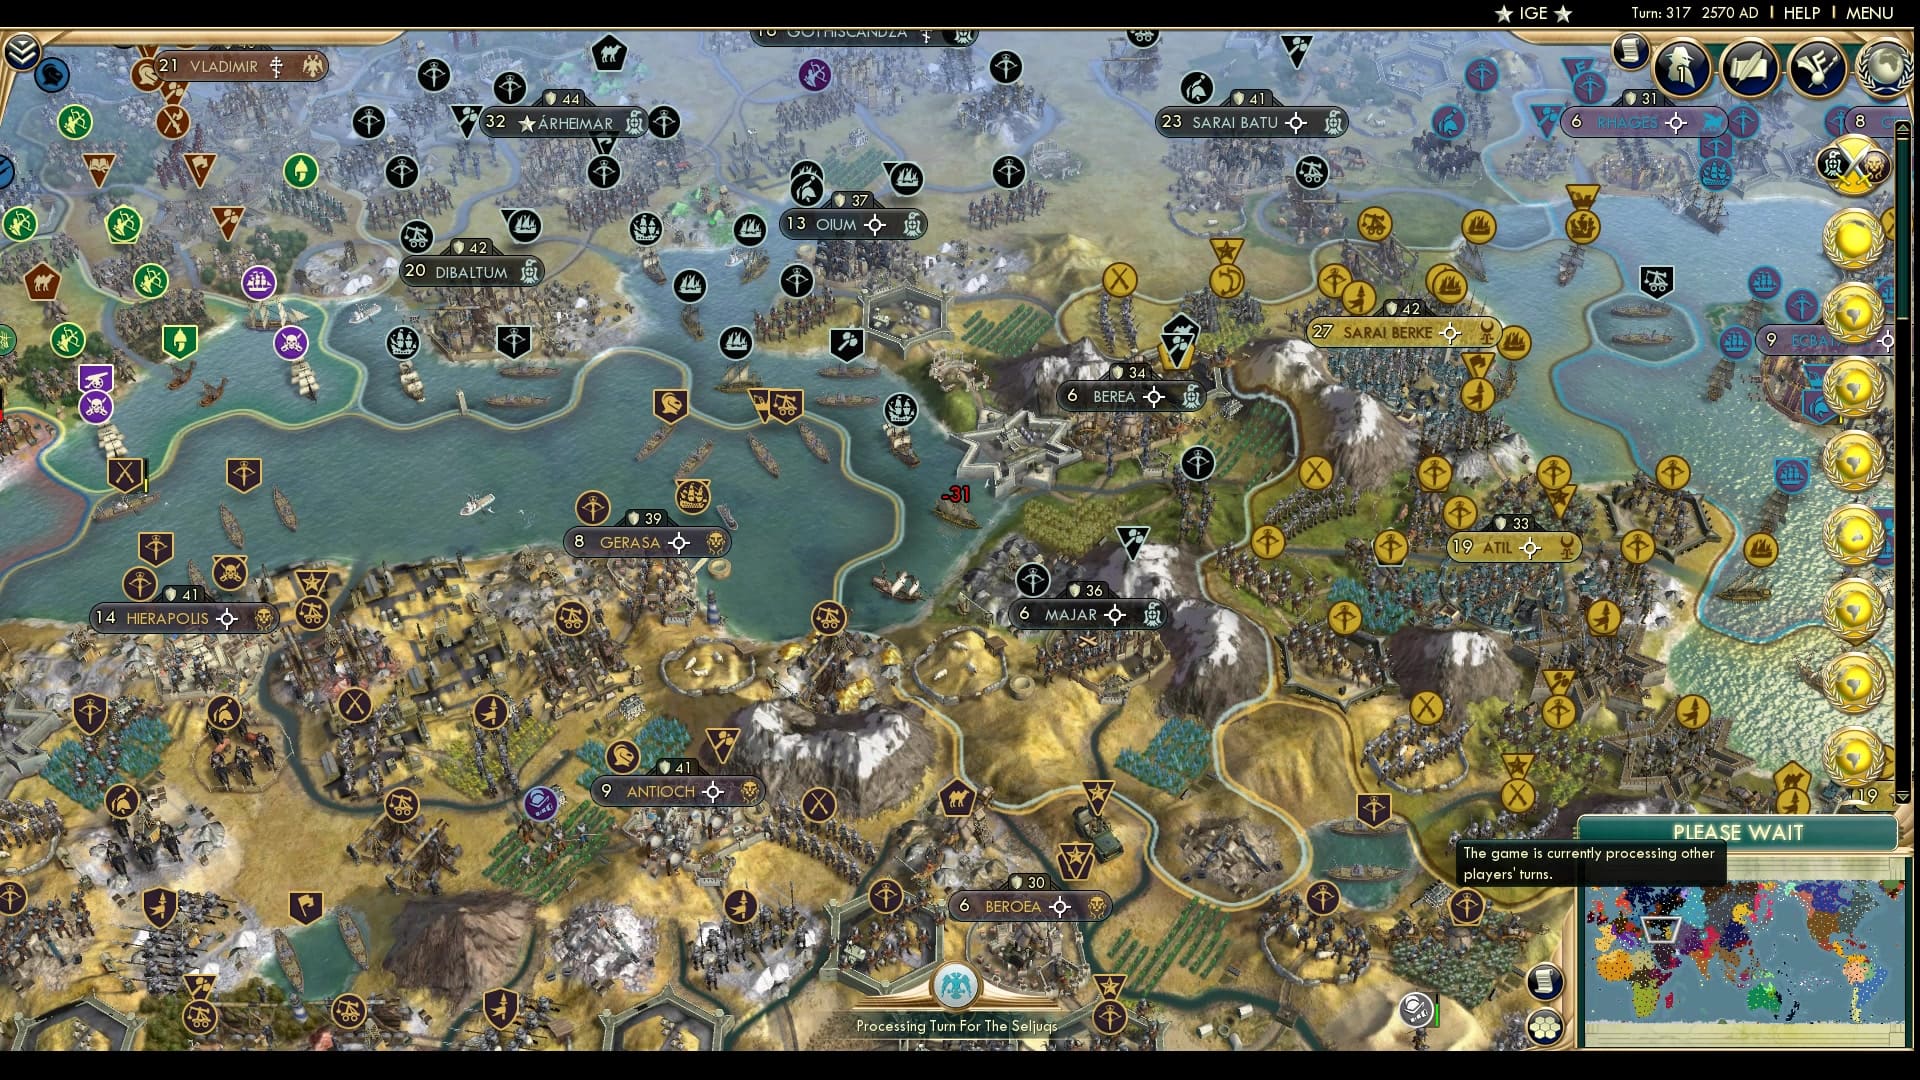
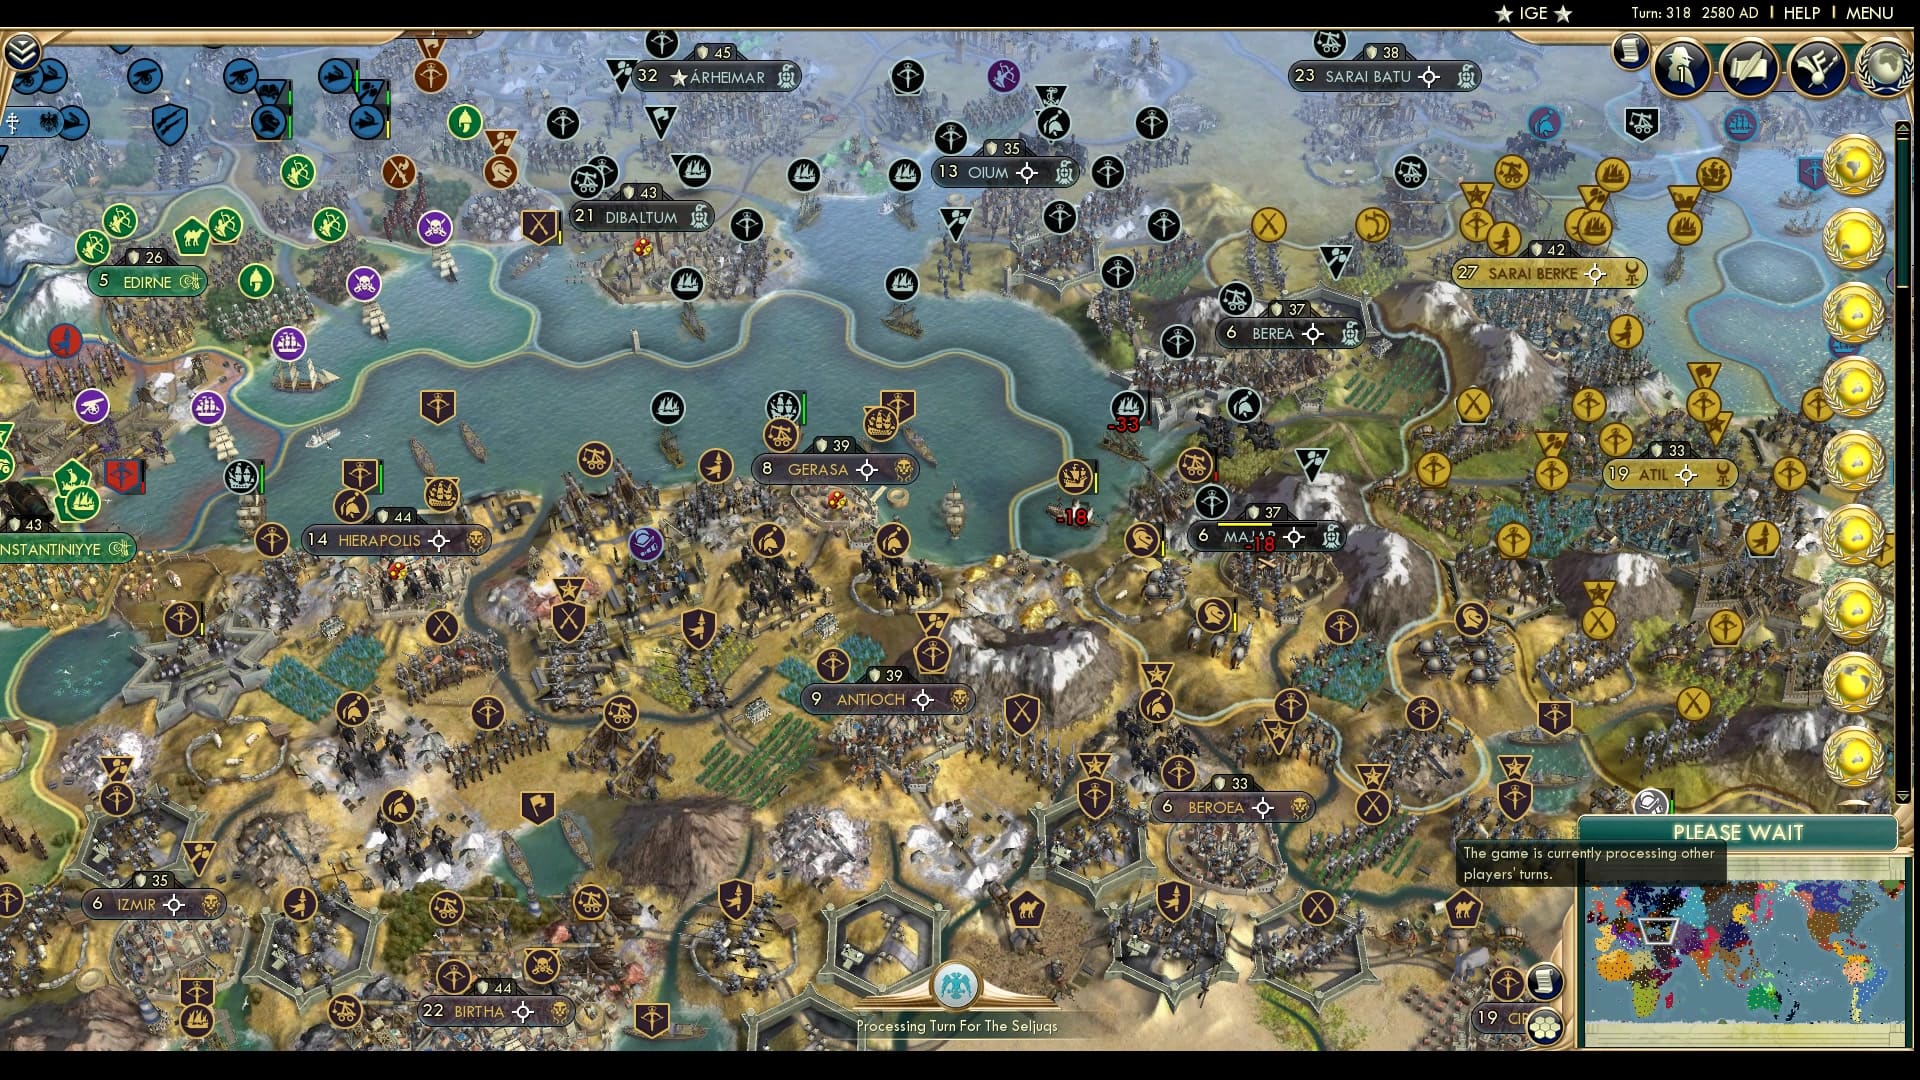
Konstantinyye continues to be attacked by the Palmyrans. Palmyra has a scary army but they seem to have sent all their melee units into the Black Sea to either flank a nonexistent Ottoman army or to take Edirne somehow. At this rate, the Czech might just take the city.
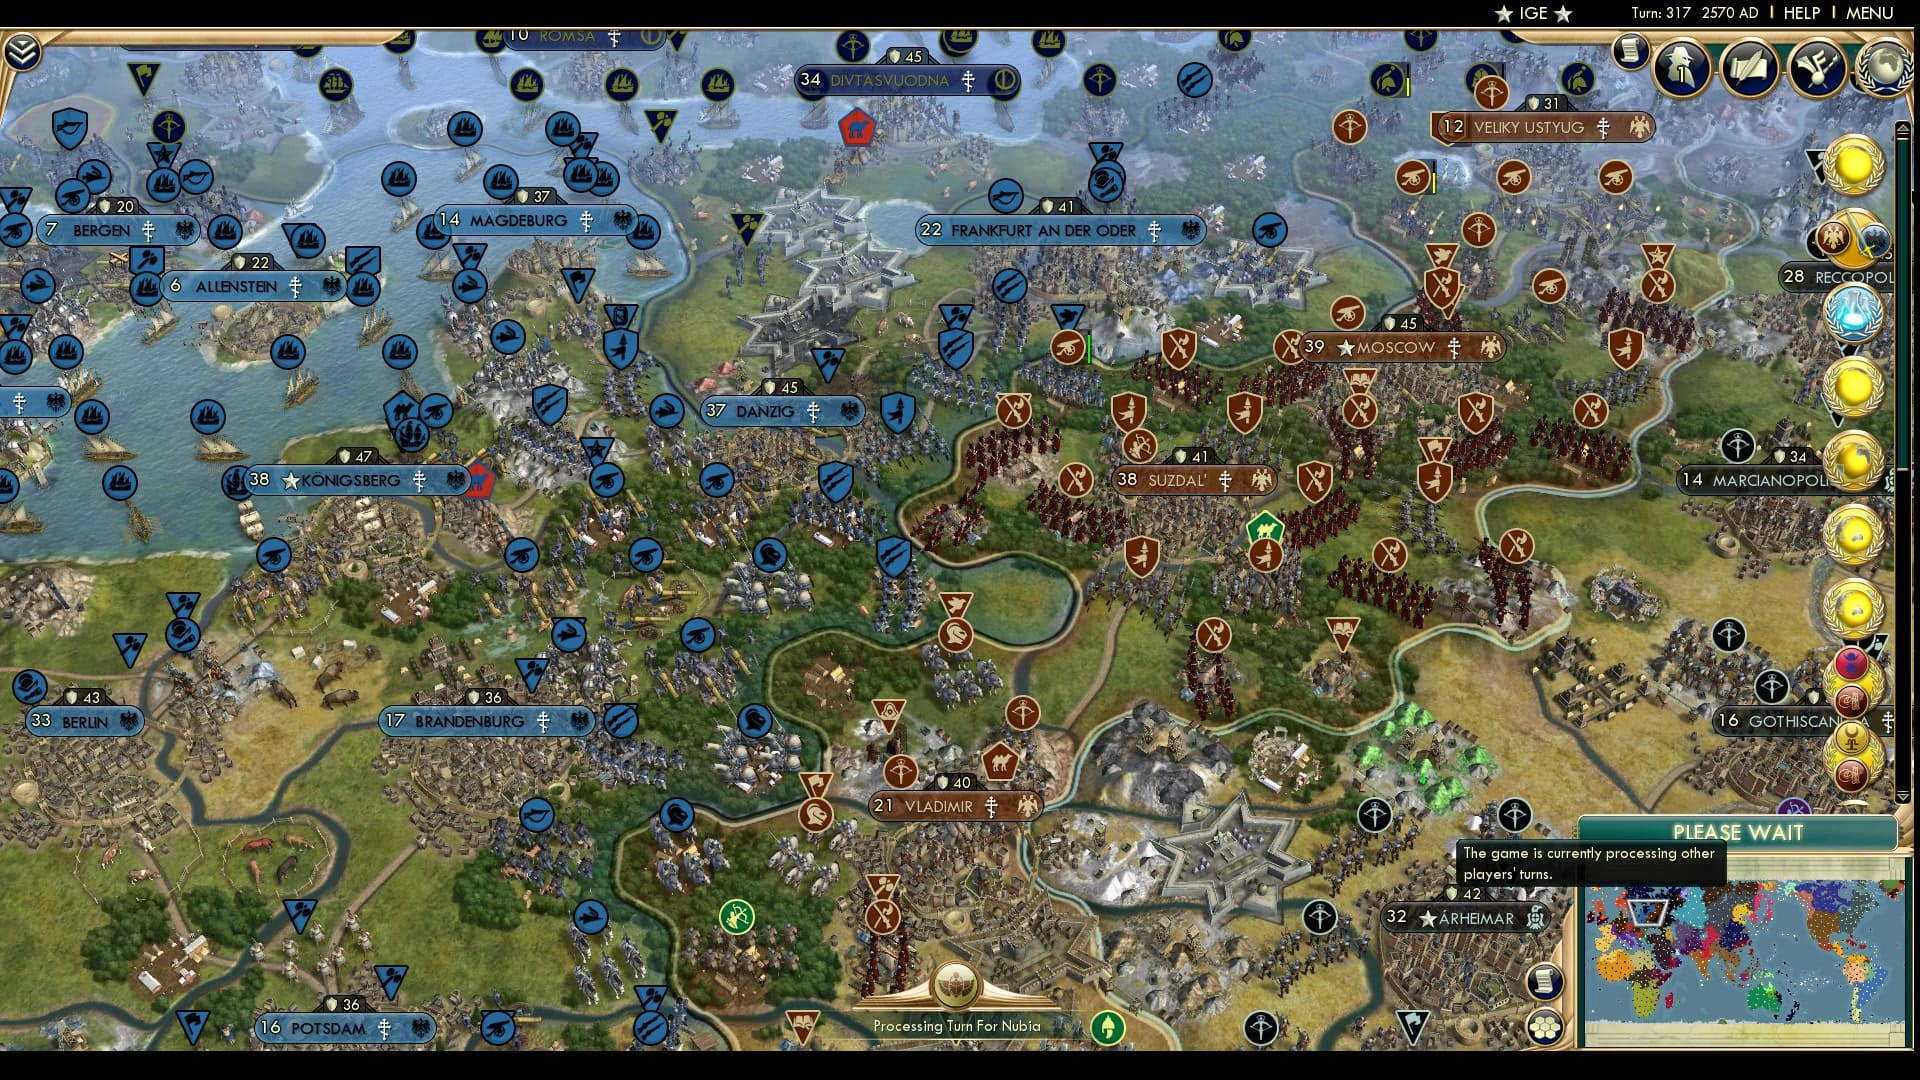
Prussia declares war on Muscovy! The formation of military units looks like Frederick’s put some thought before declaring war; all the units are nicely lined up to attack with ample melee units. Muscovy should be scared at that competence, but they have quite the carpet but it is entirely melee. Hopefully their UUs will attack twice to make up for the lack of arrows.
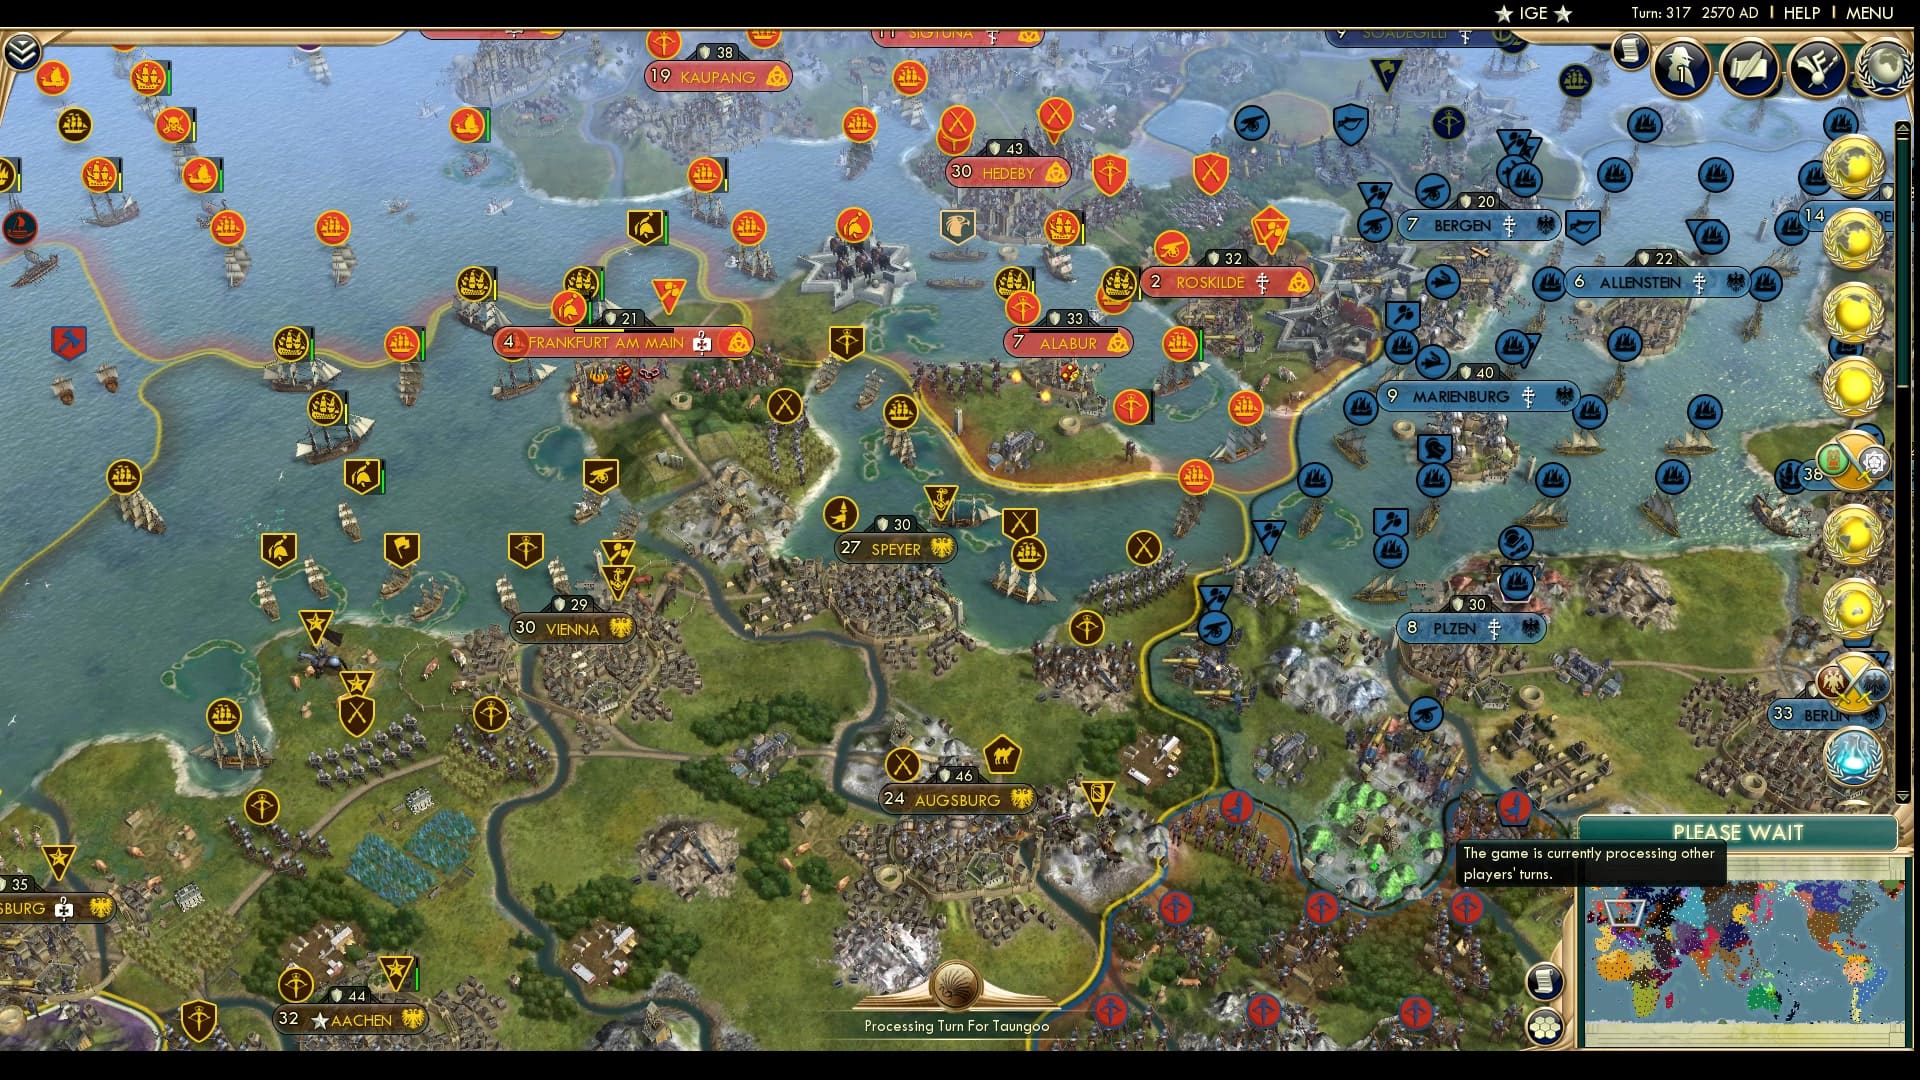
The Vikings flip Frankfurt Am Main, quite a crucial city defensively. There seems to be ample HRE units to flip it back, but if the Vikings manage to hold on to it, it’ll be the staging ground for an invasion of Europe. To the side, Alabur looks like it could fall to a HRE naval attack with those carracks.
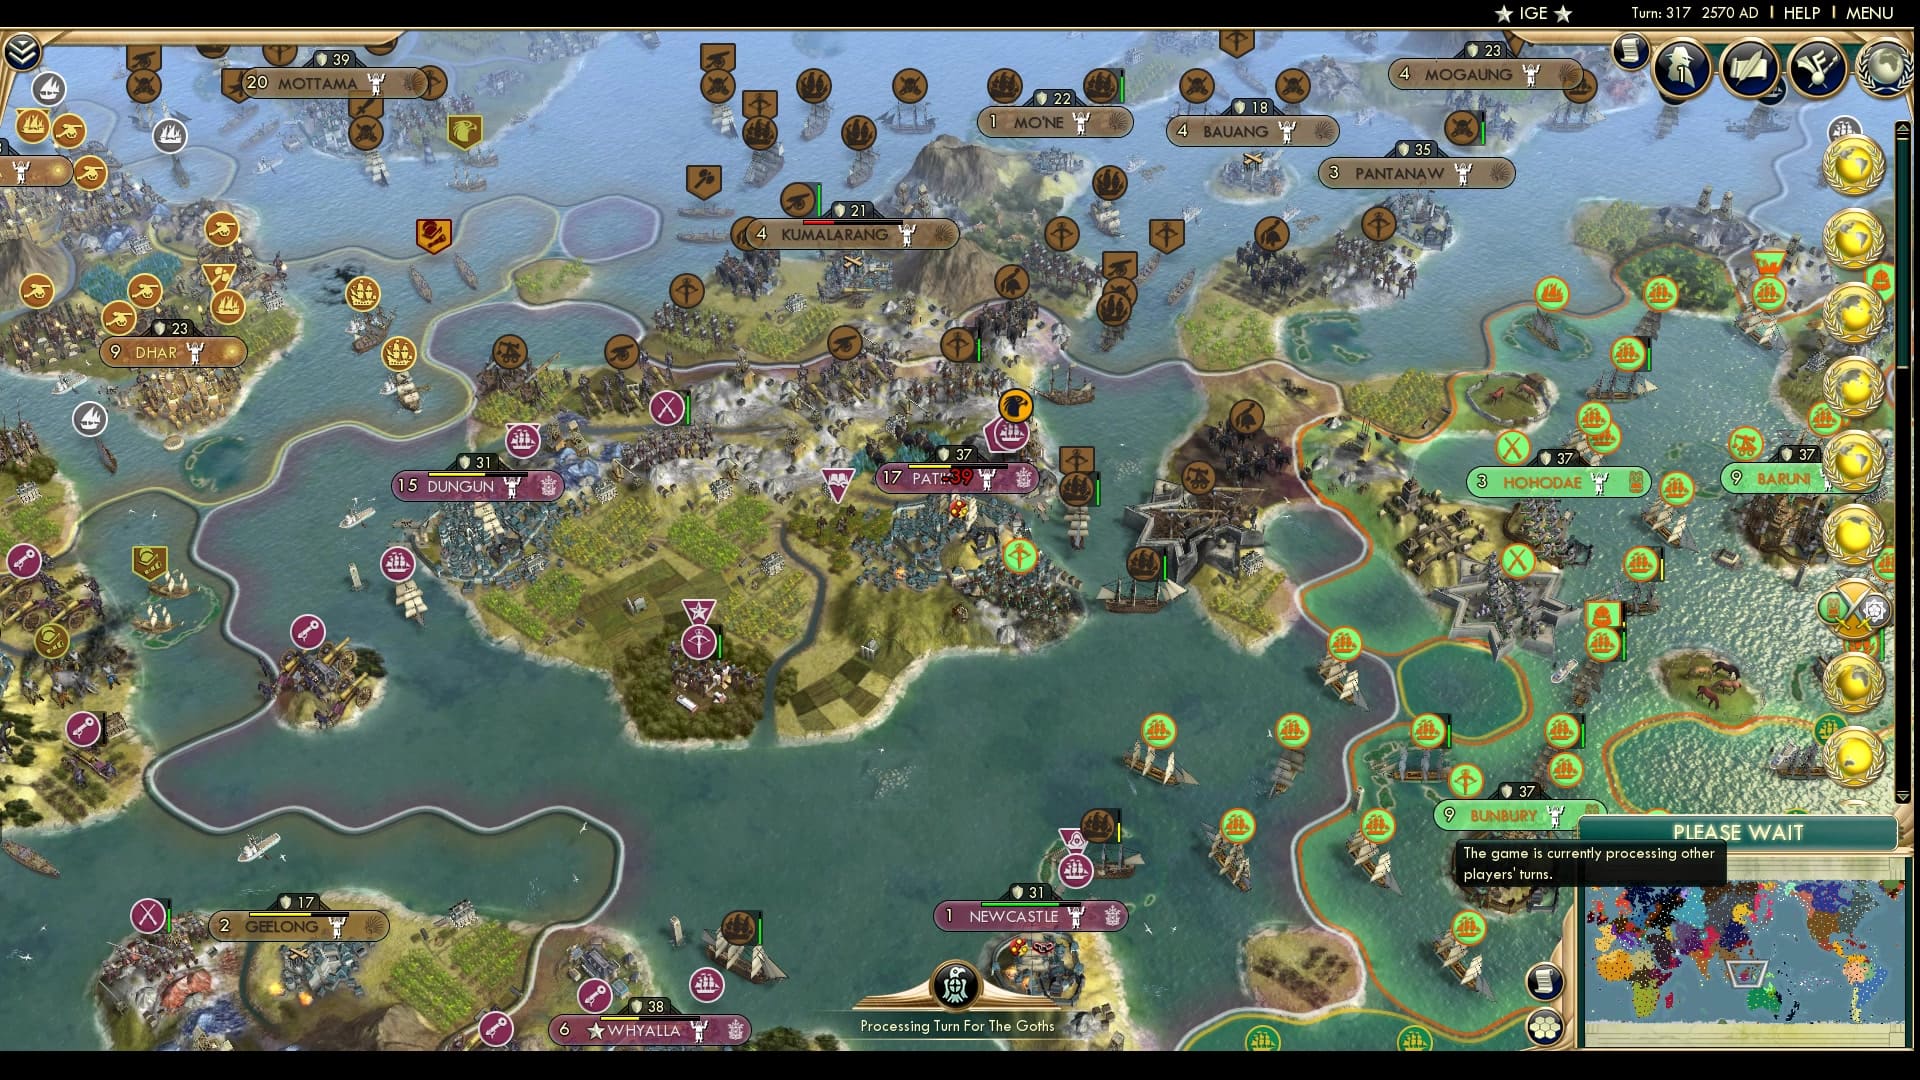
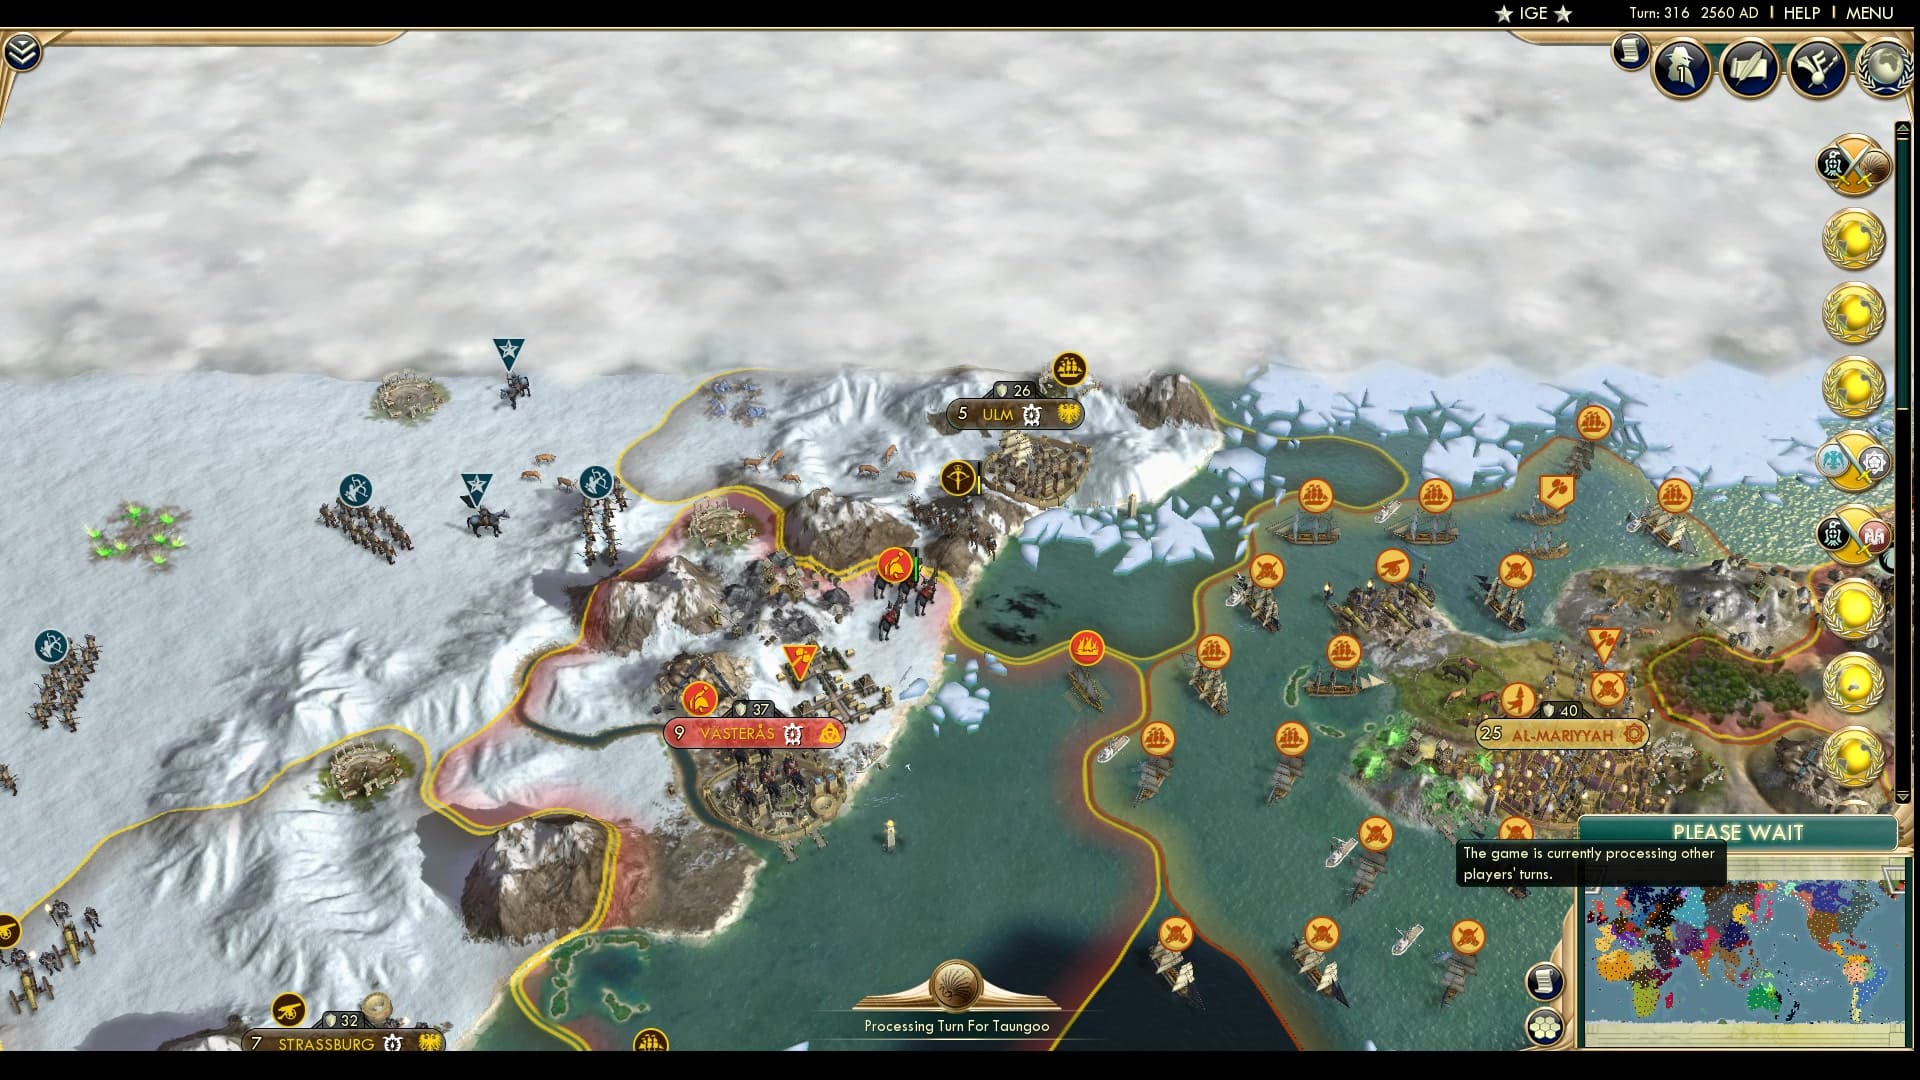
Bayinnaung lands a trebuchet on a former citadel and begins throwing 90 kg projectiles over 300 kilometres. Someone didn’t do their conversions properly. Nevertheless, Patkul is dropped to half health by the various siege forces around as Taungoo pounds the city down with only a few units. To the side, we see the Geelong is being attacked by a Sulu musketmen and one Taungoo ship each attempts to take the other Sulu cities. We’ll see if that goes anywhere.
It looks like a poor season for the Goths, after being attacked up north by the Sami and across the world by irrelevant players, Palmyra has joined the fray. They don’t seem to have much of a force, but neither do the Goths. Both players here are stretched in two front wars, and the mountains make it harder to conquer anything.
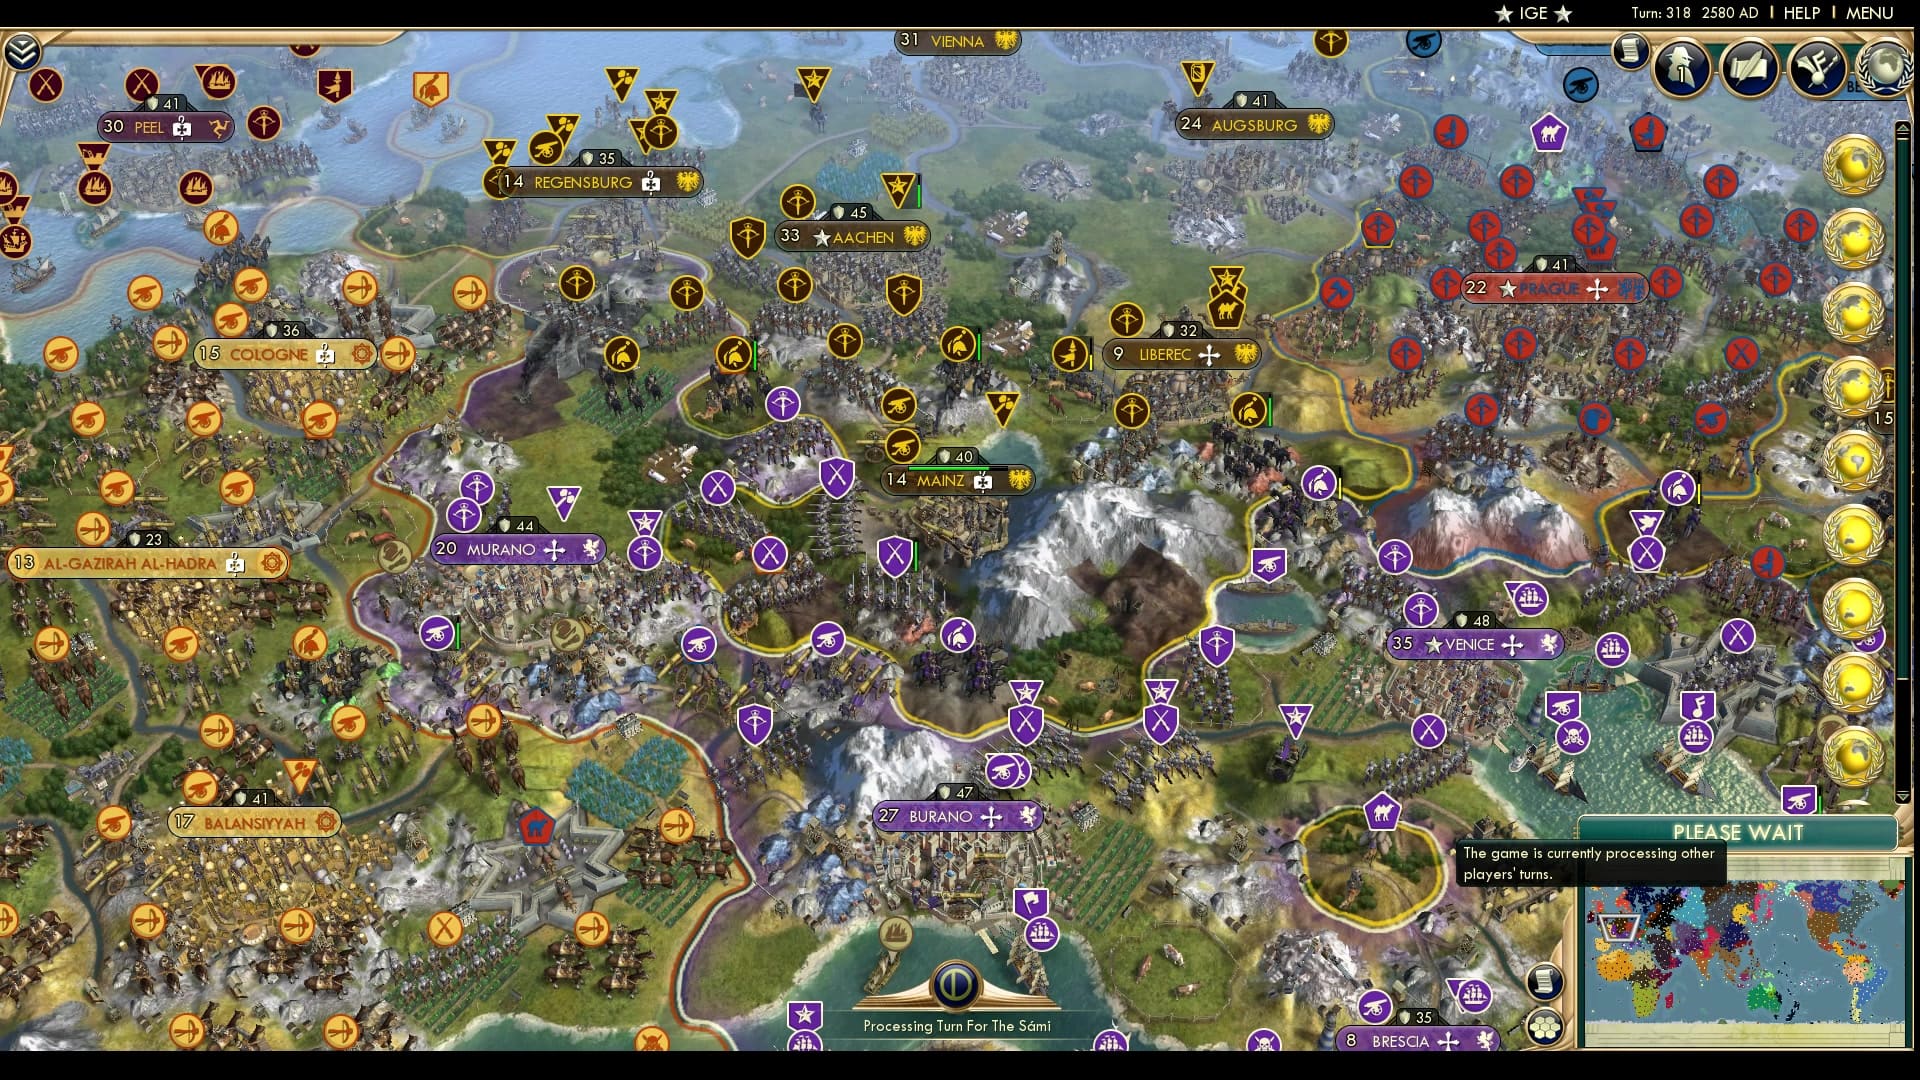
We return to the Venice-HRE war, where the HRE seems to have put more units to defend against. The Venetians have somehow gotten over their inability to go past mountains in the Balkans and have completely carpeted the Alps. The forces look even, but only one of the two is being punched at by the Vikings.

Taungoo and Sulu exchange Geelong for Patkul. Somehow that one Sulu musketmen actually took Geelong back. Bhamo’s lands look devastated but the city is as safe as ever. Sulu doesn’t seem like they can take Patkul back without any units in that area. Meanwhile the Taungoo tactic of attacking every city at once by a bit seems to be paying off by lowering Sulu’s wartime capital and Dungun to half with minimal units.
In other news: that Ideology icon is probably Haida going Autocracy.
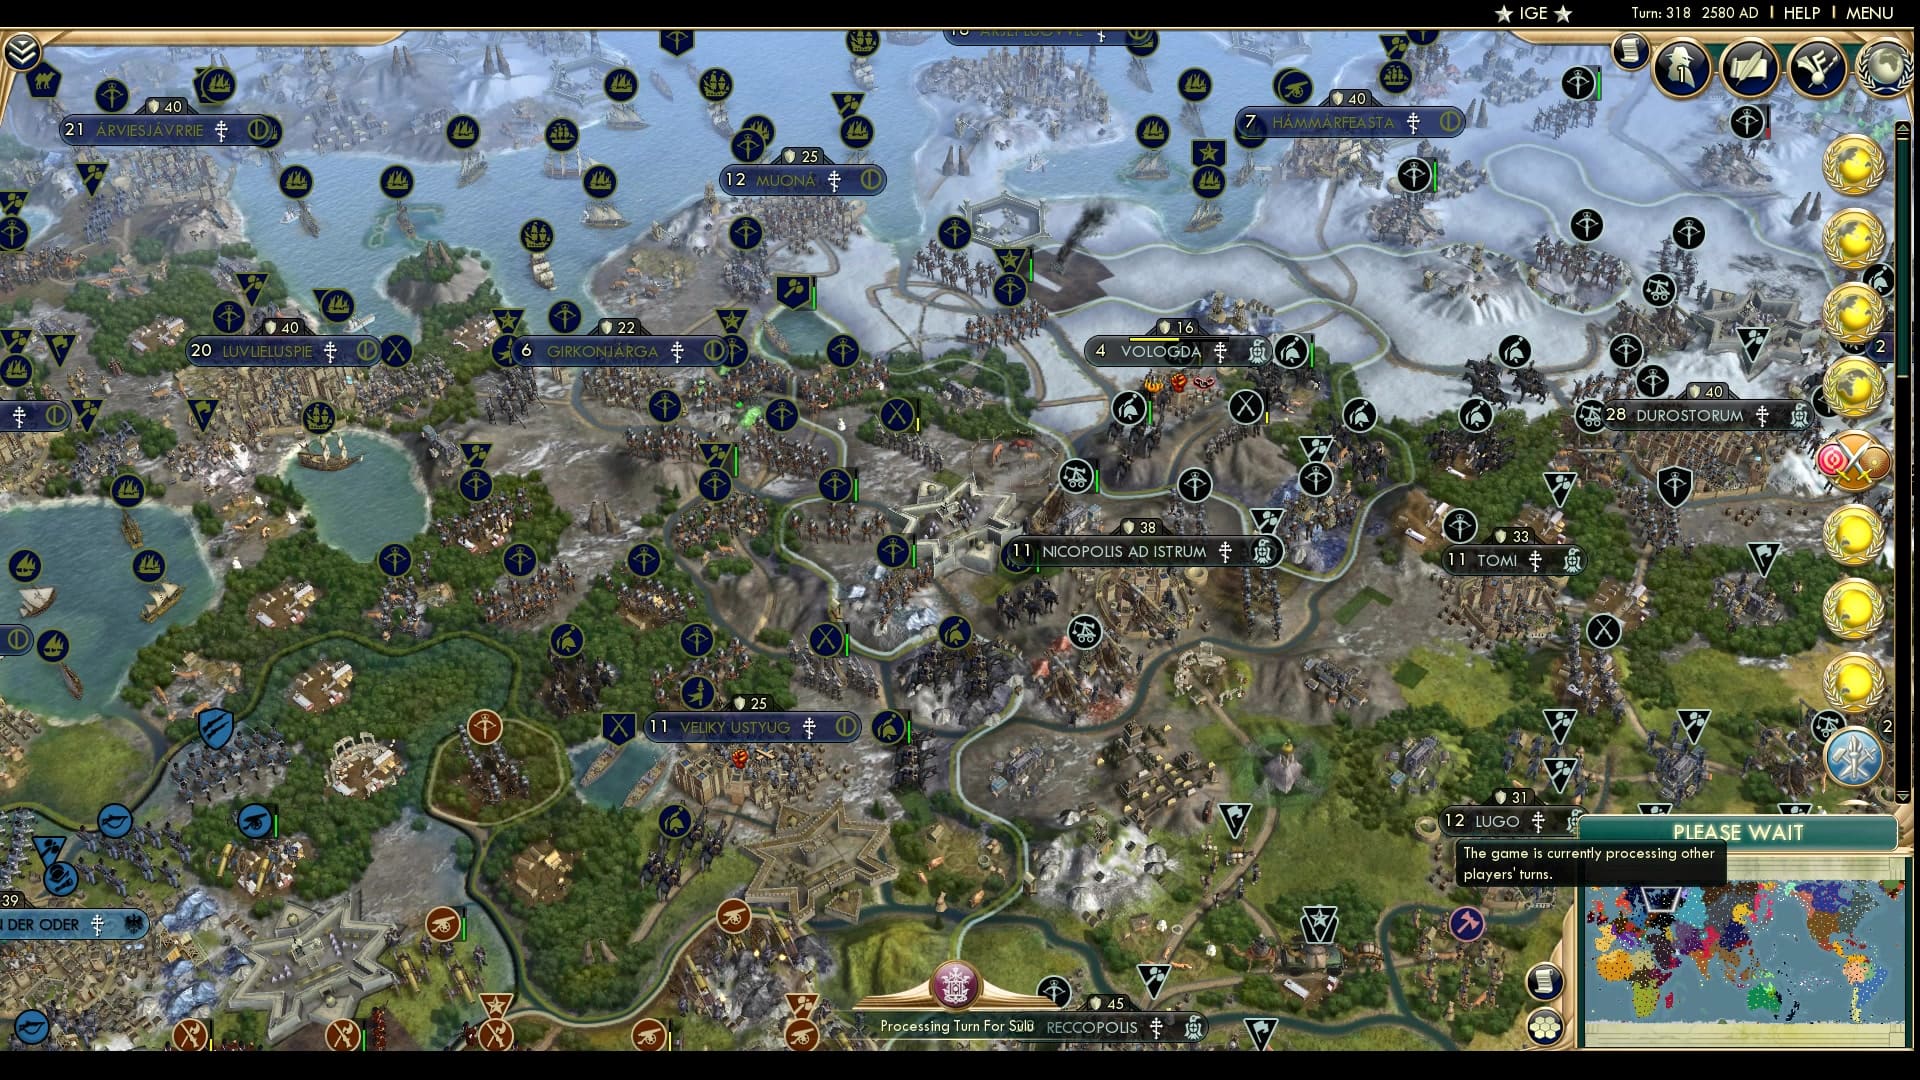
That’s embarrassing for Eadni! She’s lost her Muscovite gains that she got through war as her units struggle to make it past the citadel near Nicopolis. The Goths have sure turned it around.
In other news, Muscovy made peace with the Sami earlier. It wasn’t in the sidebars, but we see that Muscovy just decided to surrender Velky Ustyug to focus on the Prussians. Out of the corner of my eye, it looks like they’ve made the right decision.
Disregard what I said about the Palmyra-Goth front, Palmyra seems to have mobilised quite efficiently and look primed to take Majar without much more resistance from the Goths. The Goths in return send two measly ships to Gerasa.
To the left, the siege of Konstantiniyye seems to be going nowhere, miraculously for the Ottomans.
Ah, that’s why. Palmyra has been focusing their efforts to take Ankara, quite successfully. The small 2 population city seems like it will fall, but perhaps flip back. Knossos is entirely secured from any Ottoman dreams and Zenobia continues to attack Konstantiniyye with embarked land units. Good news for Mehmed, though, that one HRE scout won’t be attacking them anymore.
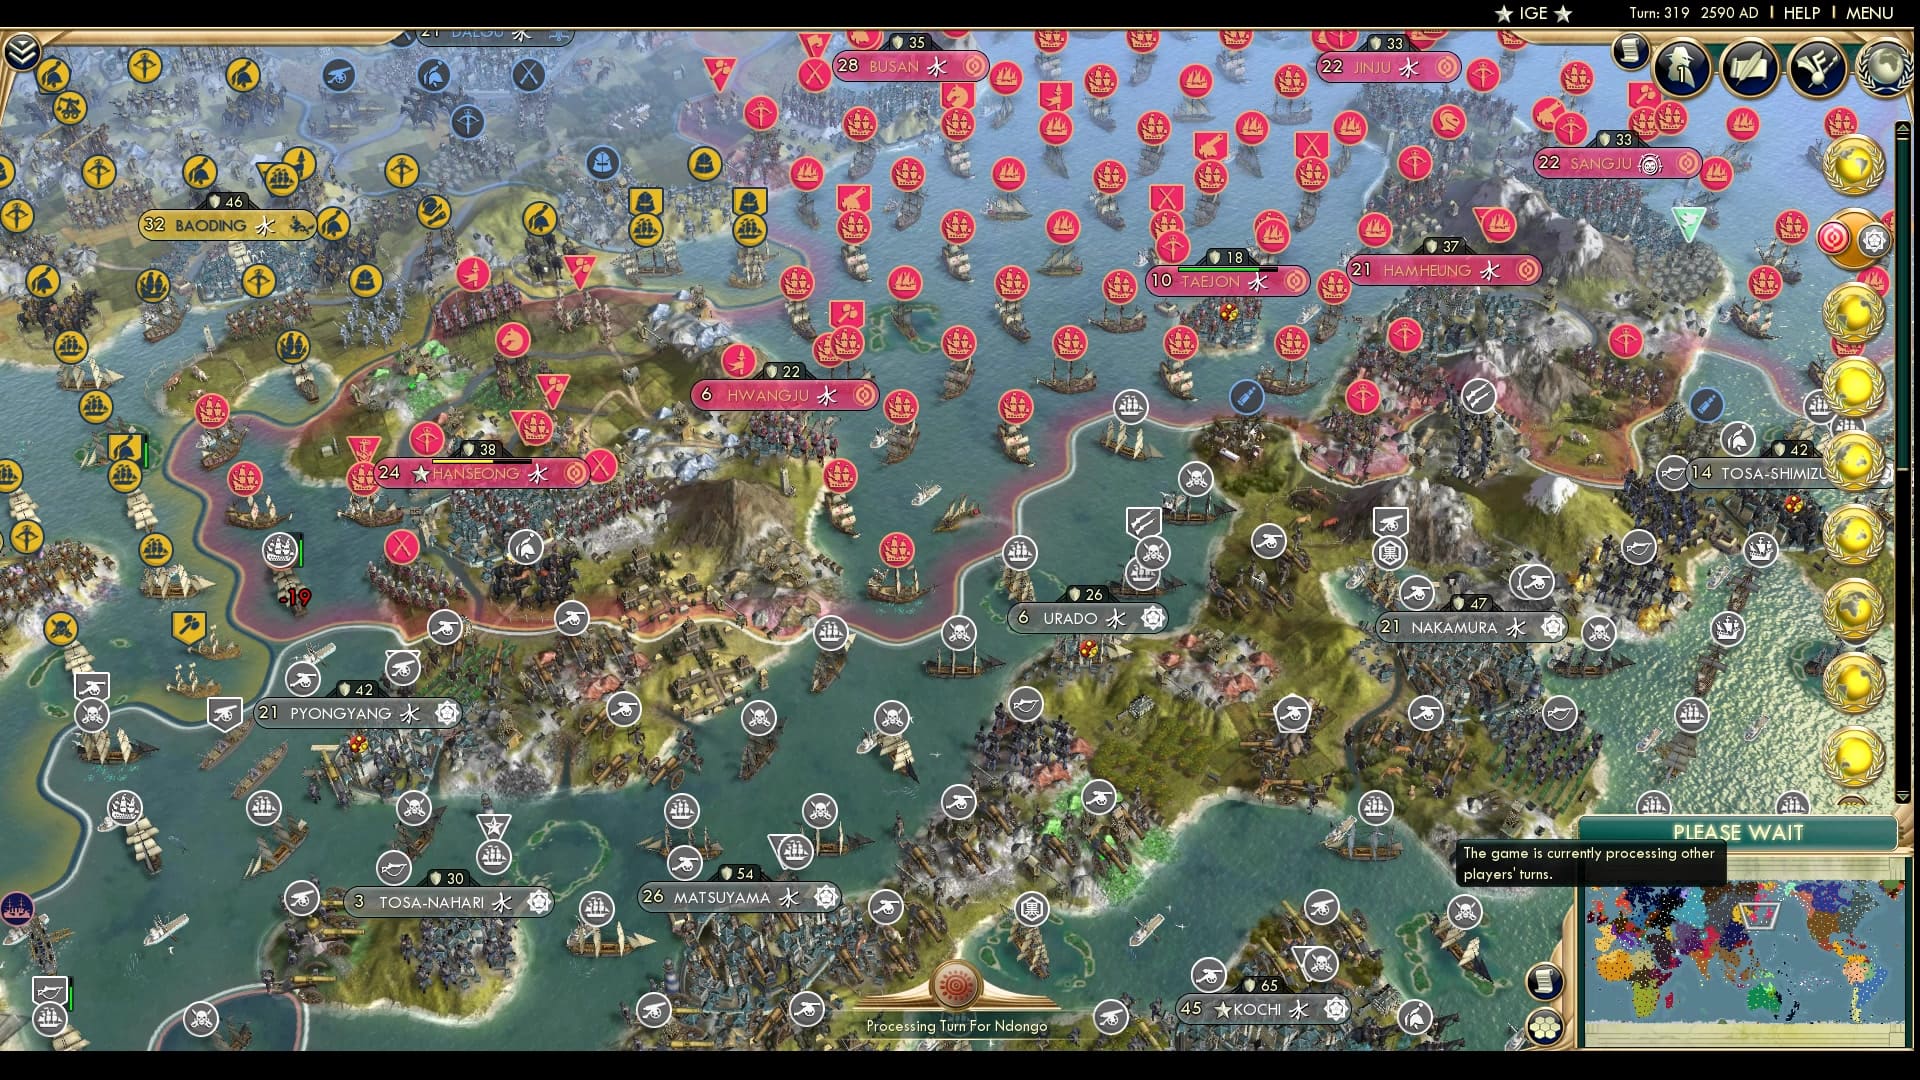
Japan declares war on Korea, finally giving up on attacking the mainland in a roundabout way. The capital of Hanseong is heavily endangered immediately and hit down hard by advanced field guns. Shikoku might get their first capital in this game quick quickly and Korea might be headed to elimination if they don’t secure their core.
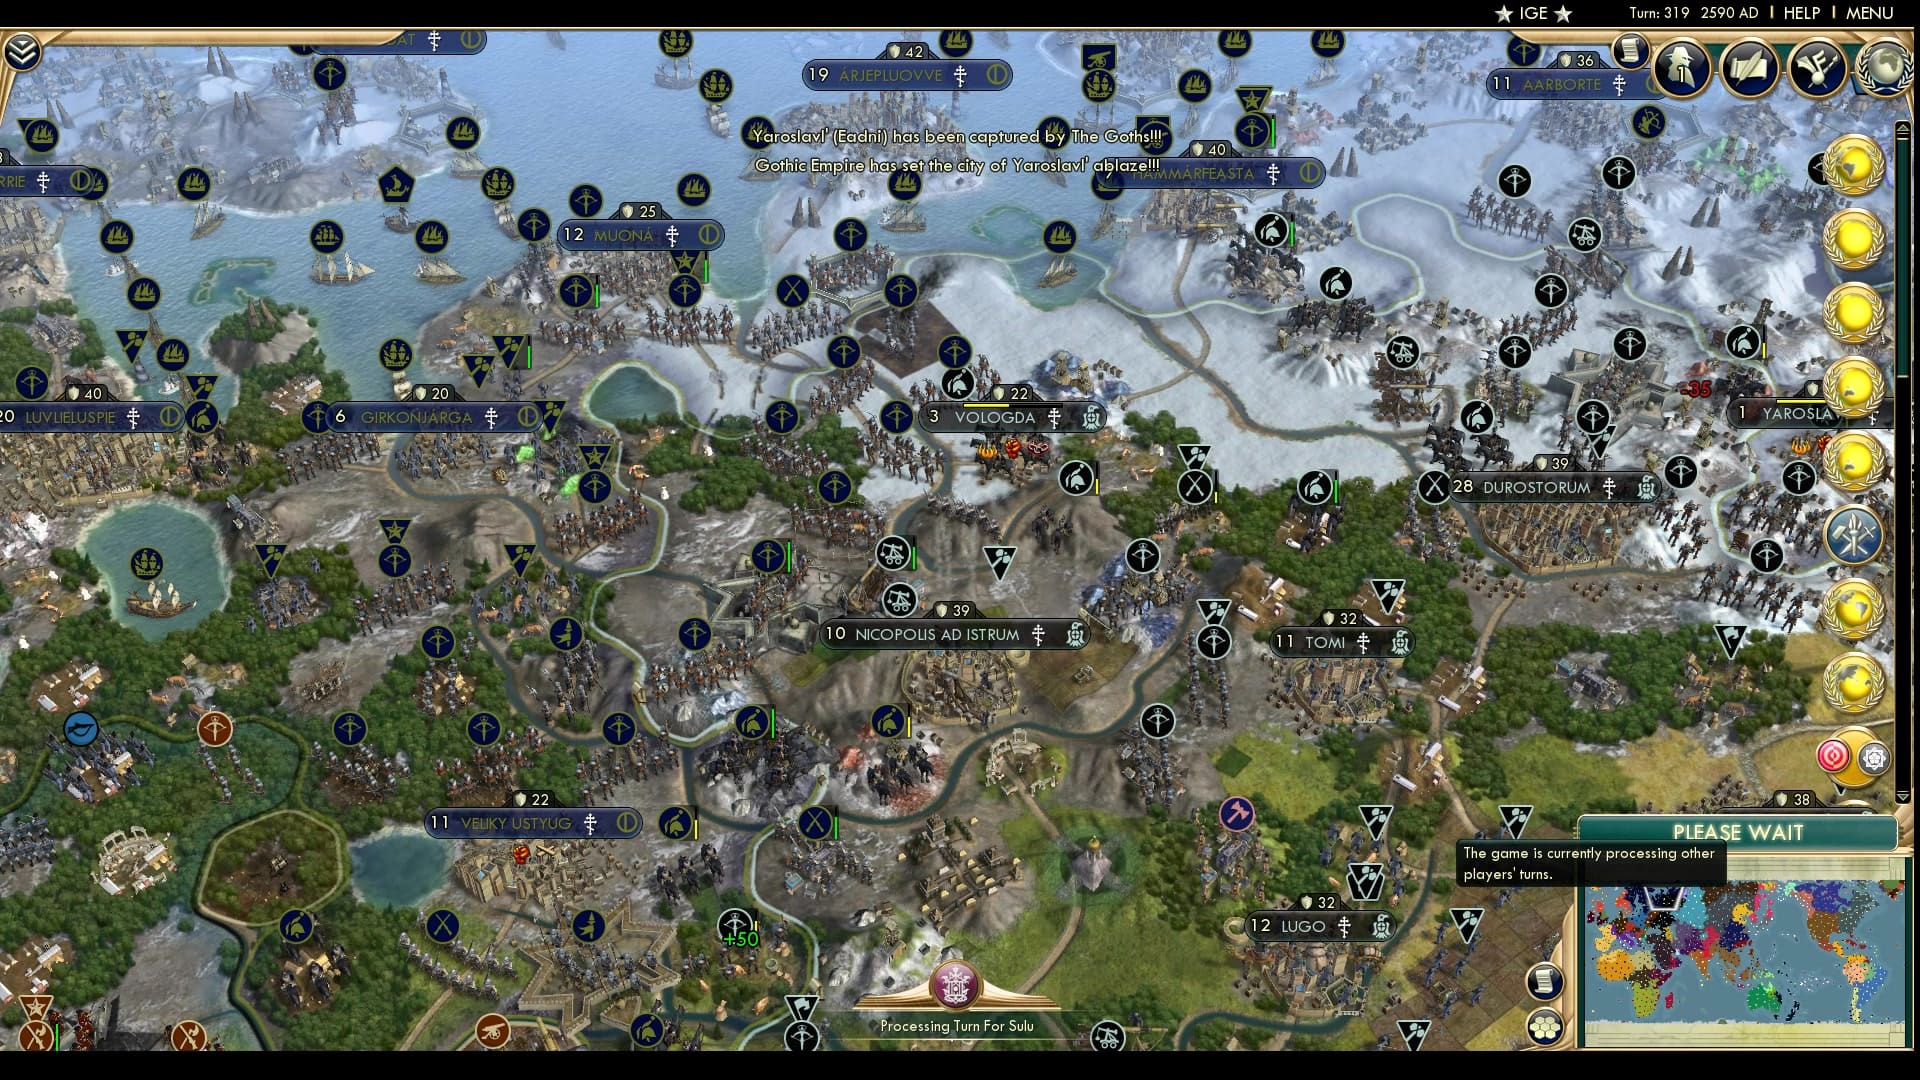
The Goths’ odds to grasp their gains grow grim as the Sami forces breach through the border and Gothic forces disappear into thin air somehow. Perhaps it might have to do with Alaric sending all his troops to capture small snow cities like Yaroslav.
In other news: ideologies happening in the corner: we can’t know who exactly in this slide, but 6 more civs take the strident path of Autocracy this part and Australia adopts Freedom. Ew, rights.
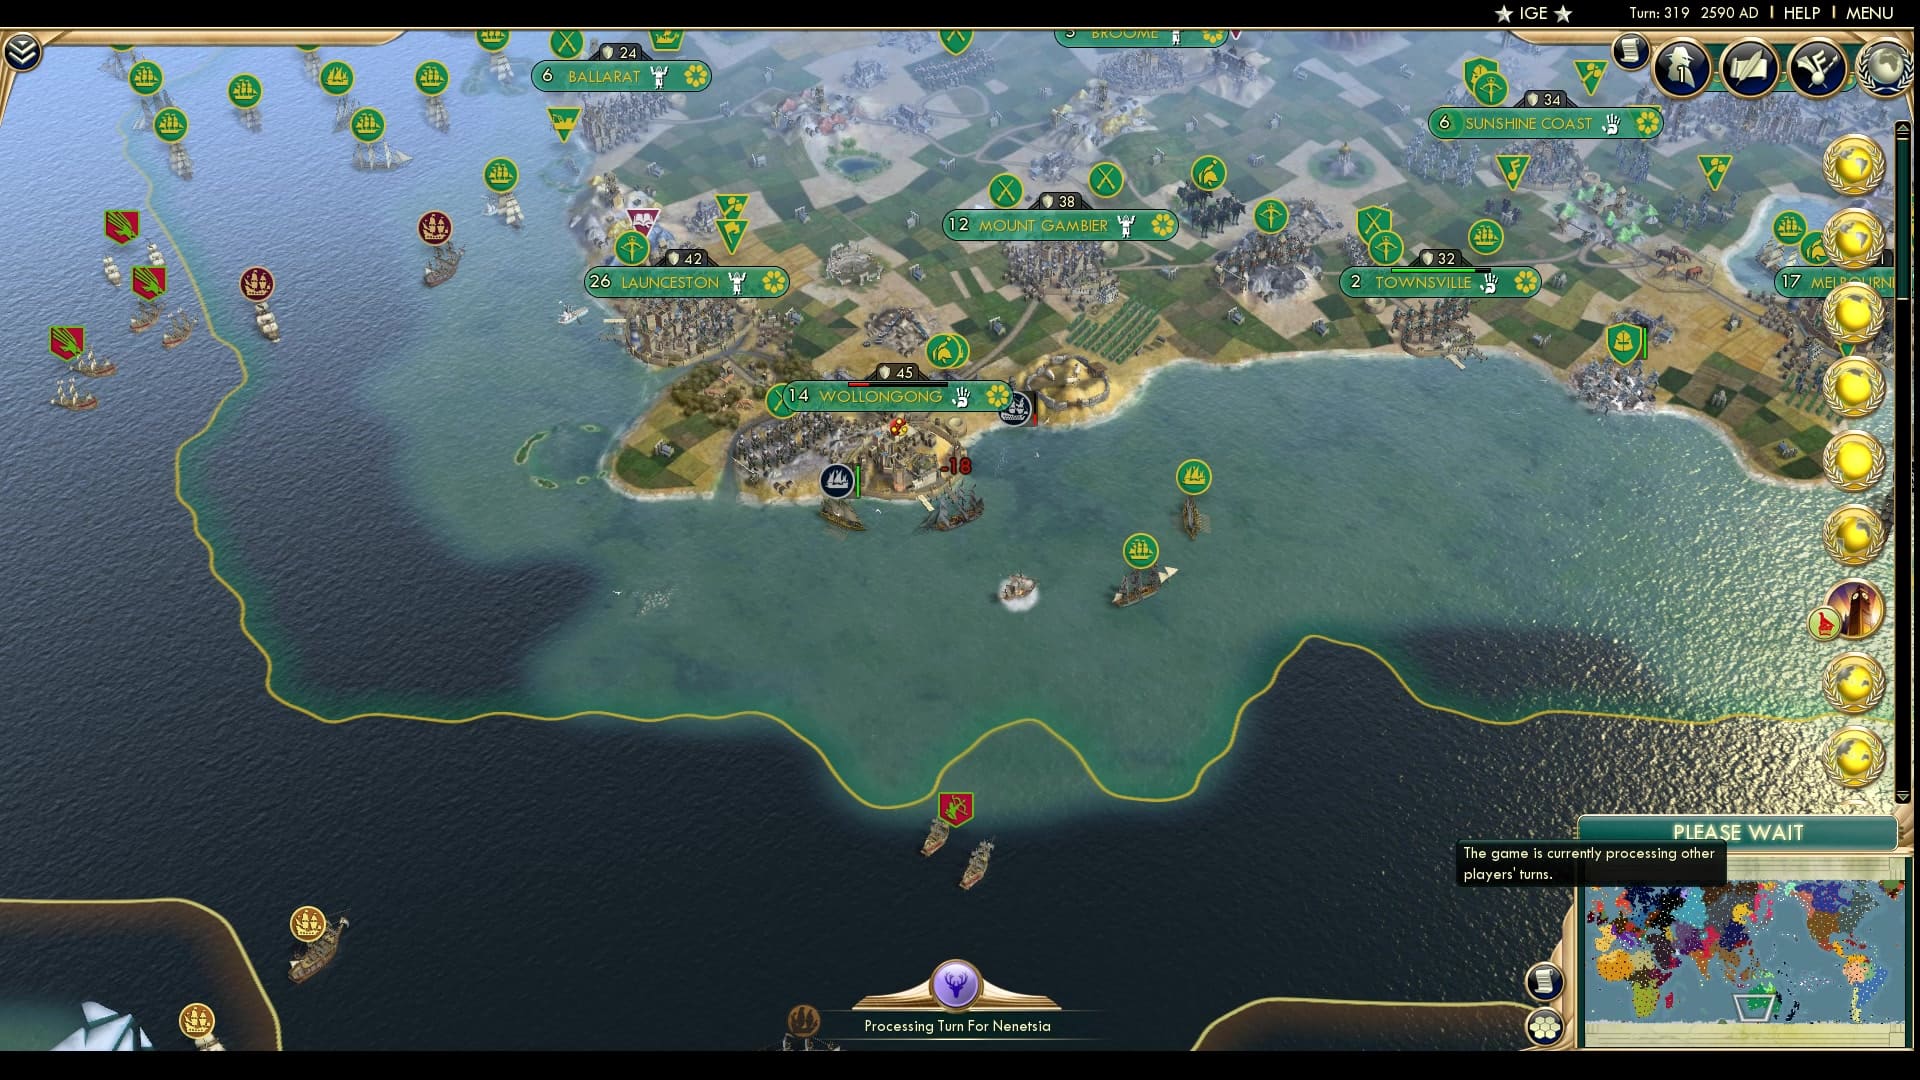
What a beautiful day in Australia, the sun is shining, Mutota’s Big Ben chiming, Kiwi ships are pounding… wait what? Wollongong being attacked by a Kiwi navy who only have two ships left. It looks like it’s about to fall any day now but Australia has some units and some chance to take it back.
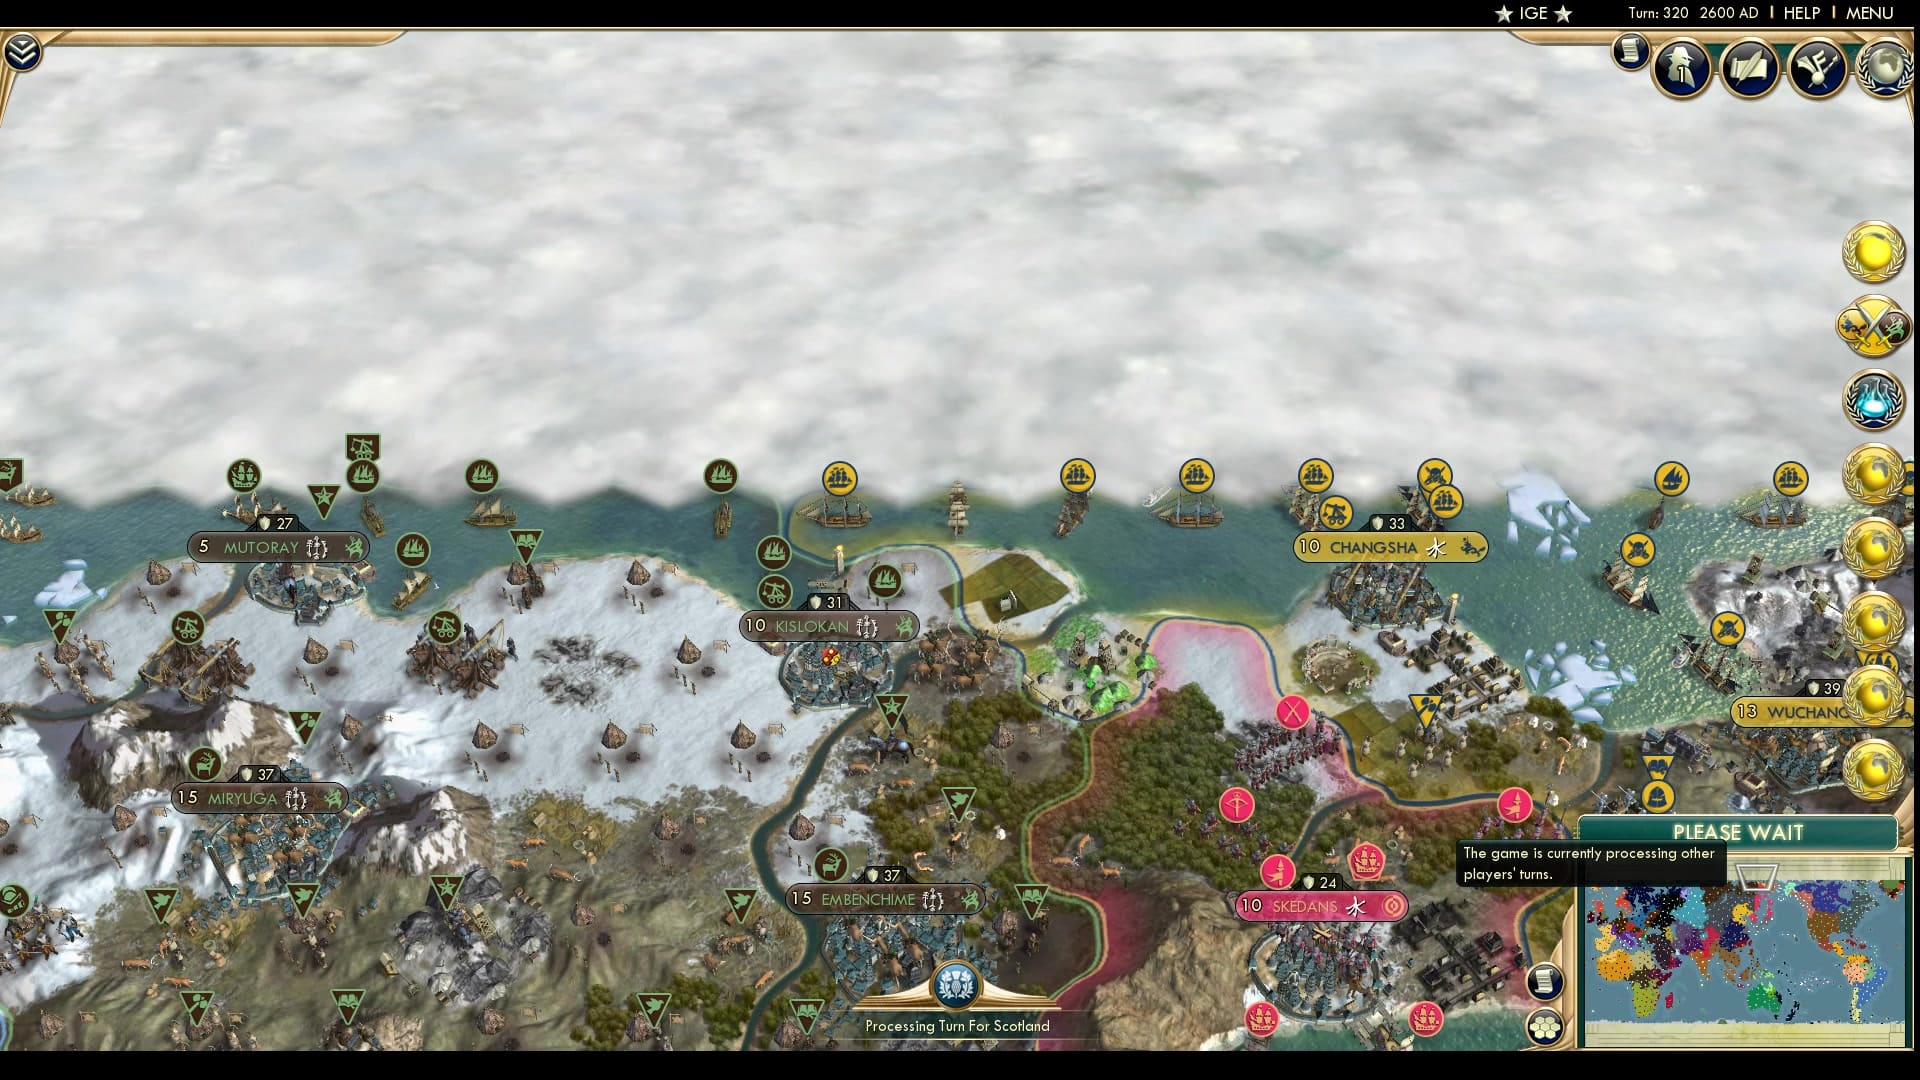
We’ve gotten so far into modernity that there’s now an active war in the Arctic! The Evenks declare war on the Qing, again with minimal front line and immediately putting their own city of Kislokan in blockade mode. Let’s see how good the AI is.
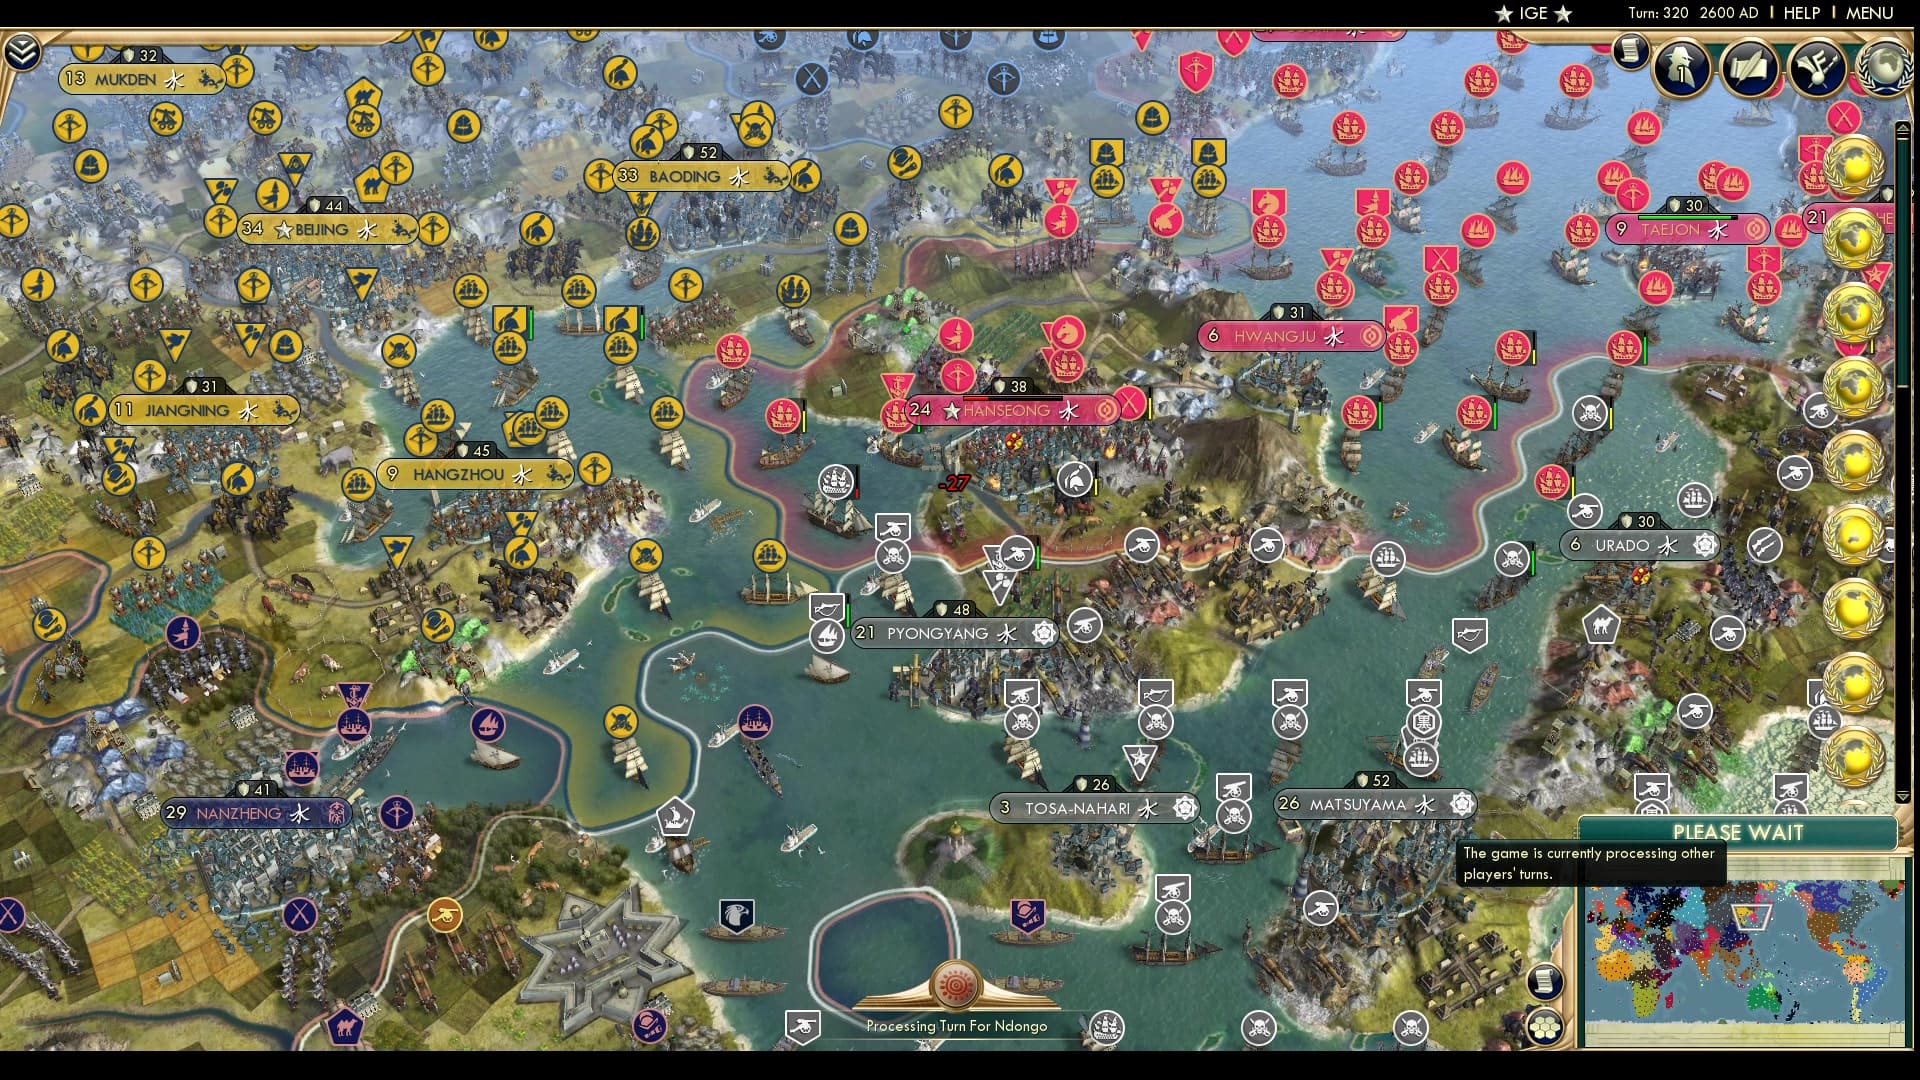
Hanseong drops to red and the melee units have not been destroyed. Even if Korea is able to kill that Curaisser, there’s a privateer and a musketman, the one currently being attacked, left to take the Korean Capital. The units around Korea fray into the territory of being unable to retake it. Truly a nightmare for Seonjo.
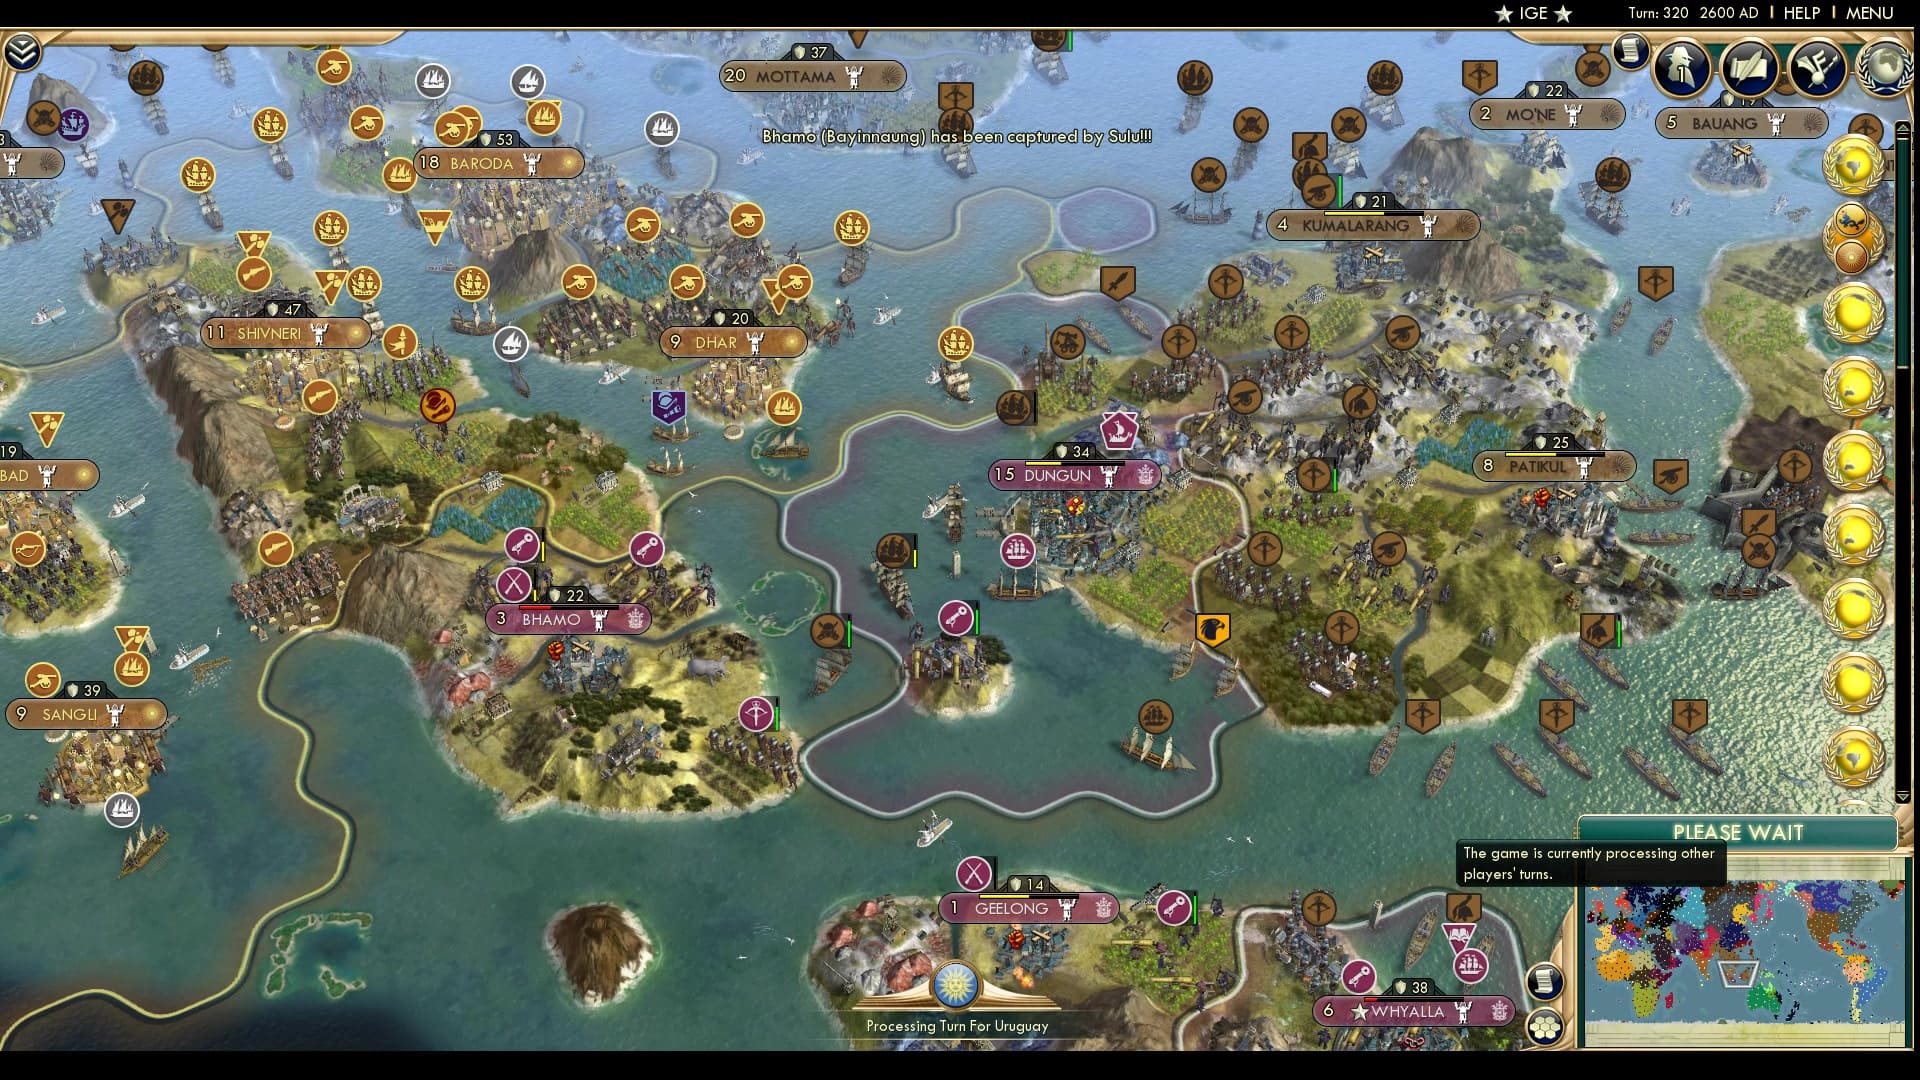
Sulu takes the Taungoo colony of Bhamo, finally sending a melee unit after years and years of shooting at Bhamo. They also flip Geelong back again, but it looks grim for Sulu still. The Taungoo forces close in on Dungun and their wartime capital is about to fall. Newcastle off-screen is also taken for now.

Palmyran fans will surely be cheering as the Palmyra finally move forward against the ottomans, taking Ankara. It is still flippable, but will most likely remain Palmyran in the end. Furthermore Zenobia has finally learnt not to send her troops into the ocean. Perhaps it was the Venetian troops blocking any hope of attacking Edirne.
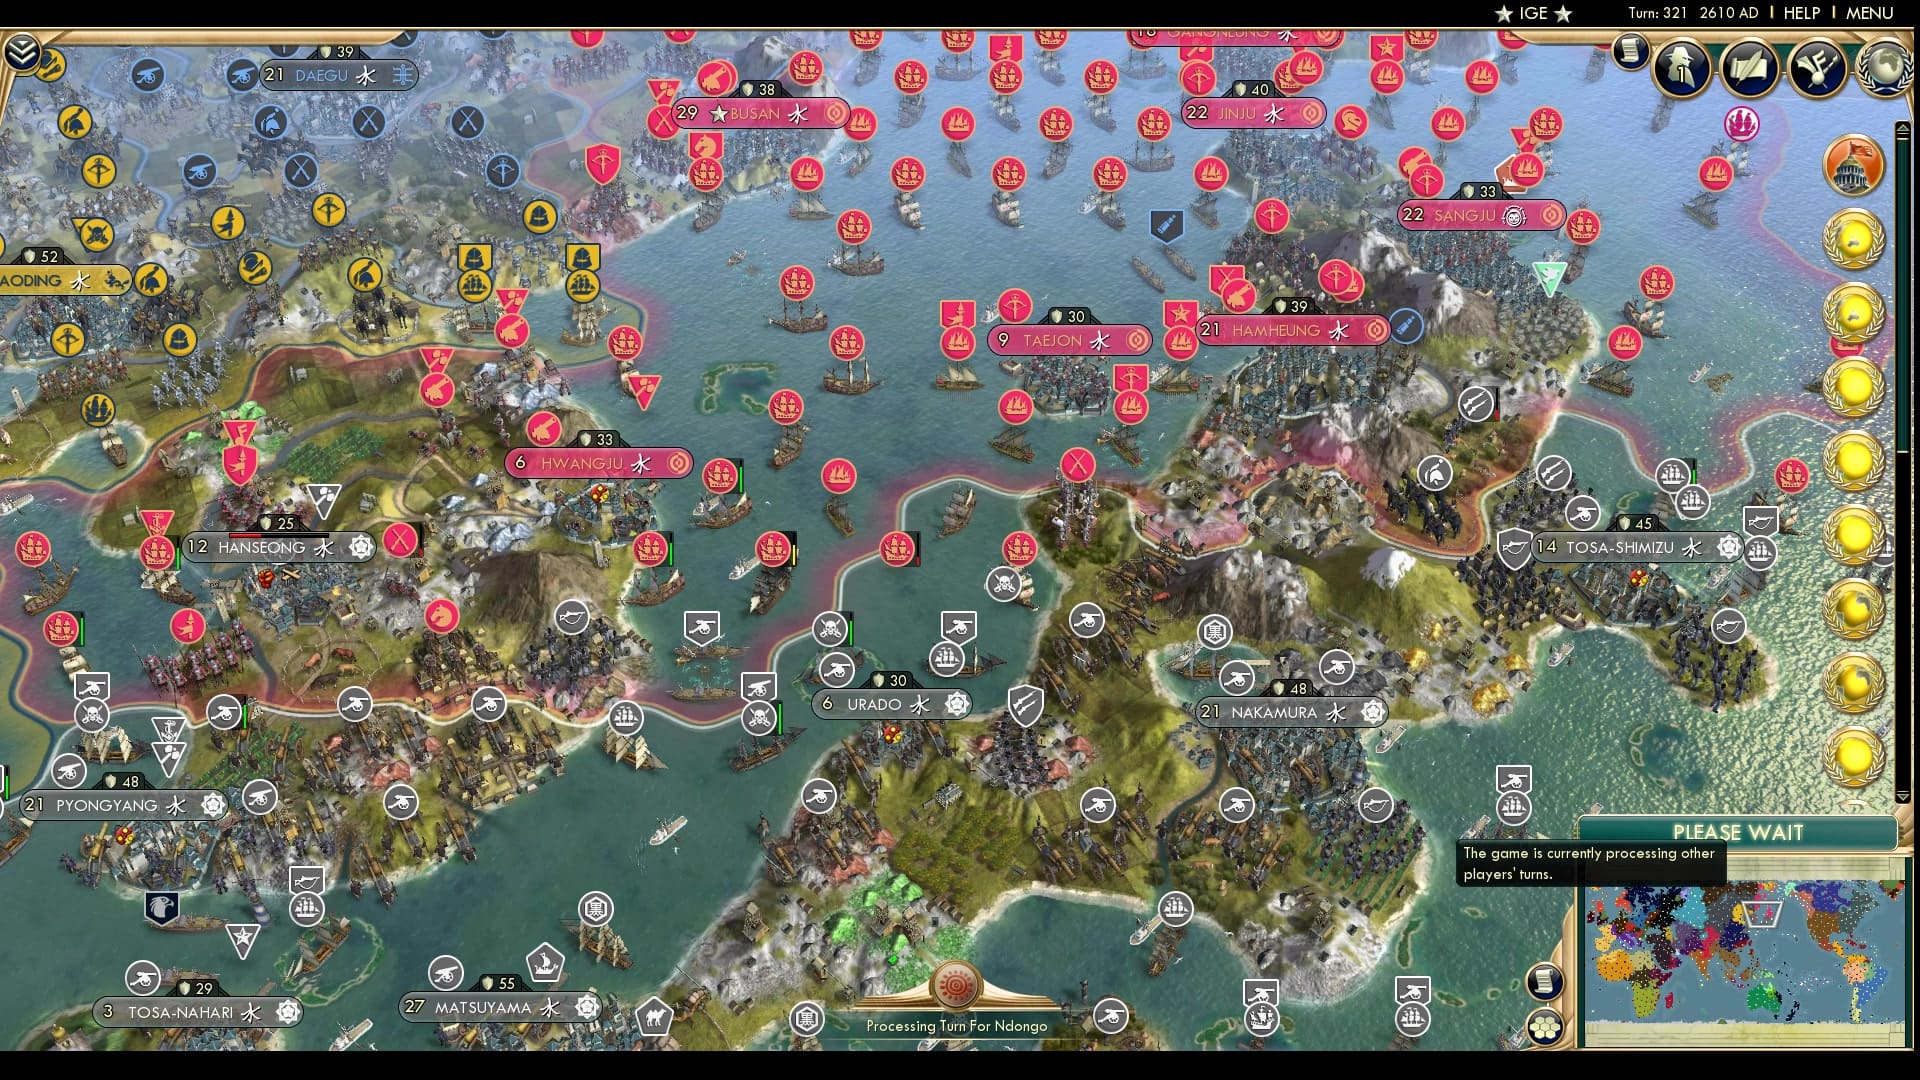
And score! Shikoku has taken the capital of Korea! Hanseong falls...to a worker? In any case, it looks like the Koreans could flip it back but those fieldguns are not going to let the city’s health go up anytime soon. Seonjo flees to Busan and luckily still has a strong core. Shame their capital was disconnected from their main core.
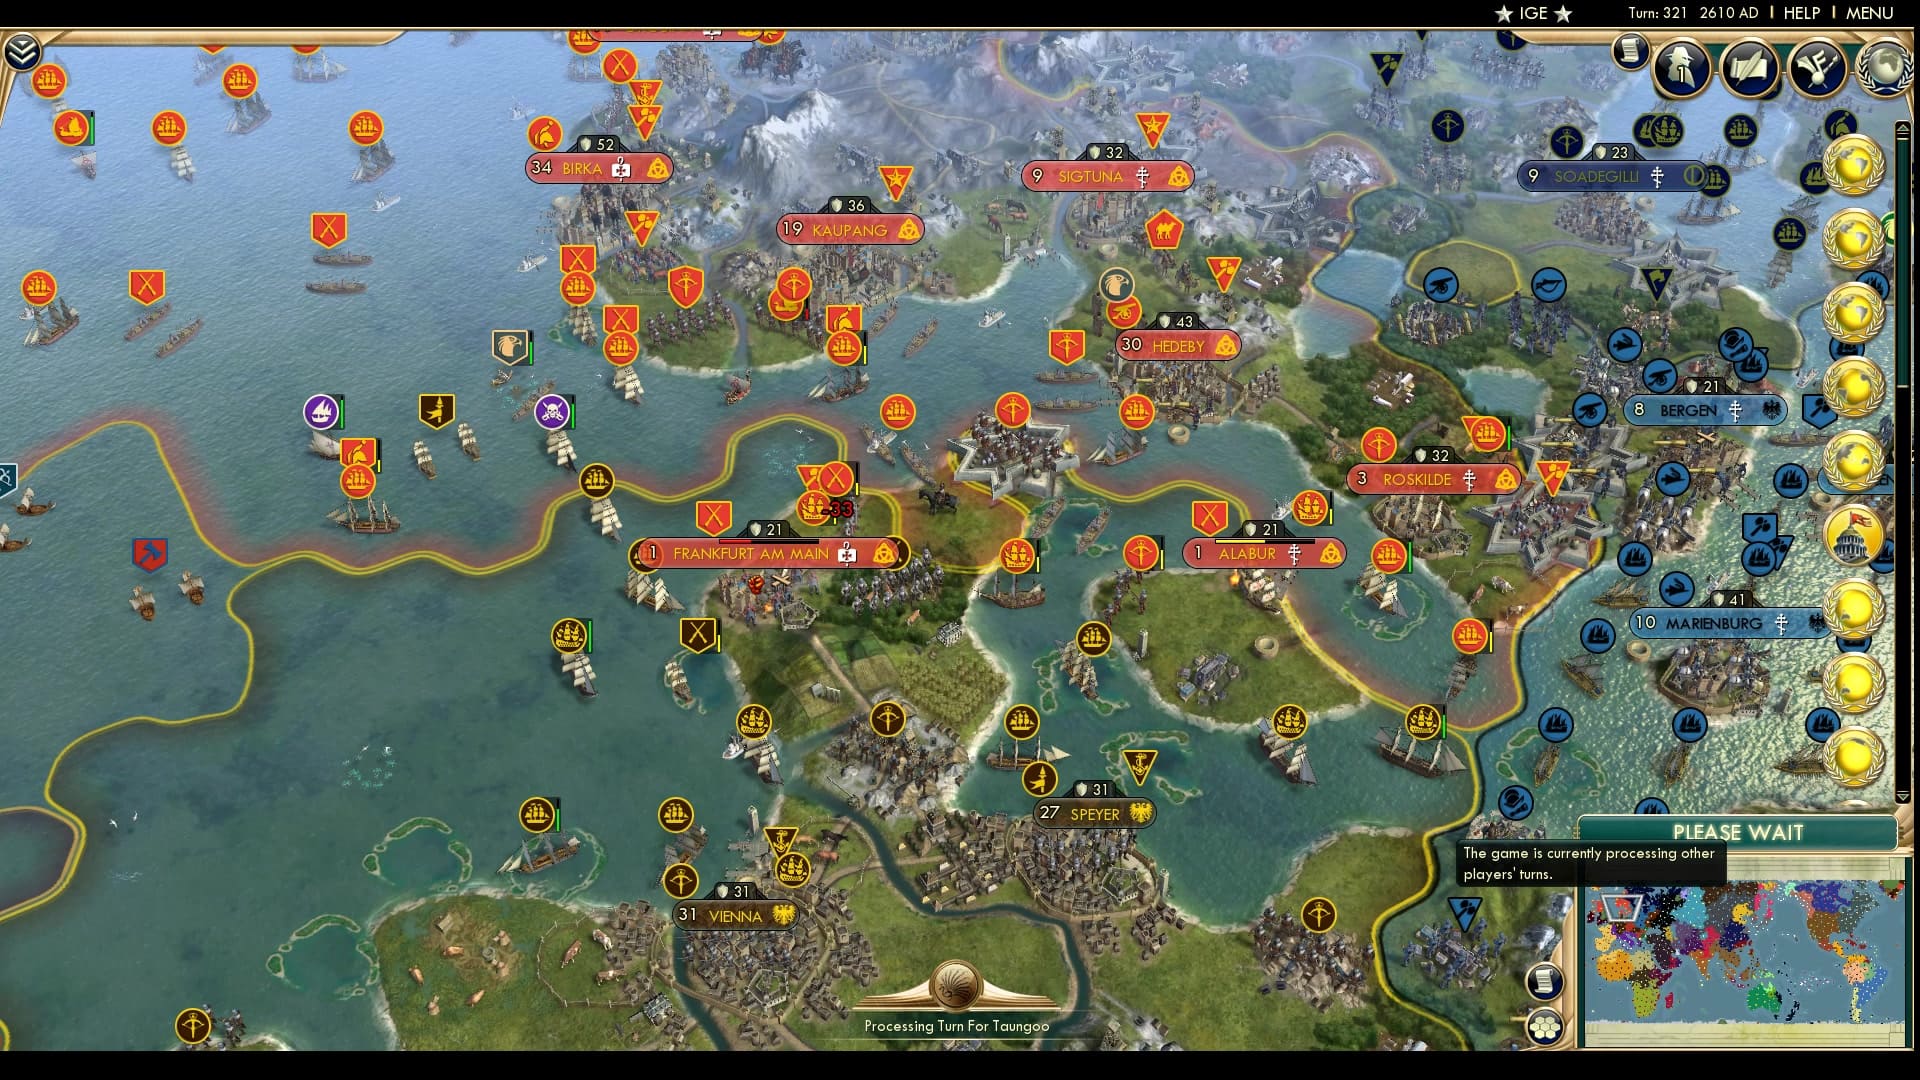
Frankfurt and Alabur flip to the Vikings and the HRE units around do not seem to be thin enough to keep it. Alabur might be safe for a while but Frankfurt will most likely flip very soon.
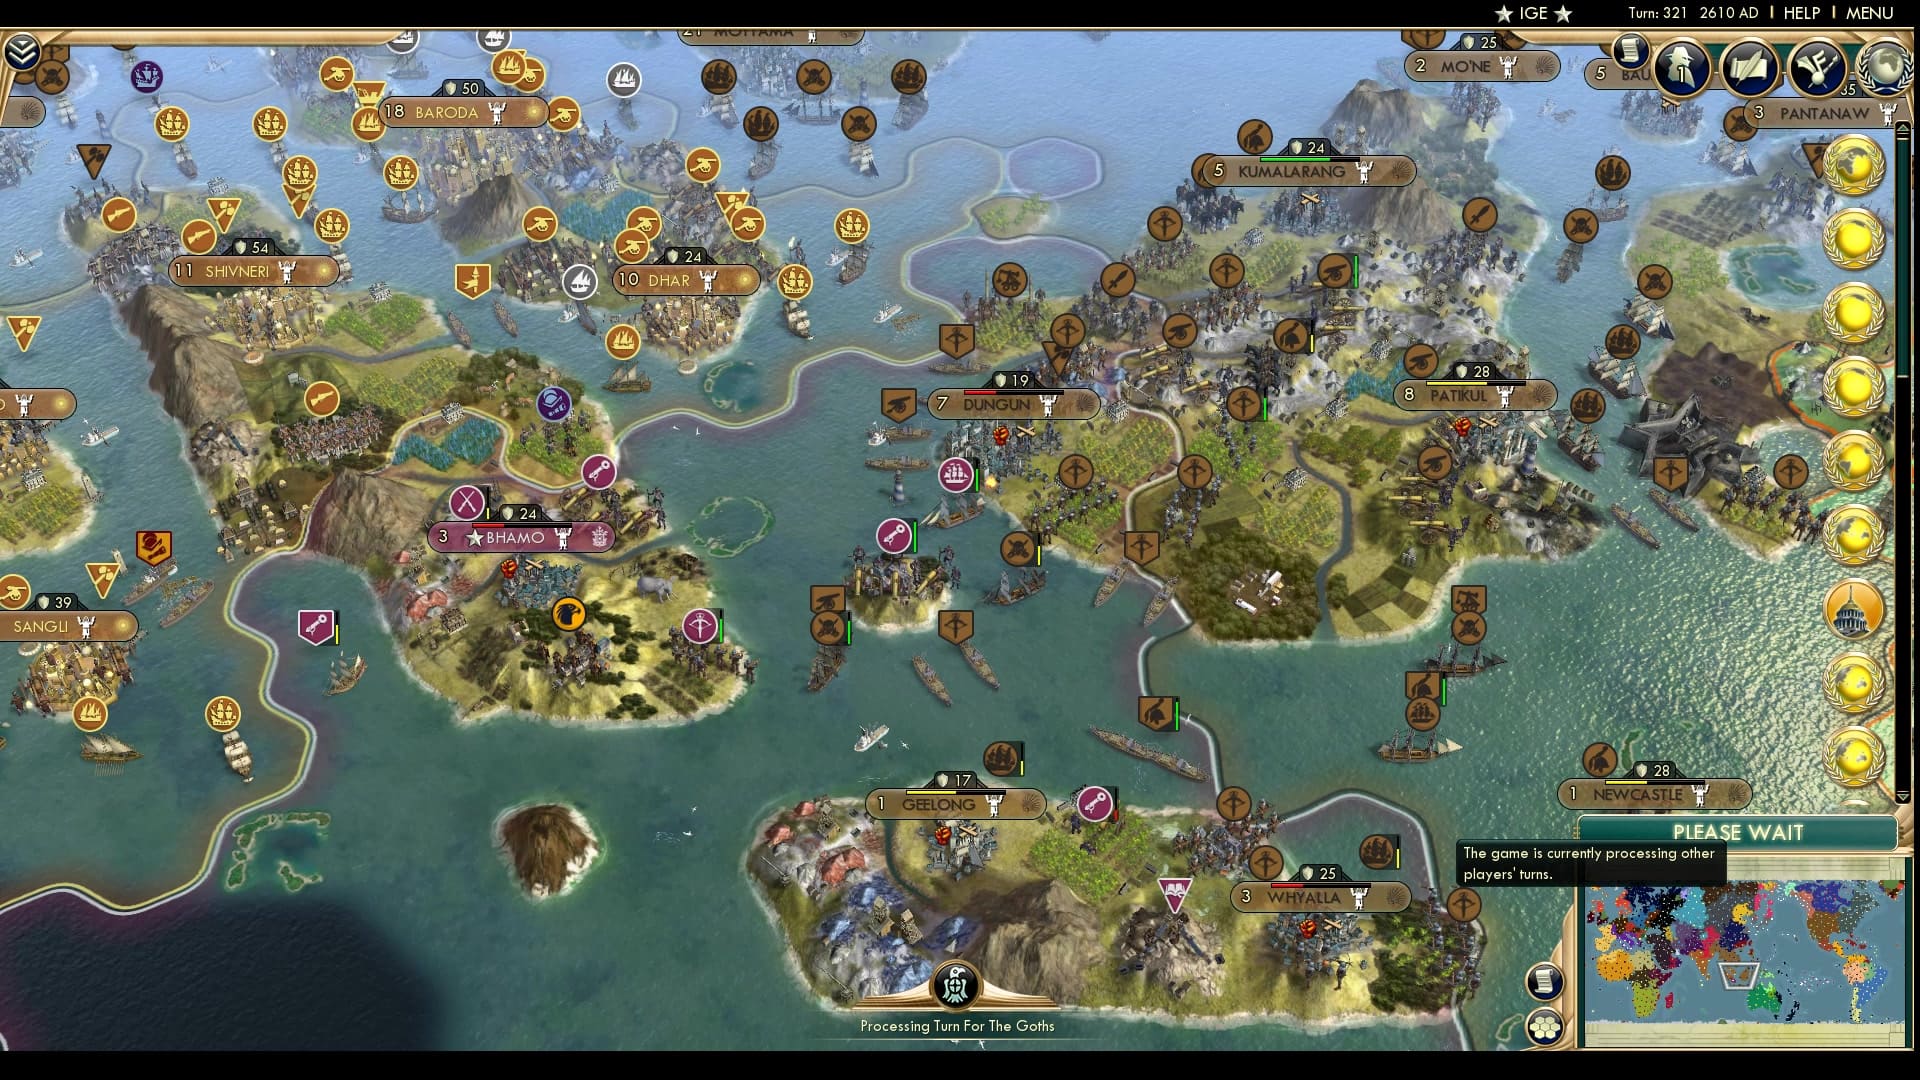
Geelong and Whyalla AND dungun fall to the Taungoo and the lack of melee units make the situation to retake any city dire for the Sulu. Bhamo remains relatively safe for at least one turn, but Jamalul is barely able to escape the impressive simultaneous three-city flip to the former Taungoo city. Something tells me that Bayinnaung won’t let them keep it. With Bhamo in resistance, Sulu won’t have the time to pull a melee unit out to take a city unless there’s peace.
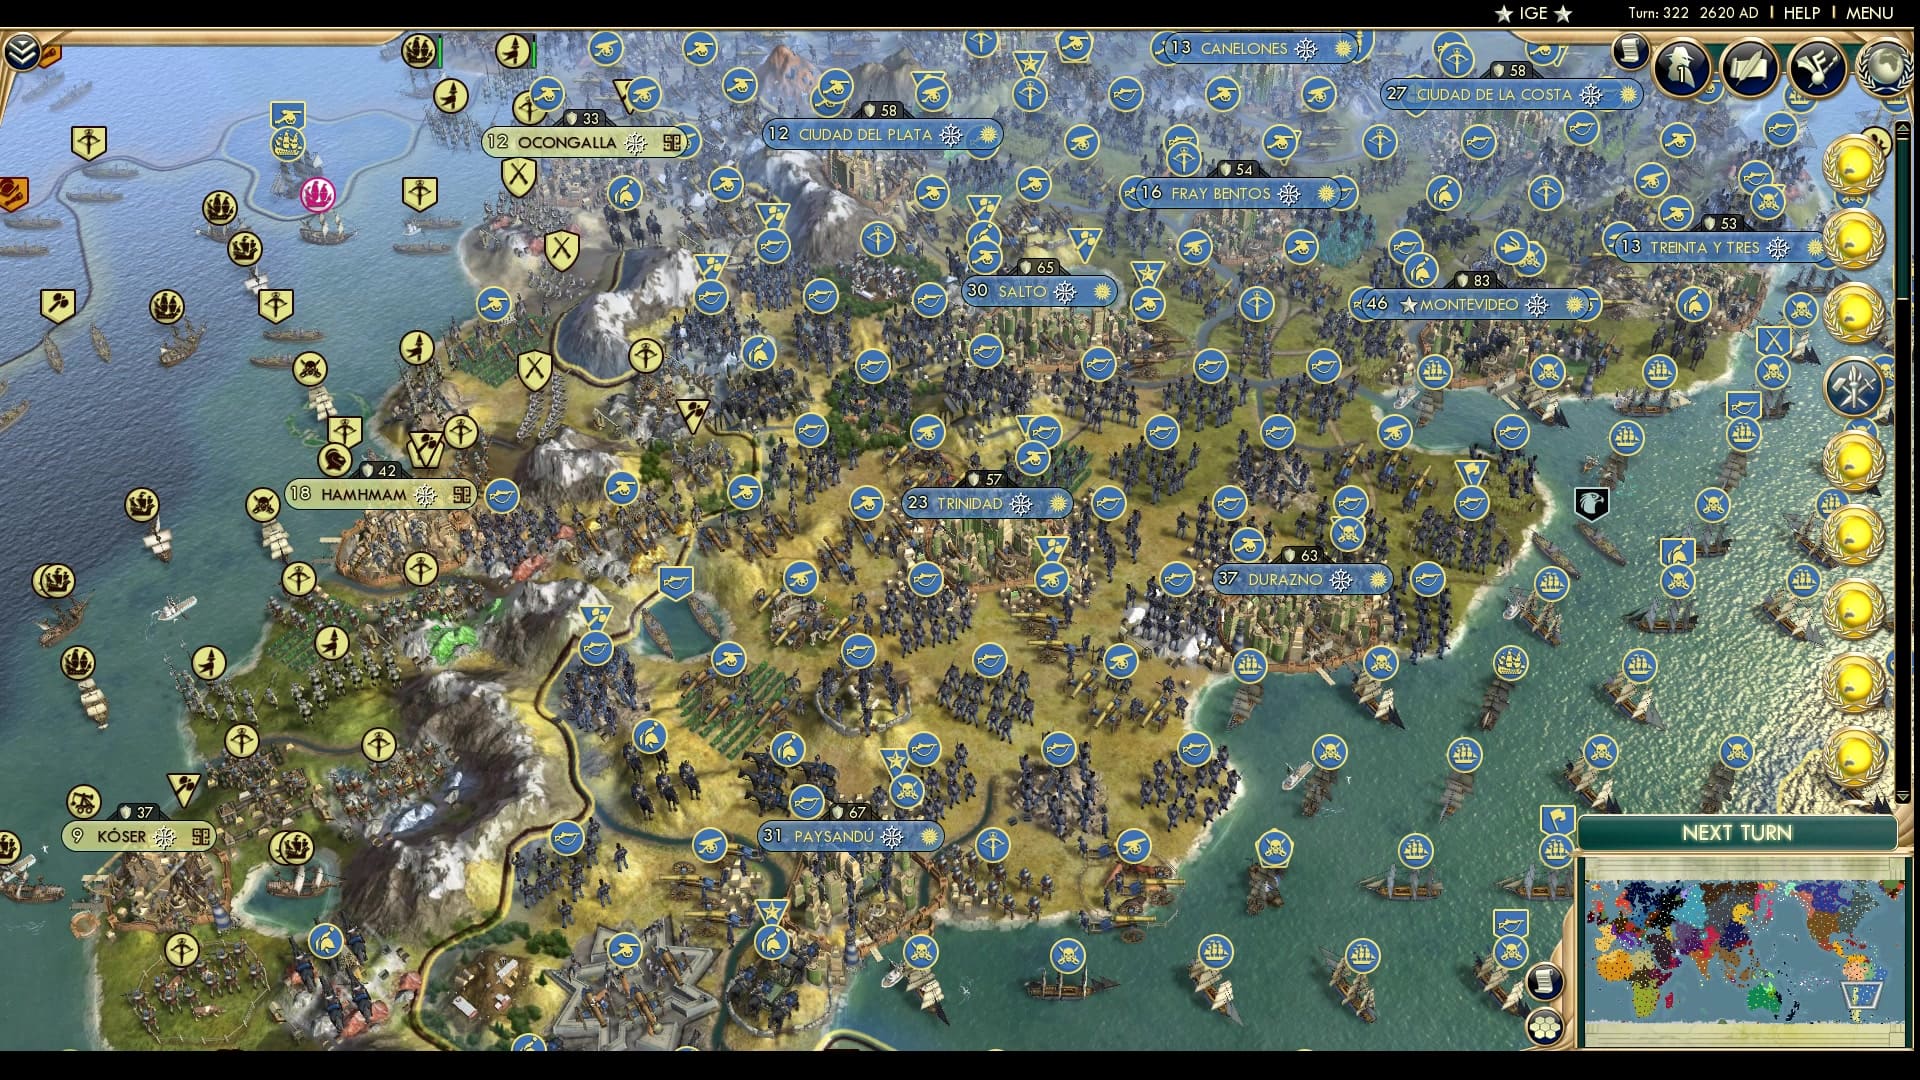
We take a break to look at the #1 in the tournament this season and just look at those units. I’m sure the Uruguayans are beside themselves, but as is the case in these tournaments, there is no guarantee just yet. The South American wars have not been able to do anything at all, which is not good for their chances at victory.

Look at all those crossbows. That’s a big OOF play from Sami. They might’ve taken their formerly controlled city of Vologda, but they only have two more melee units to take the bigger prize of Nicopolis and one of them is about to die. The Goths meanwhile might not be able to flip either back if either city falls one more time.
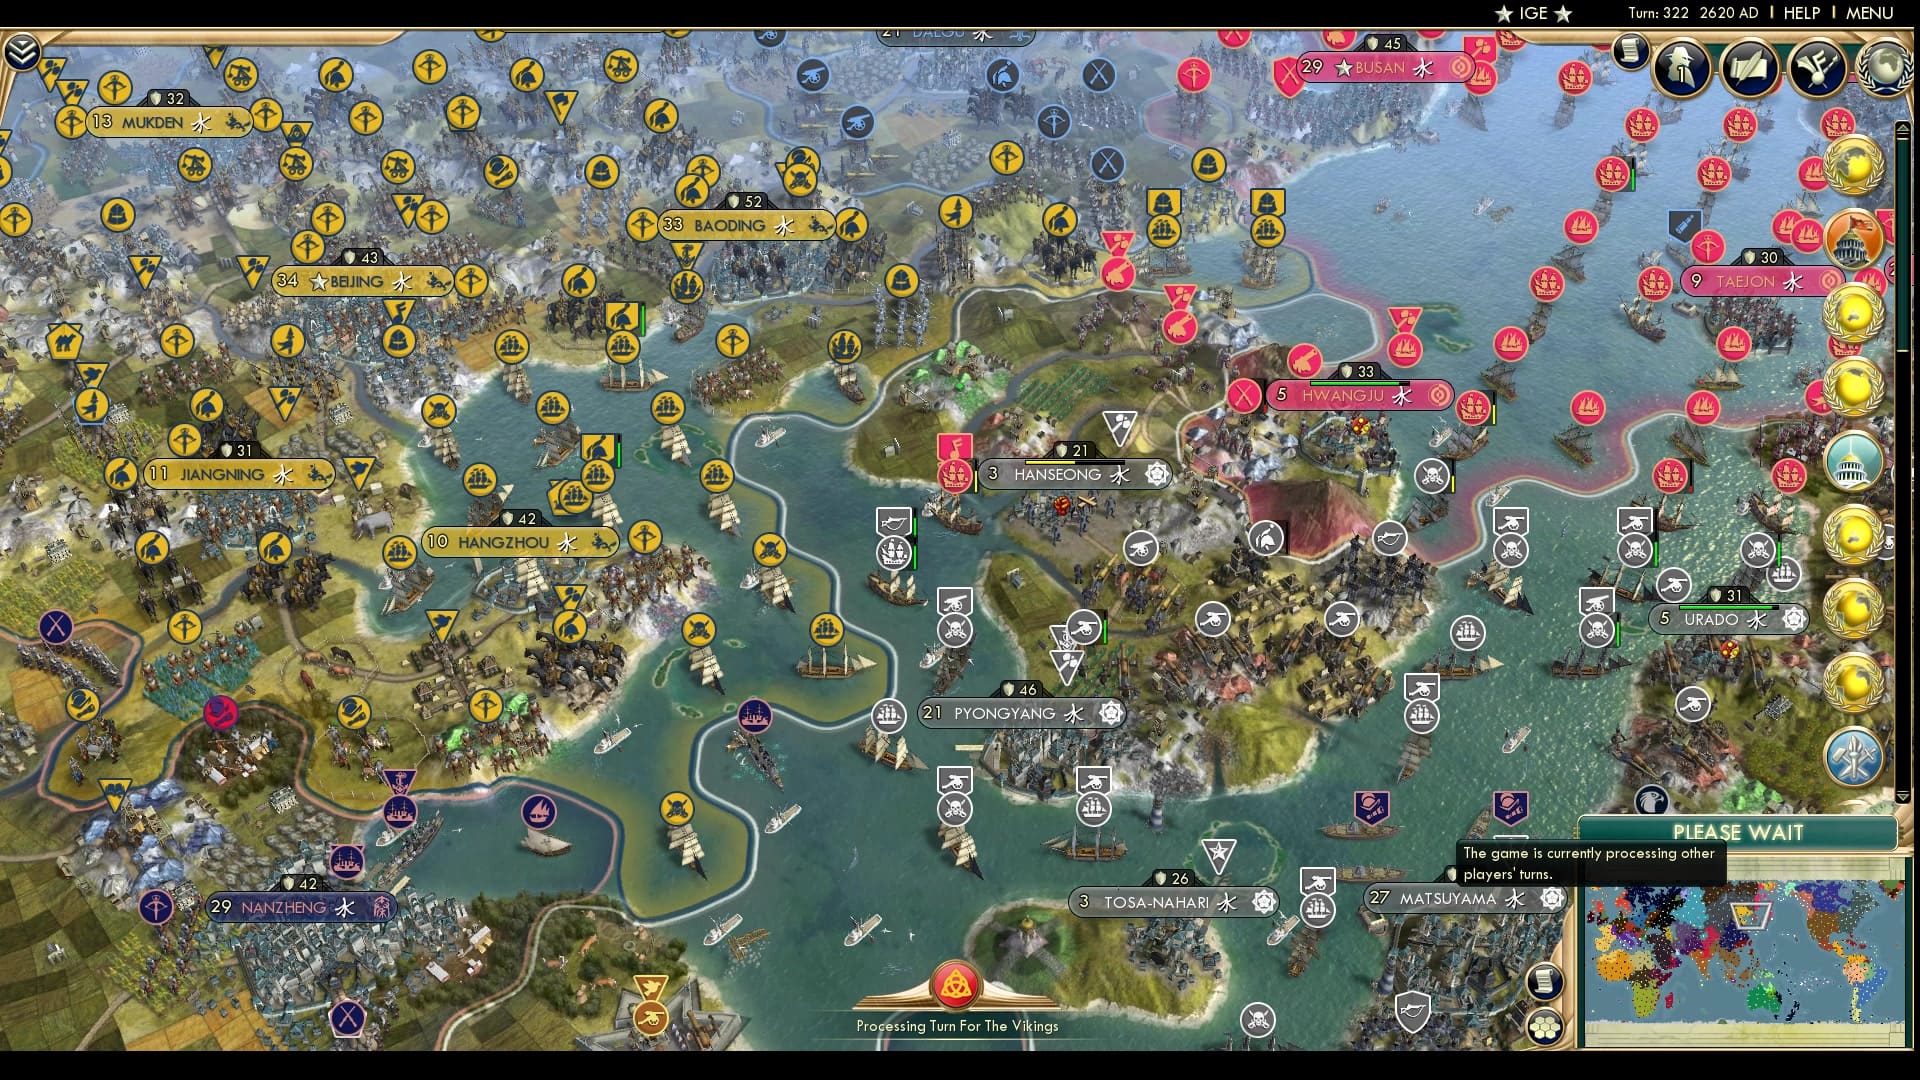
The Shikoku seem to have consolidated their hold over Hanseong after another flip, but the city is still vulnerable. It’s just the Korean forces have thinned considerably. The navy to the north also looks unfortunate for Seonjo. Shikoku looks posed to take the entire peninsula and Seonjo might flip the capital one more time!
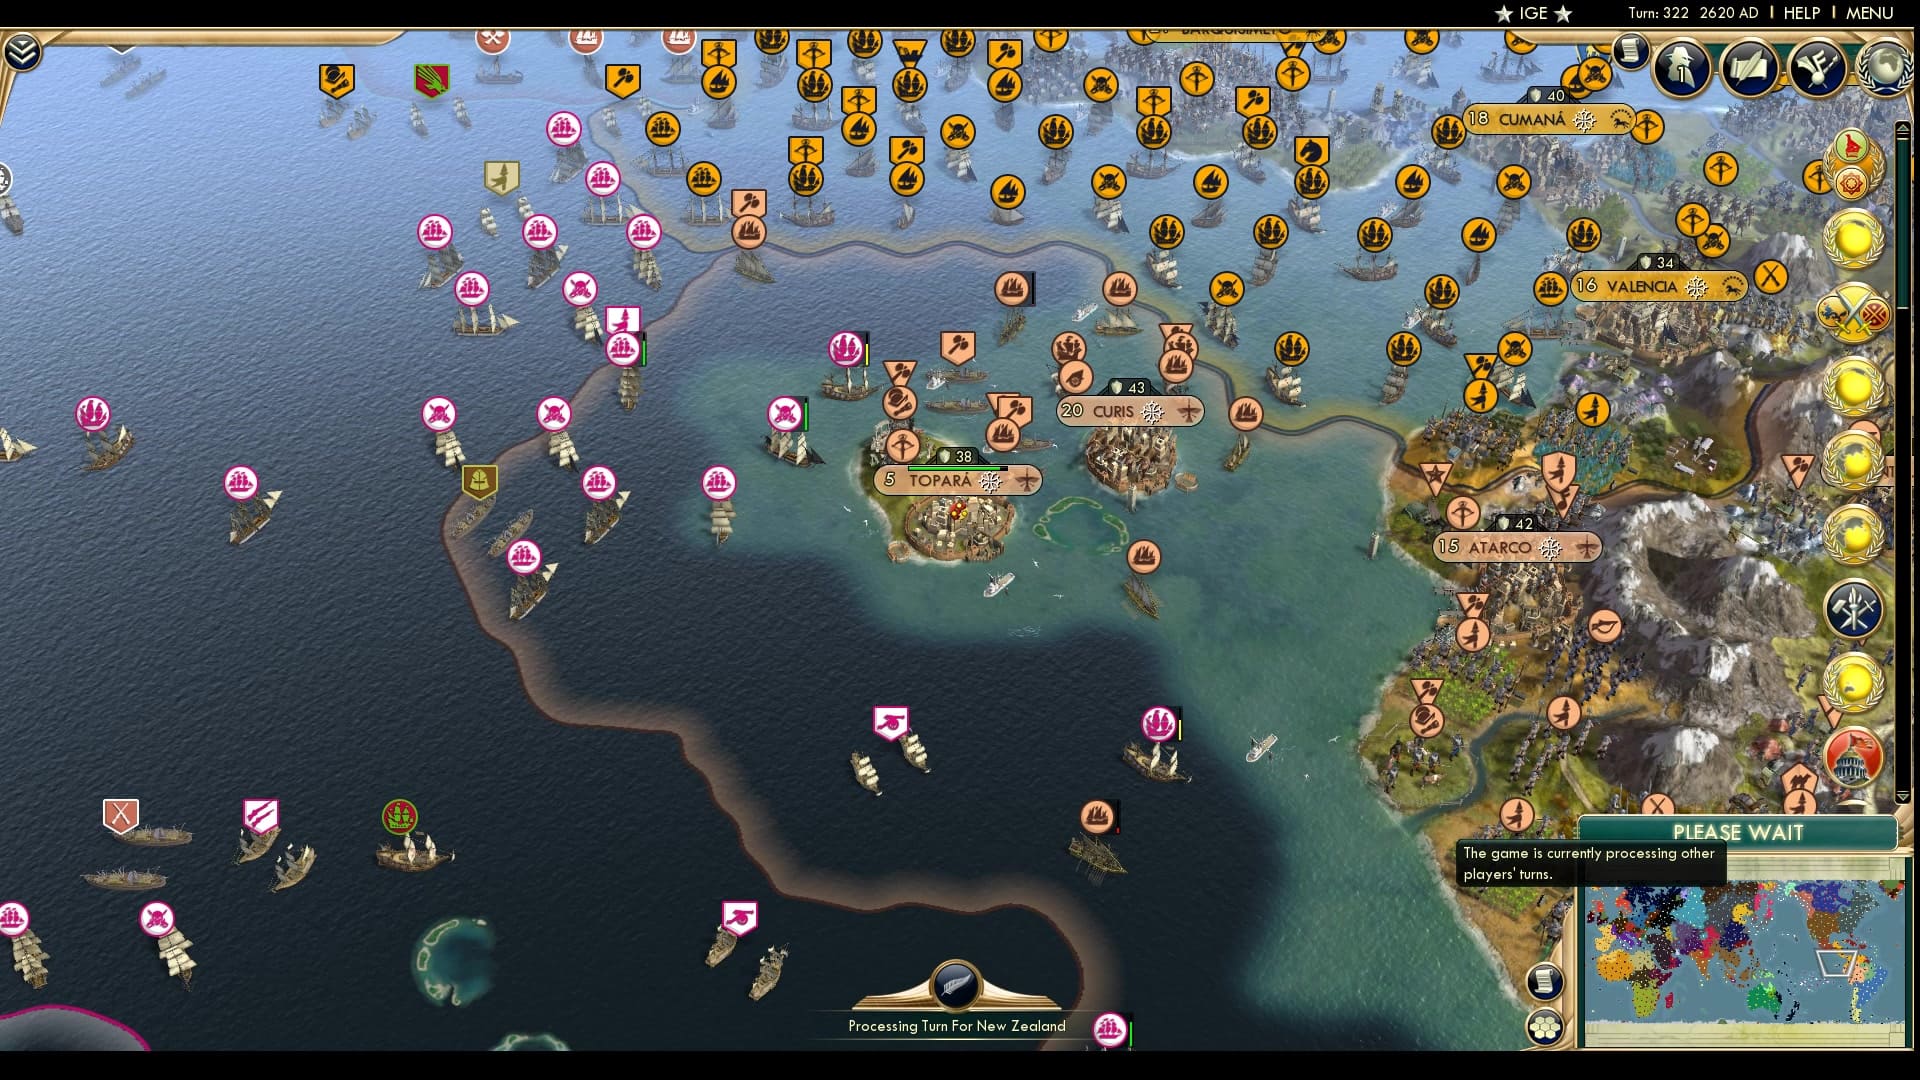
The SPOR has actually predicted that the Tonga-Nazca war might be relevant and it seems like Siaosi has actually gone forward with it. Perhaps invigorated by trans rights, Topara is under attack and there looks to be a stronger Tongan offensive fleet than a Nazca defensive. New Zealand, also at war with the Nazca, are nowhere to be seen.
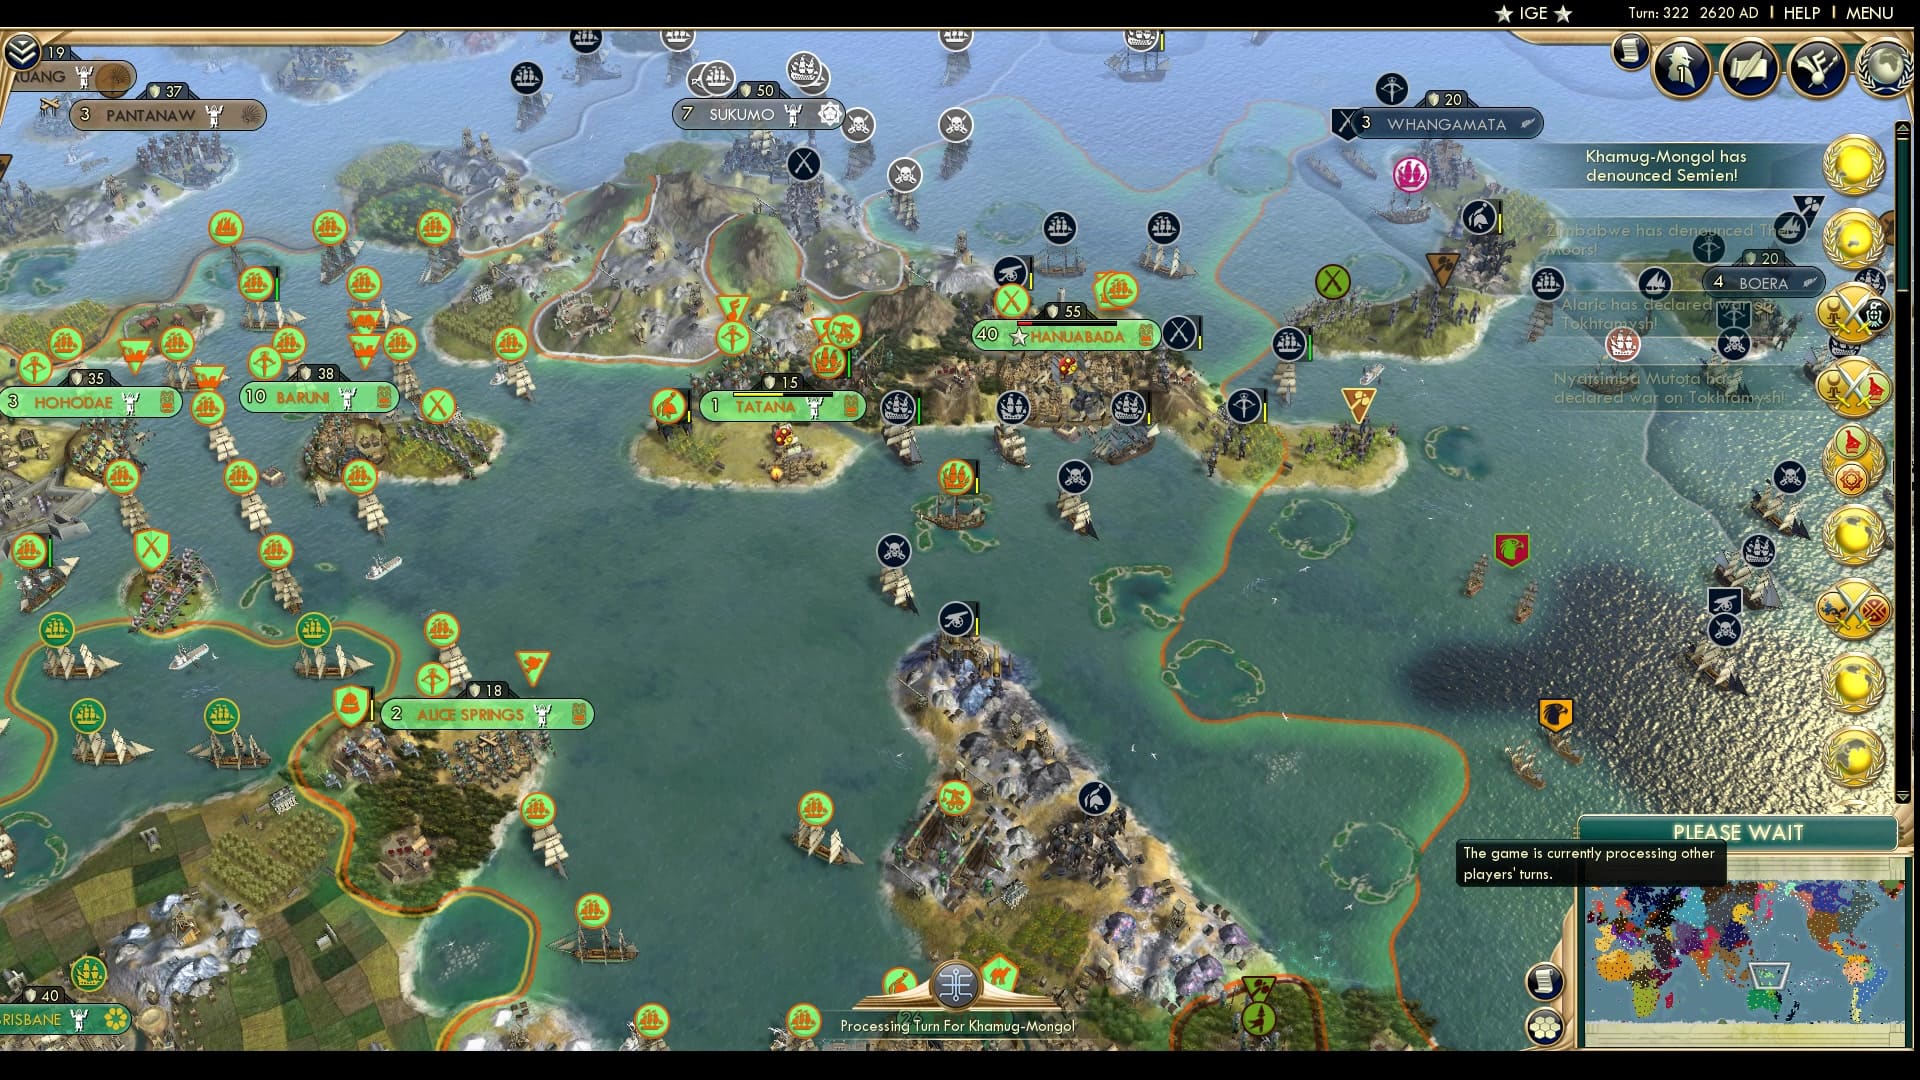
Turns out New Zealand had not given up taking out Papua, being ever so close to taking the capital. This time Seddon has launched a strong offensive from all sides onto Hanuabada by landing some cannons into the mix. The large 40 pop city seems poised to fall to fill New Zealand’s bloodlust. Tatana also seems ready to fall quickly. Will Papua even be able to flip it back?
In other news: the Goths open their third front by attacking the Golden Horde.
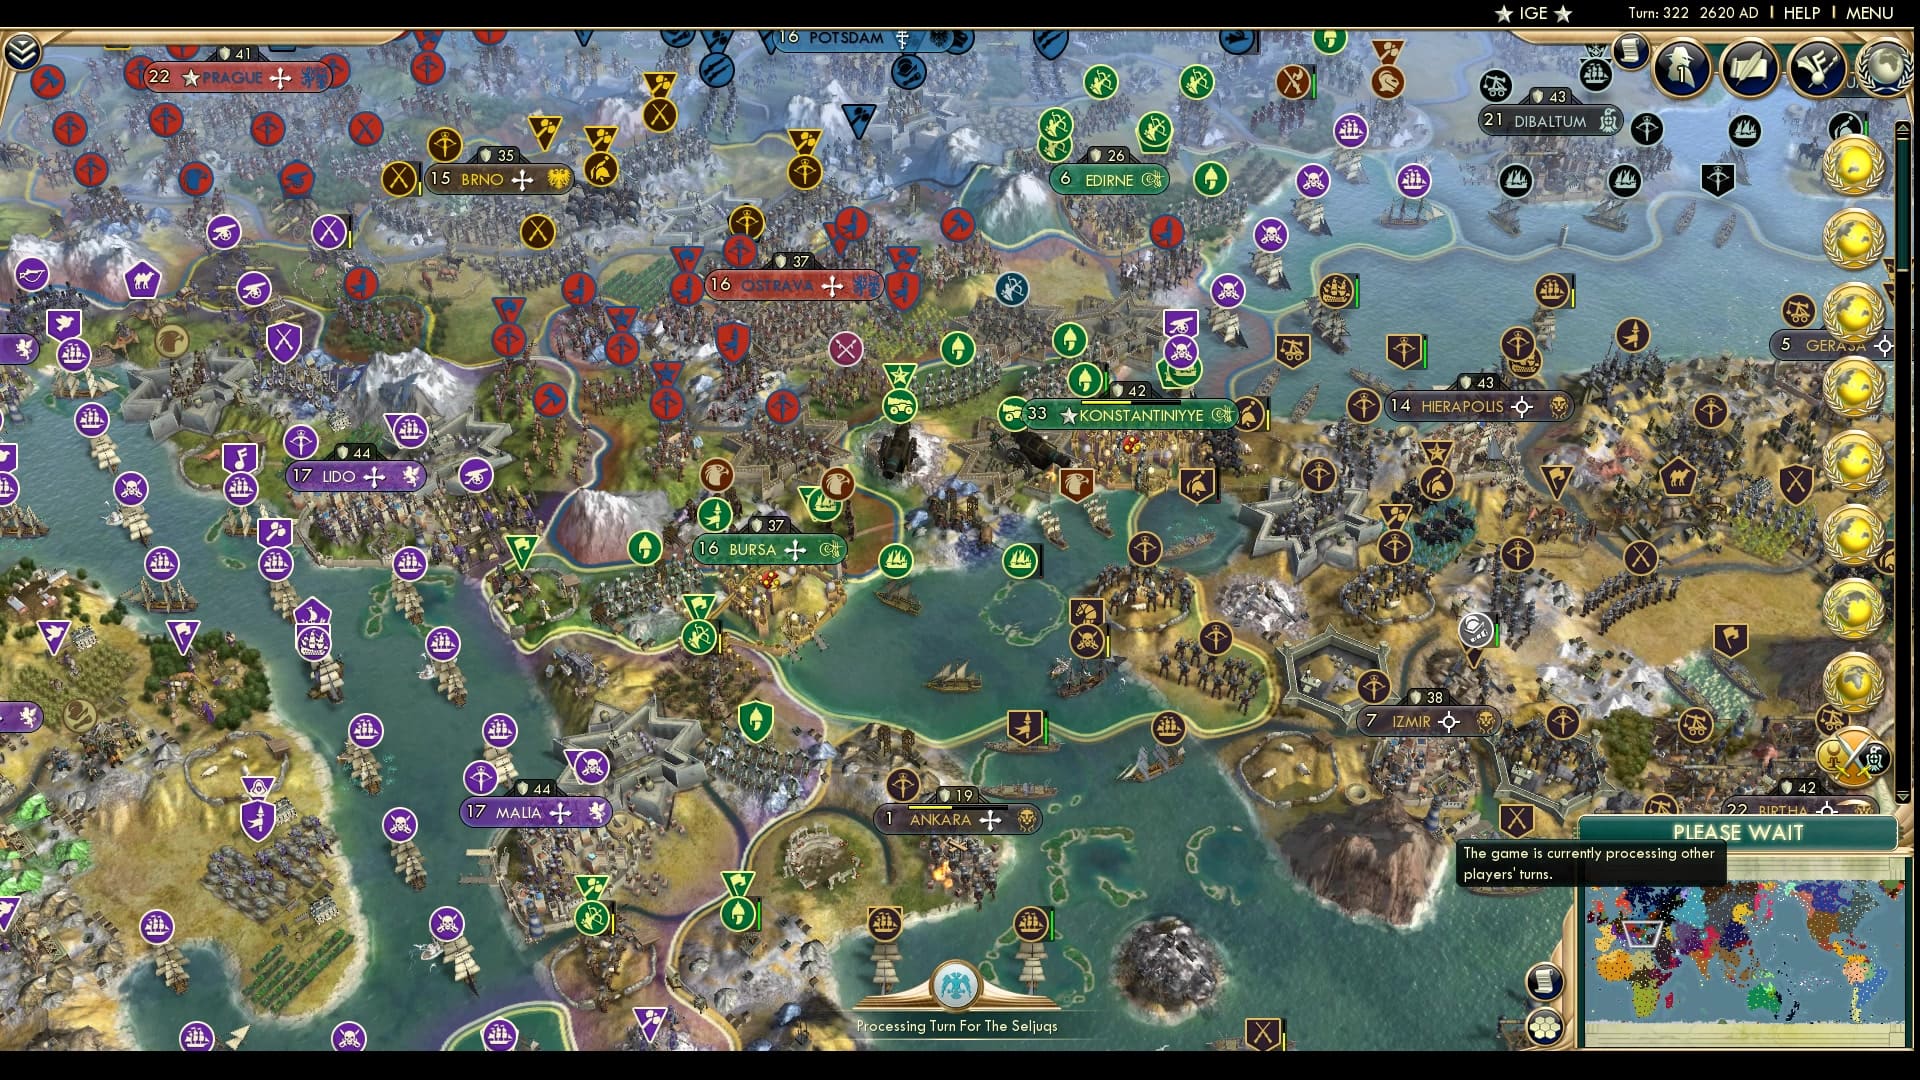
Palmyran forces knock on the walls of the city of Konstantiniyye with the Ottomans reduced to very small patches of land. It seems slow but Palmyra has the tide of war on their side after capturing and holding onto Ankara.
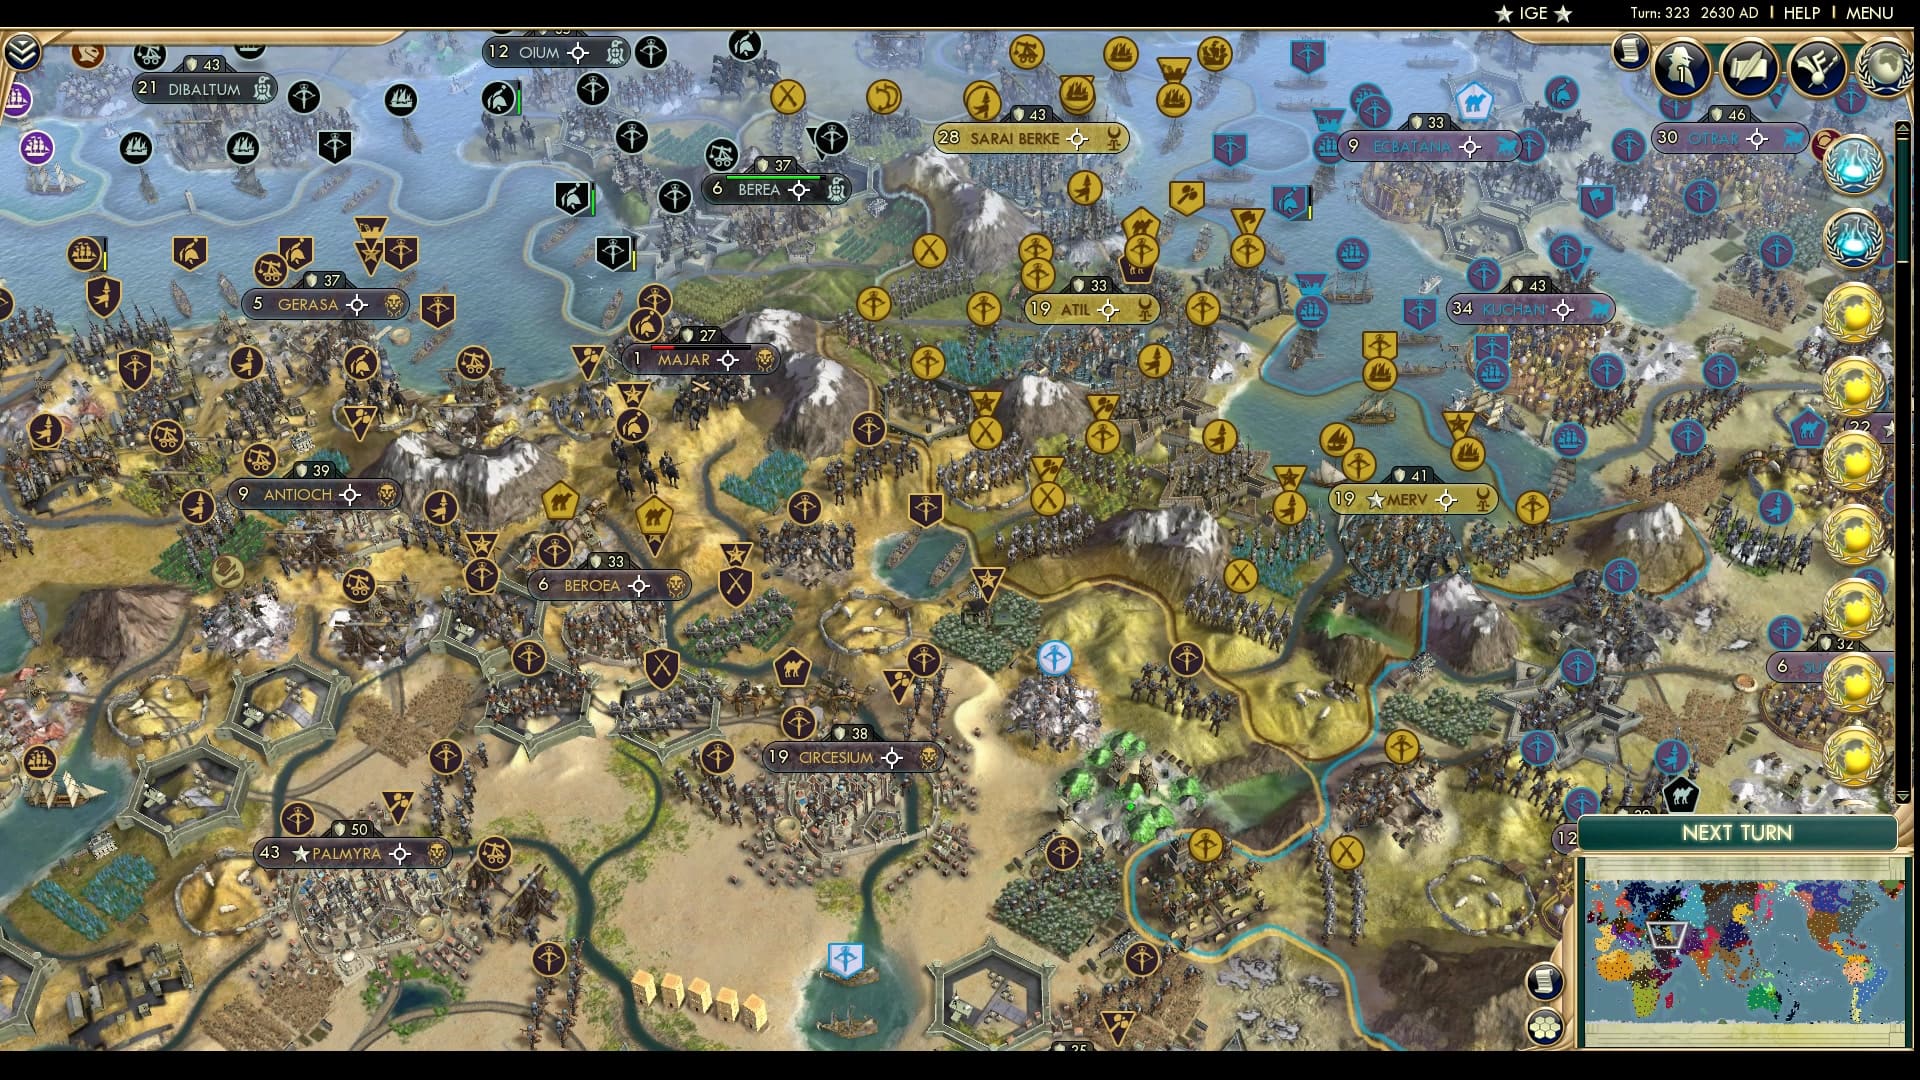
The Old front of Palmyra-Goths have stabilized with a gain for Palmyra. The Goths declared on the Horde but have not seemed to make any moves. Perhaps they were deluded by the promise of a Zimbabwean force taking cities for them? With this and Konstantiniyye, Palmyra has been incredibly competent at fighting on two fronts.
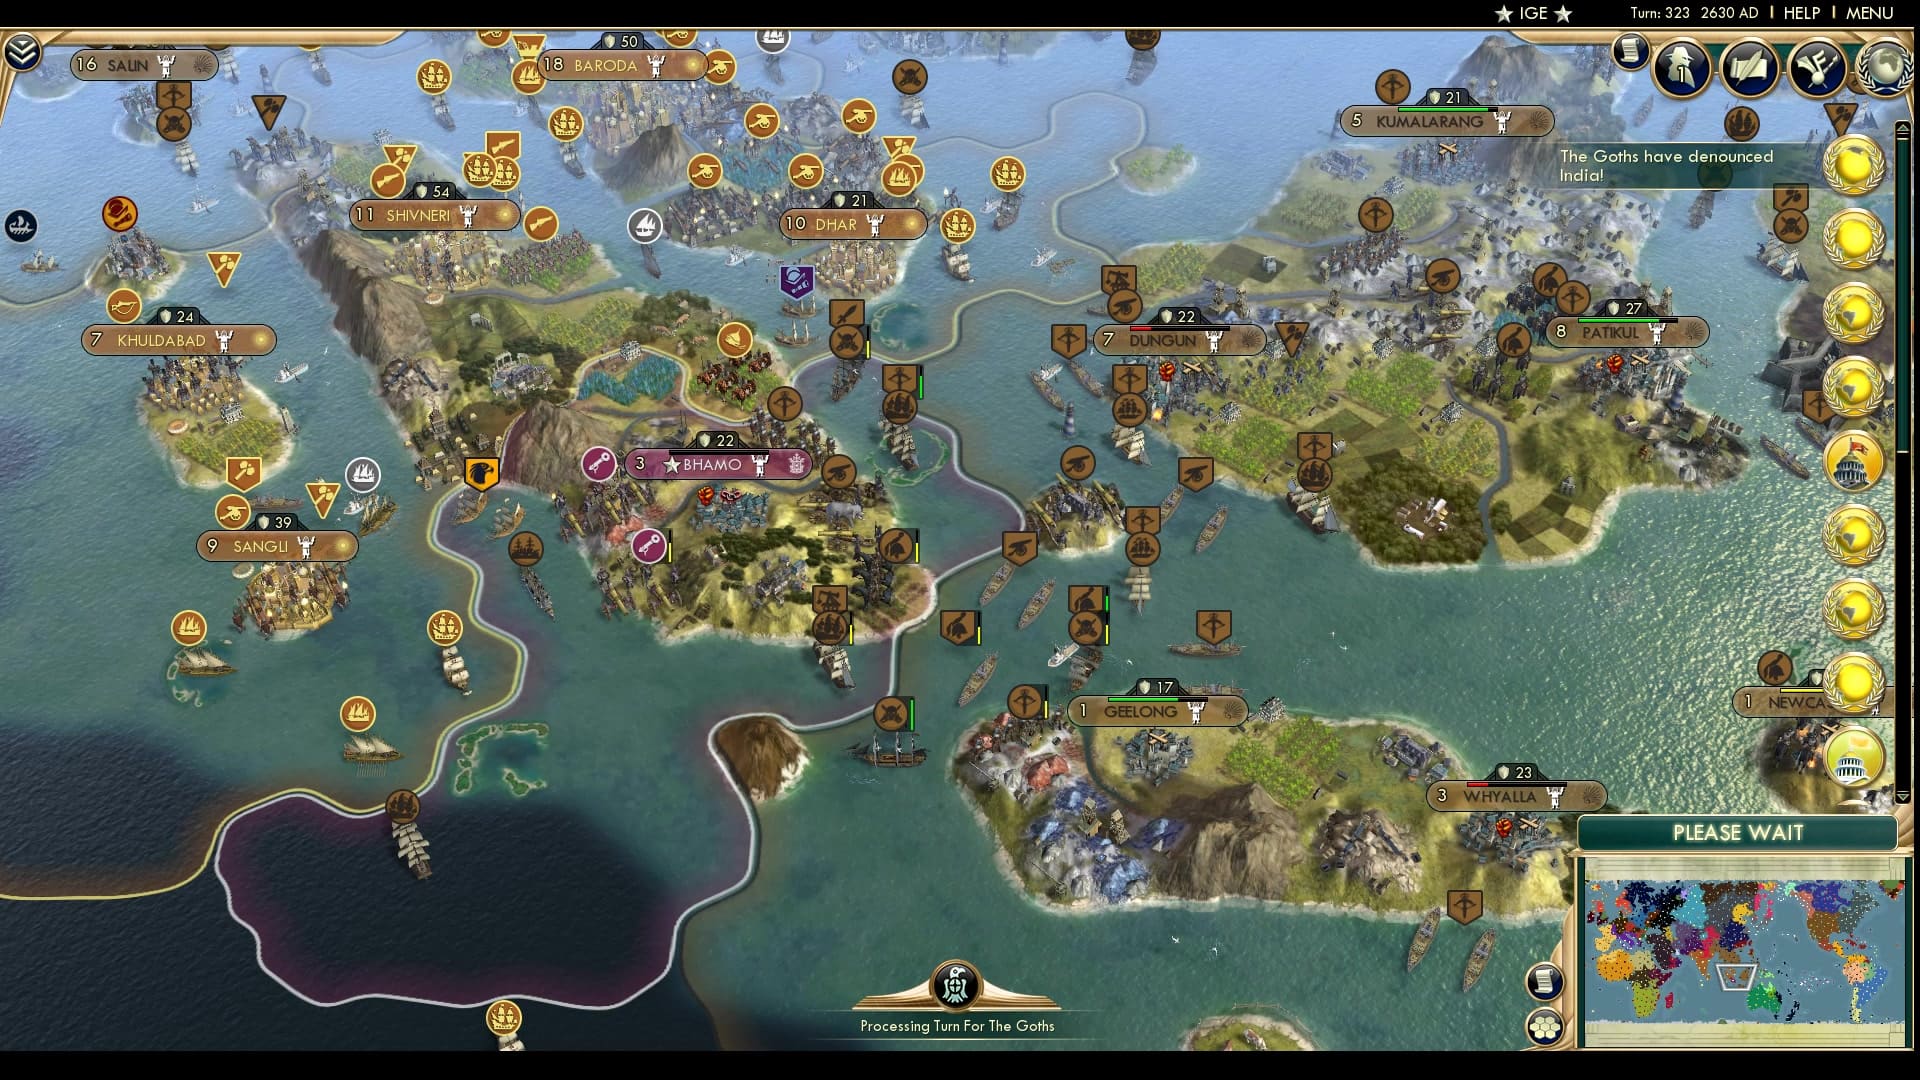
Taungoo land around Bhamo and Sulu’s situation looks entirely hopeless. Not much of the analysis here as changed from before. The remaining Sulu units around the other places seem to have been killed and Taungoo has puppetted all the cities, probably feeding massively into their UA. In other news, the Korean capital flips on the sidebar.
New Zealand takes the Papuan capital, gaining Seddon his first capital and destroying Papuan hopes. Papua most likely can’t take back any of the cities on Papua itself and has wisely kept their main forces at bay, seeing if they can rump their way out of this mess. Oceania is being consolidated rather rapidly this part.
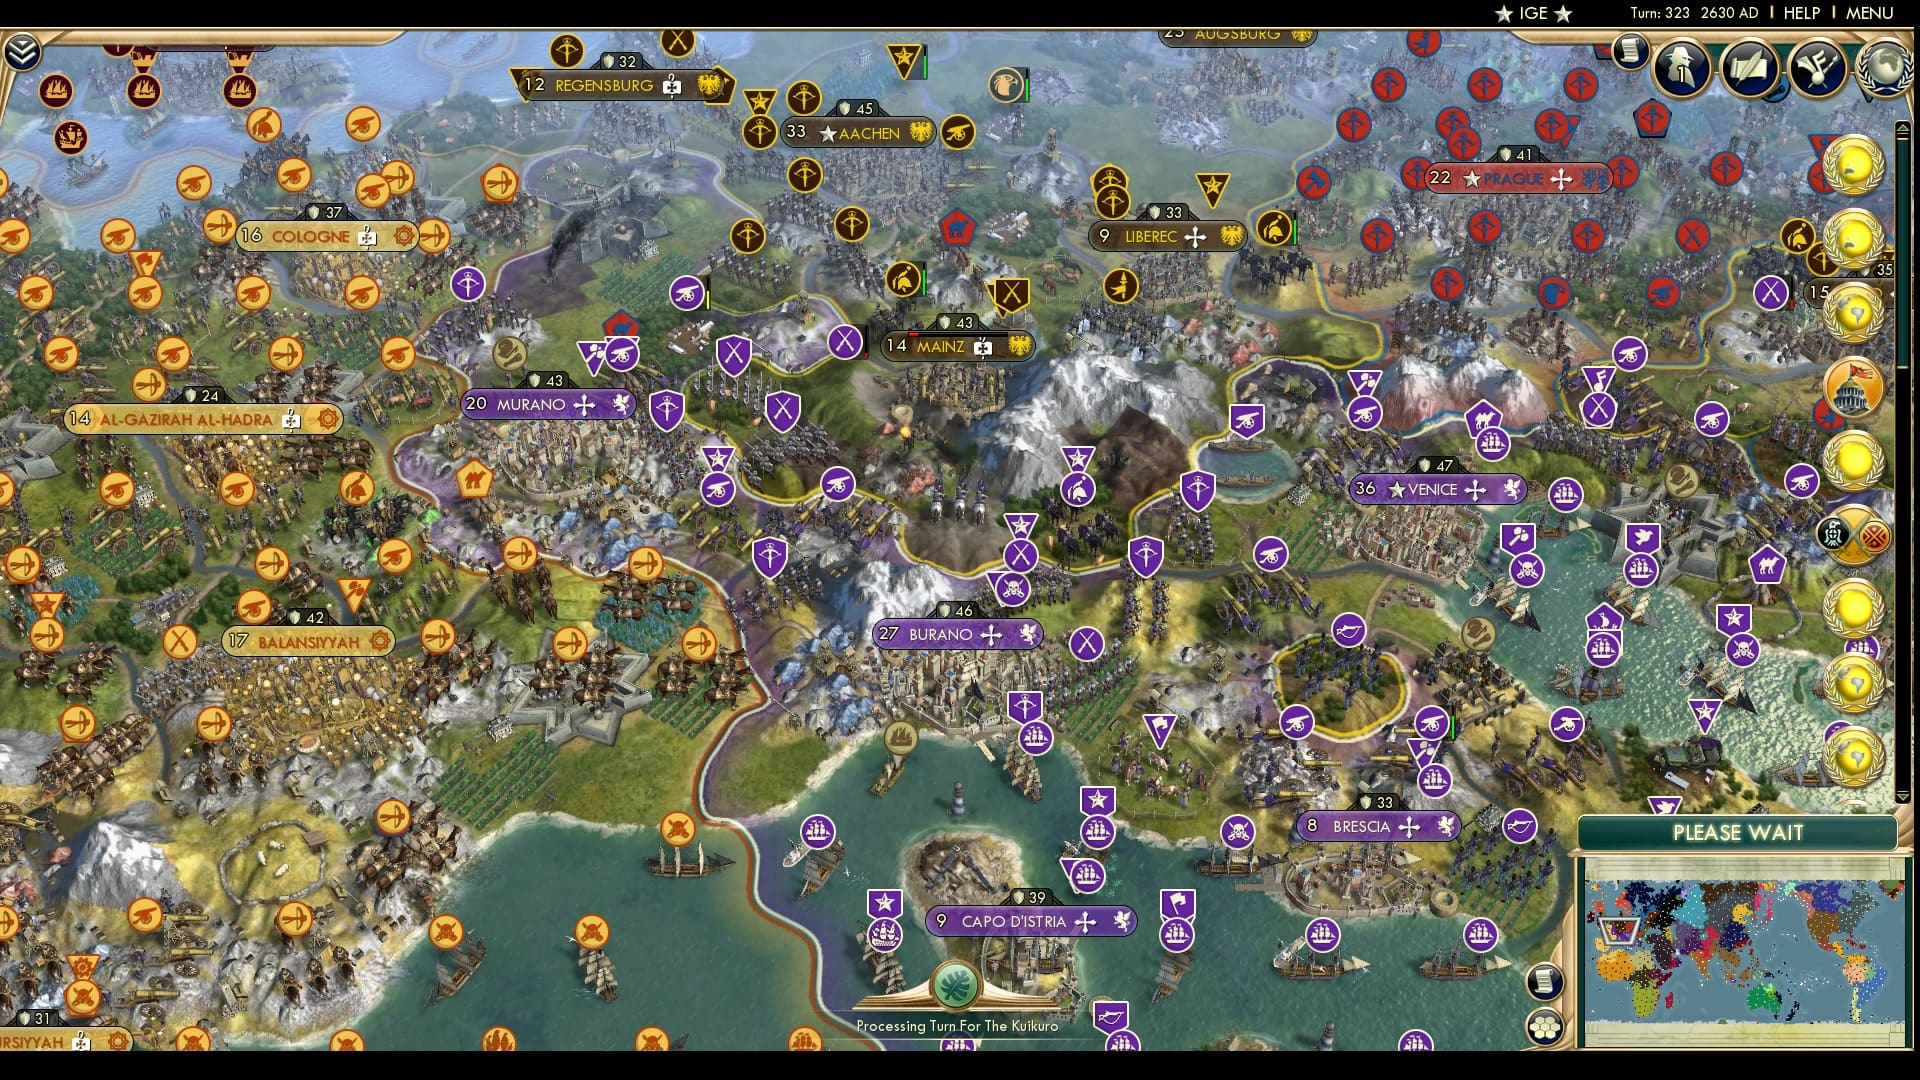
Venetian Alpine forces whittle down Mainz and their own numbers, but it seems poised for HRE to lose a city. It’ll be quite a blow to the HRE core and severely threaten Aachen itself, but the HRE have more than enough forces to probably take Mainz back. To the right we see a few Venetians try to attack Brno but without the same might as against Mainz.
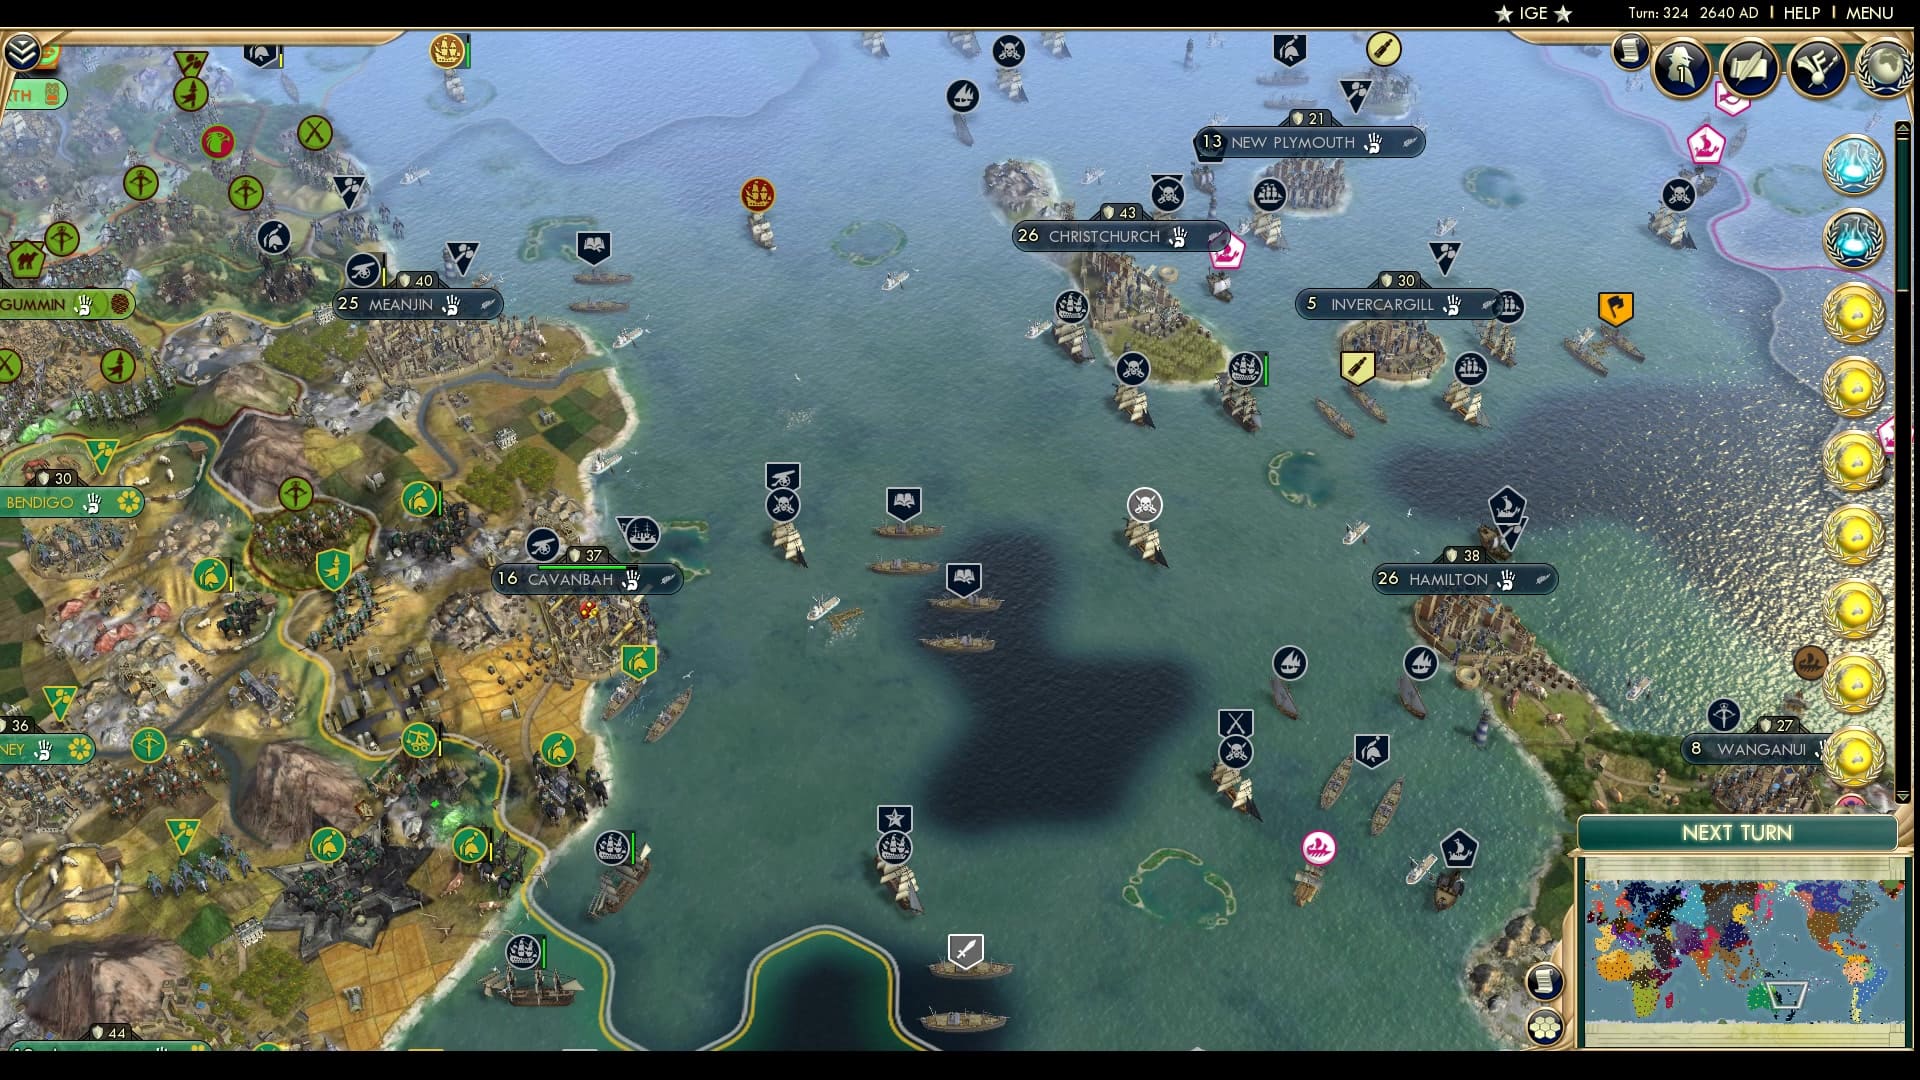
On the other corner of the cylinder we see one of the fronts of the Great Oceanic War largely ignore: Australia and New Zealand. So far New Zealand has been either attacking the Australian west coast or the Papuans and ignoring their foothold on the continent. Australia sends a few units to try to and take it back, but it seems futile as Hawke’s military strategy seems to have been entirely stumped by one mountain.
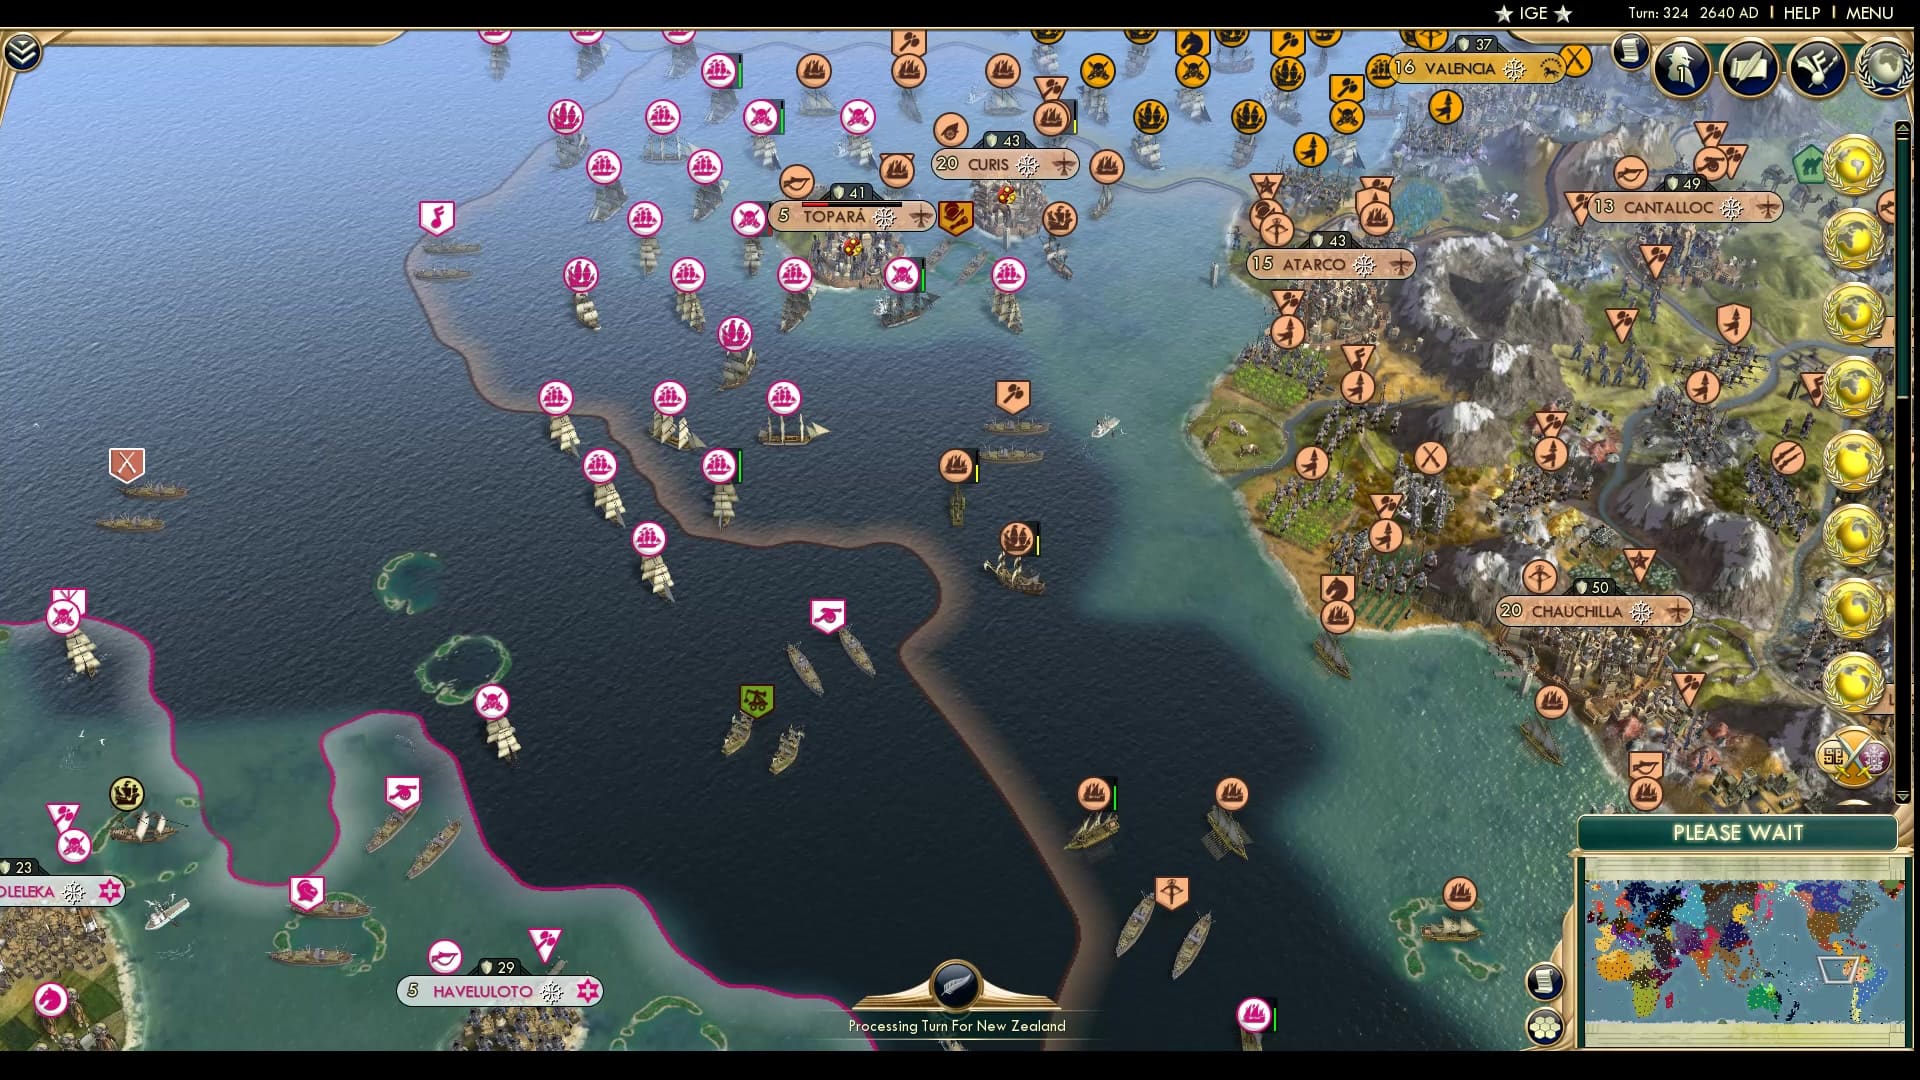
The Tonga-Nazca war moves into greater relevancy and the Tonga ships attack Nazca city of Topara down to red. That navy is nothing to sneeze at. Chances seems rough for the two naval melee units that Nazca have left to take the city back.
In other news: Sulu screams in agony and asks Selknam-chan to kill them off.

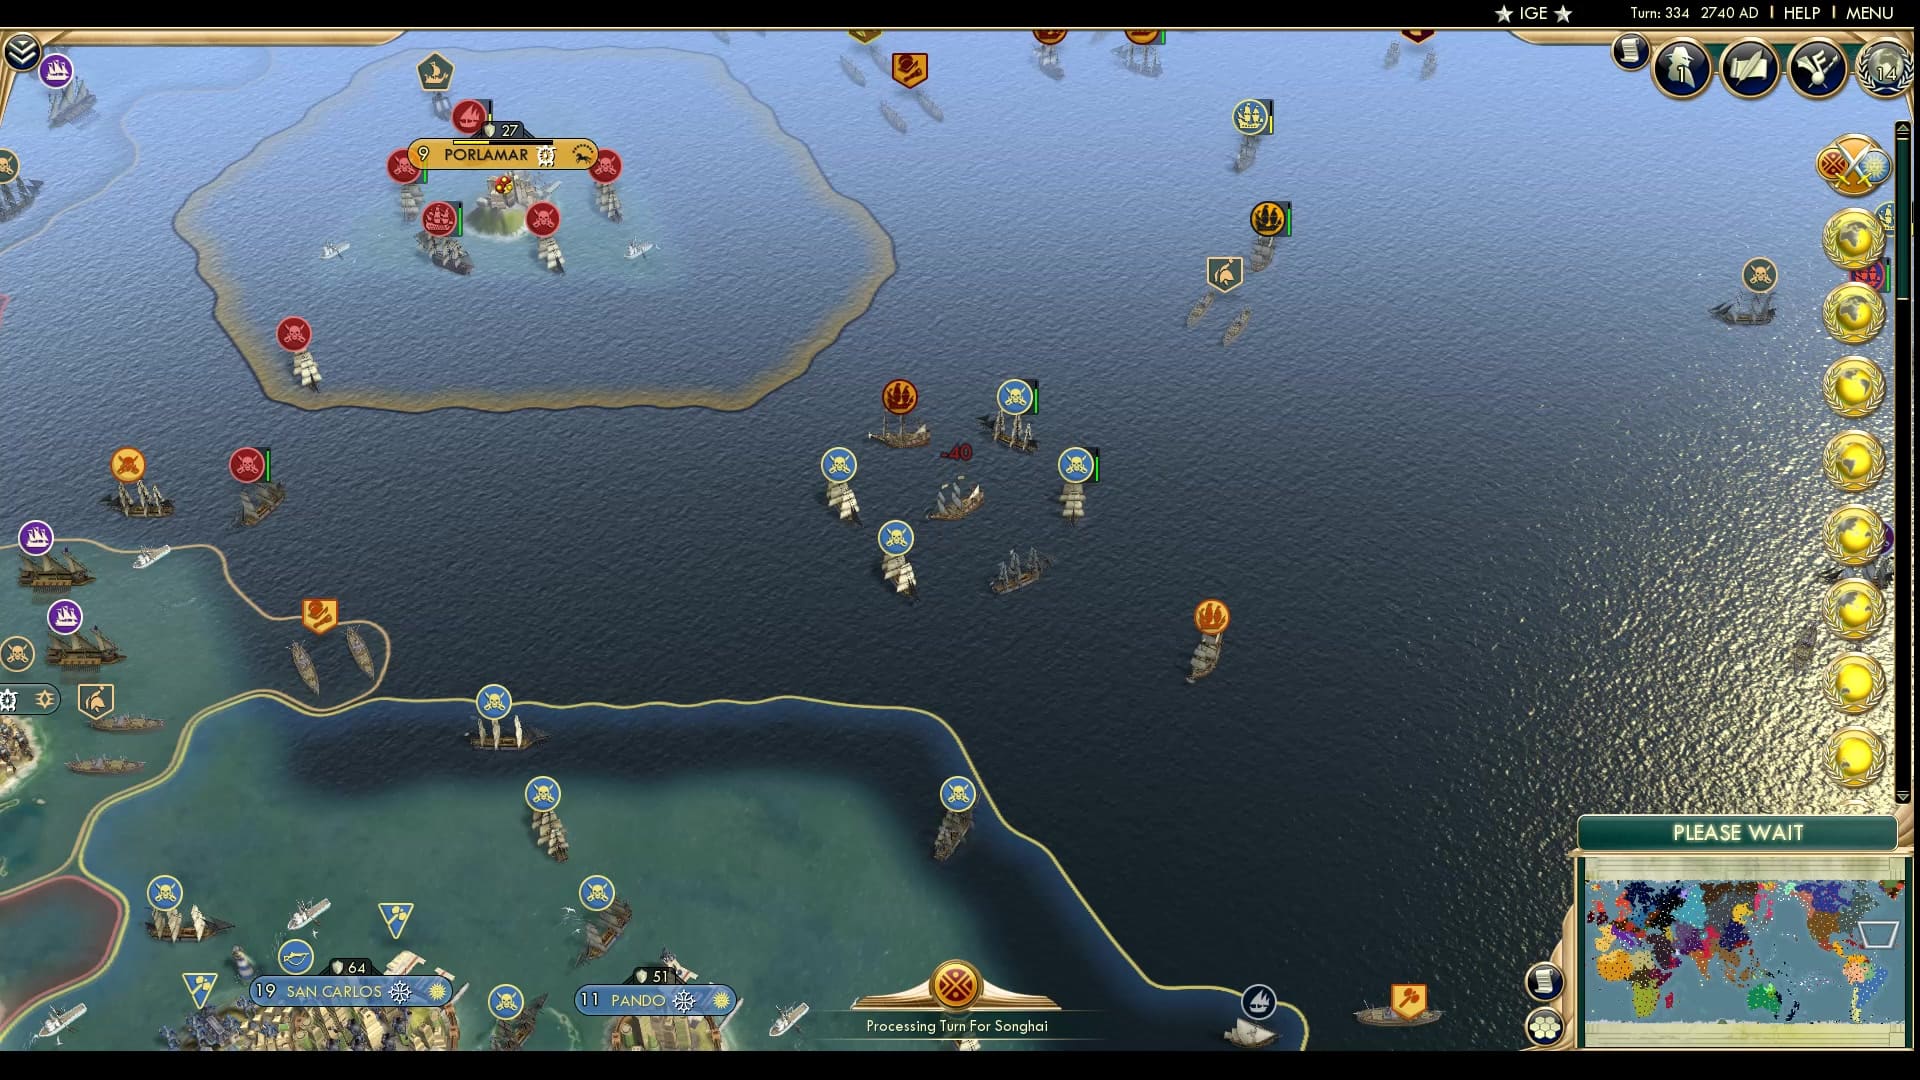
Chavez does a standard long-distance DoW to tell the Selknam that they are bad and forgets that he has Antarctic colonies. The Selknam have sure moved fast in attacking those colonies and the measly Venezuelan defence won’t be any use in this front.
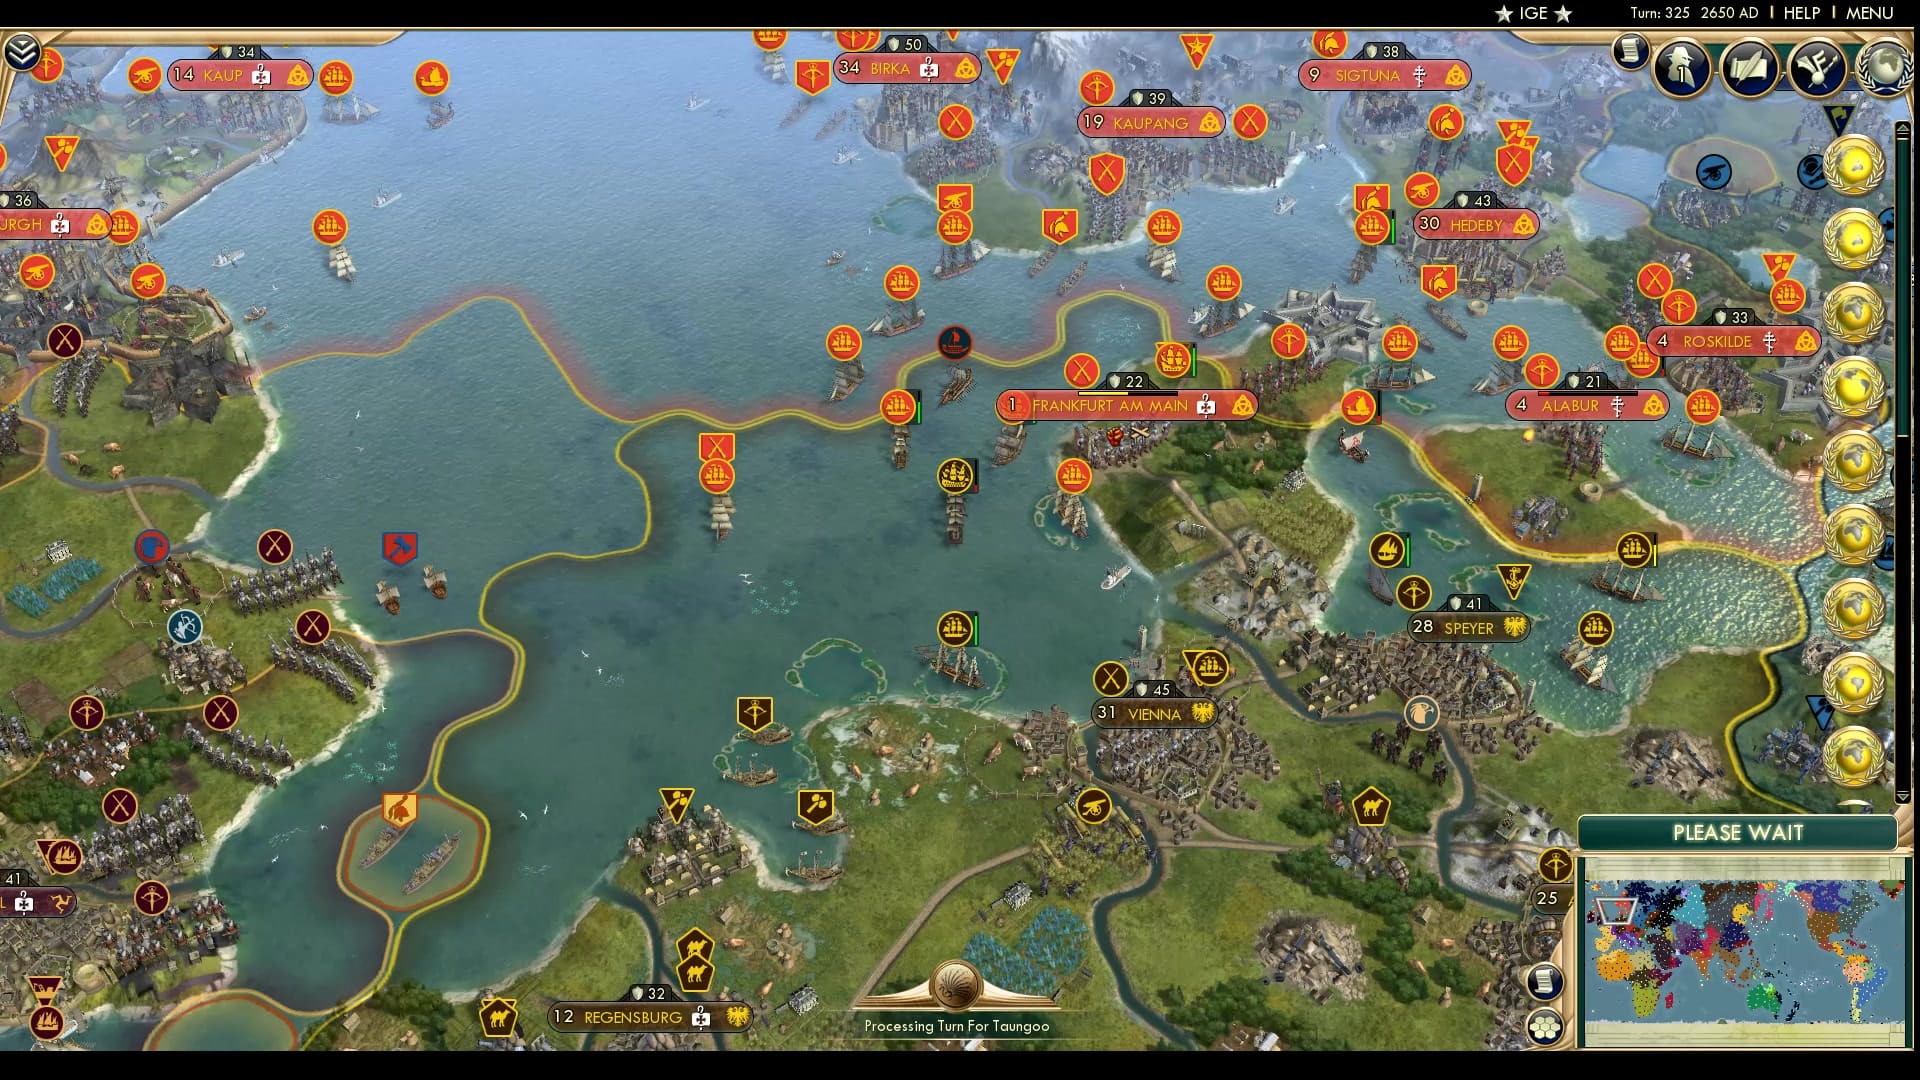
The Vikings move into Denmark and seem to have secured Alabur and Frankfurt. There’s still a hope for Frankfurt to be taken back by the HRE but their two naval units in range are growing quite weak and Viking reinforcements have arrived behind. Alabur, meanwhile can get pelted down by the German Frigates, but that caravel will have a hard time taking the city.
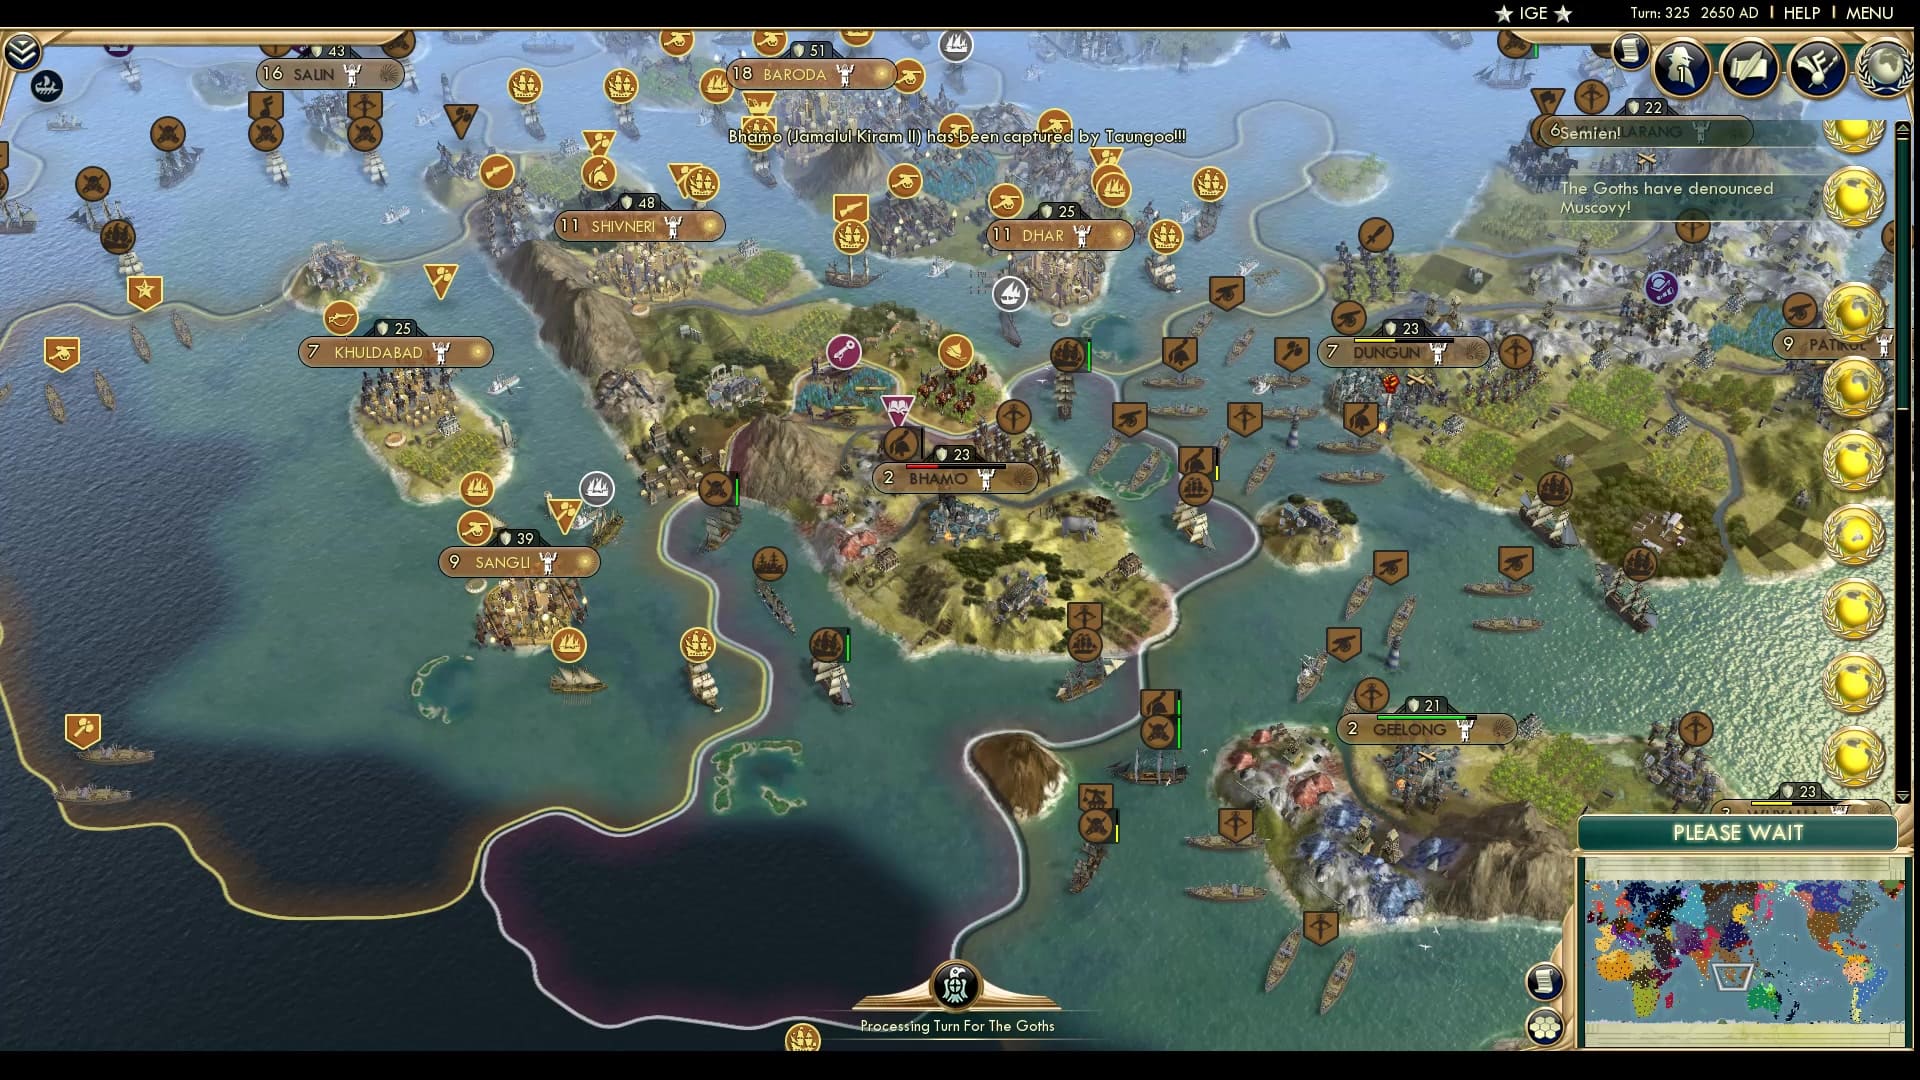
And just like that Sulu has been eliminated. Starting from a modestly sized rump state at the start of this part and growing strong just a while ago, the brown goo has managed to quickly overflow past Bauang and quickly in a few turns consuming all of Sulu. Sulu will be remembered as the founder of Bogomilism, with their one missionary left, and one of the leaders in technology in the globe, with their fancy unique gun left, who almost got their break against Australia to the south, but got ganked by Taungoo when they forgot to settle the Philippines. Rest in peace, Jamalul.
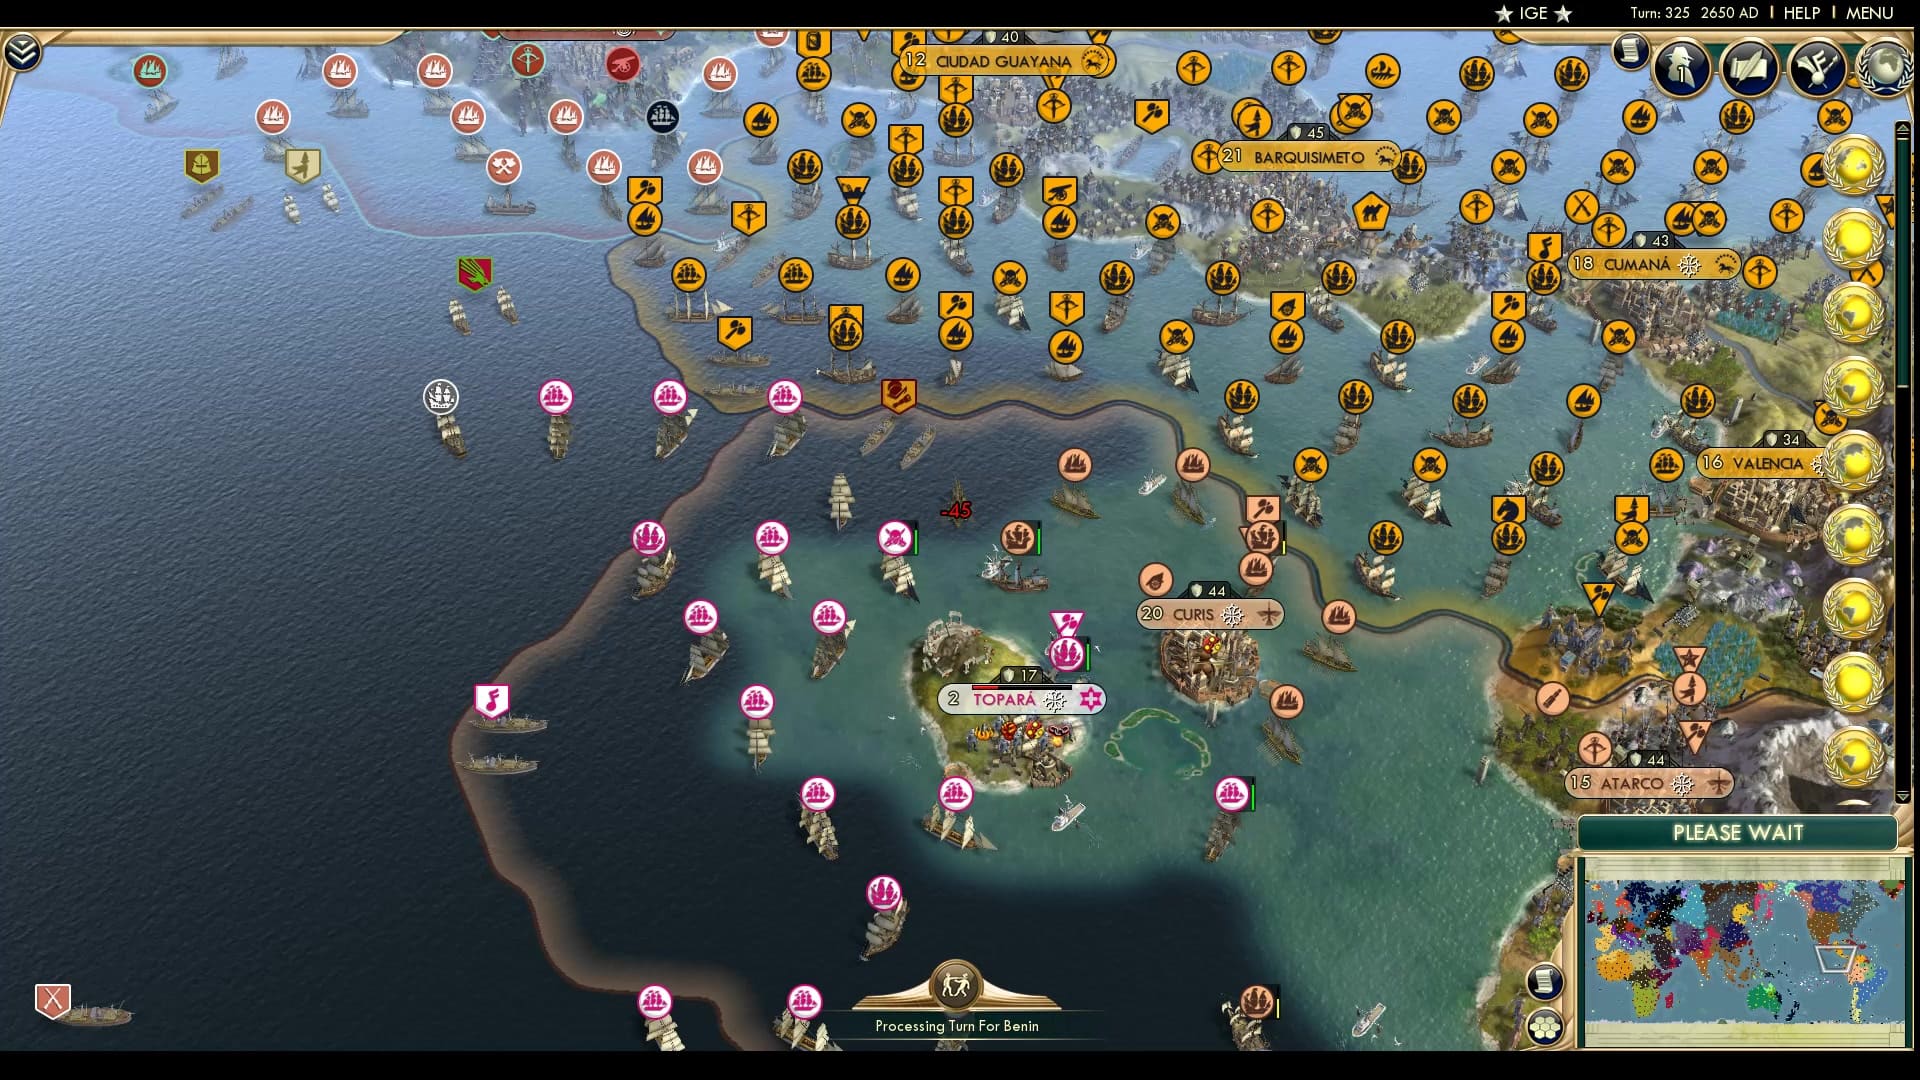
On the exact opposite note, get ready to be excited again as Tonga takes the first capture across the Pacific Ocean! Topara is taken from the Nazca and immediately razed by Siaosi. The nearby city of Curis, looks defended but not well enough to be safe. If Tonga doesn’t push on, they might have nothing to show from this war.
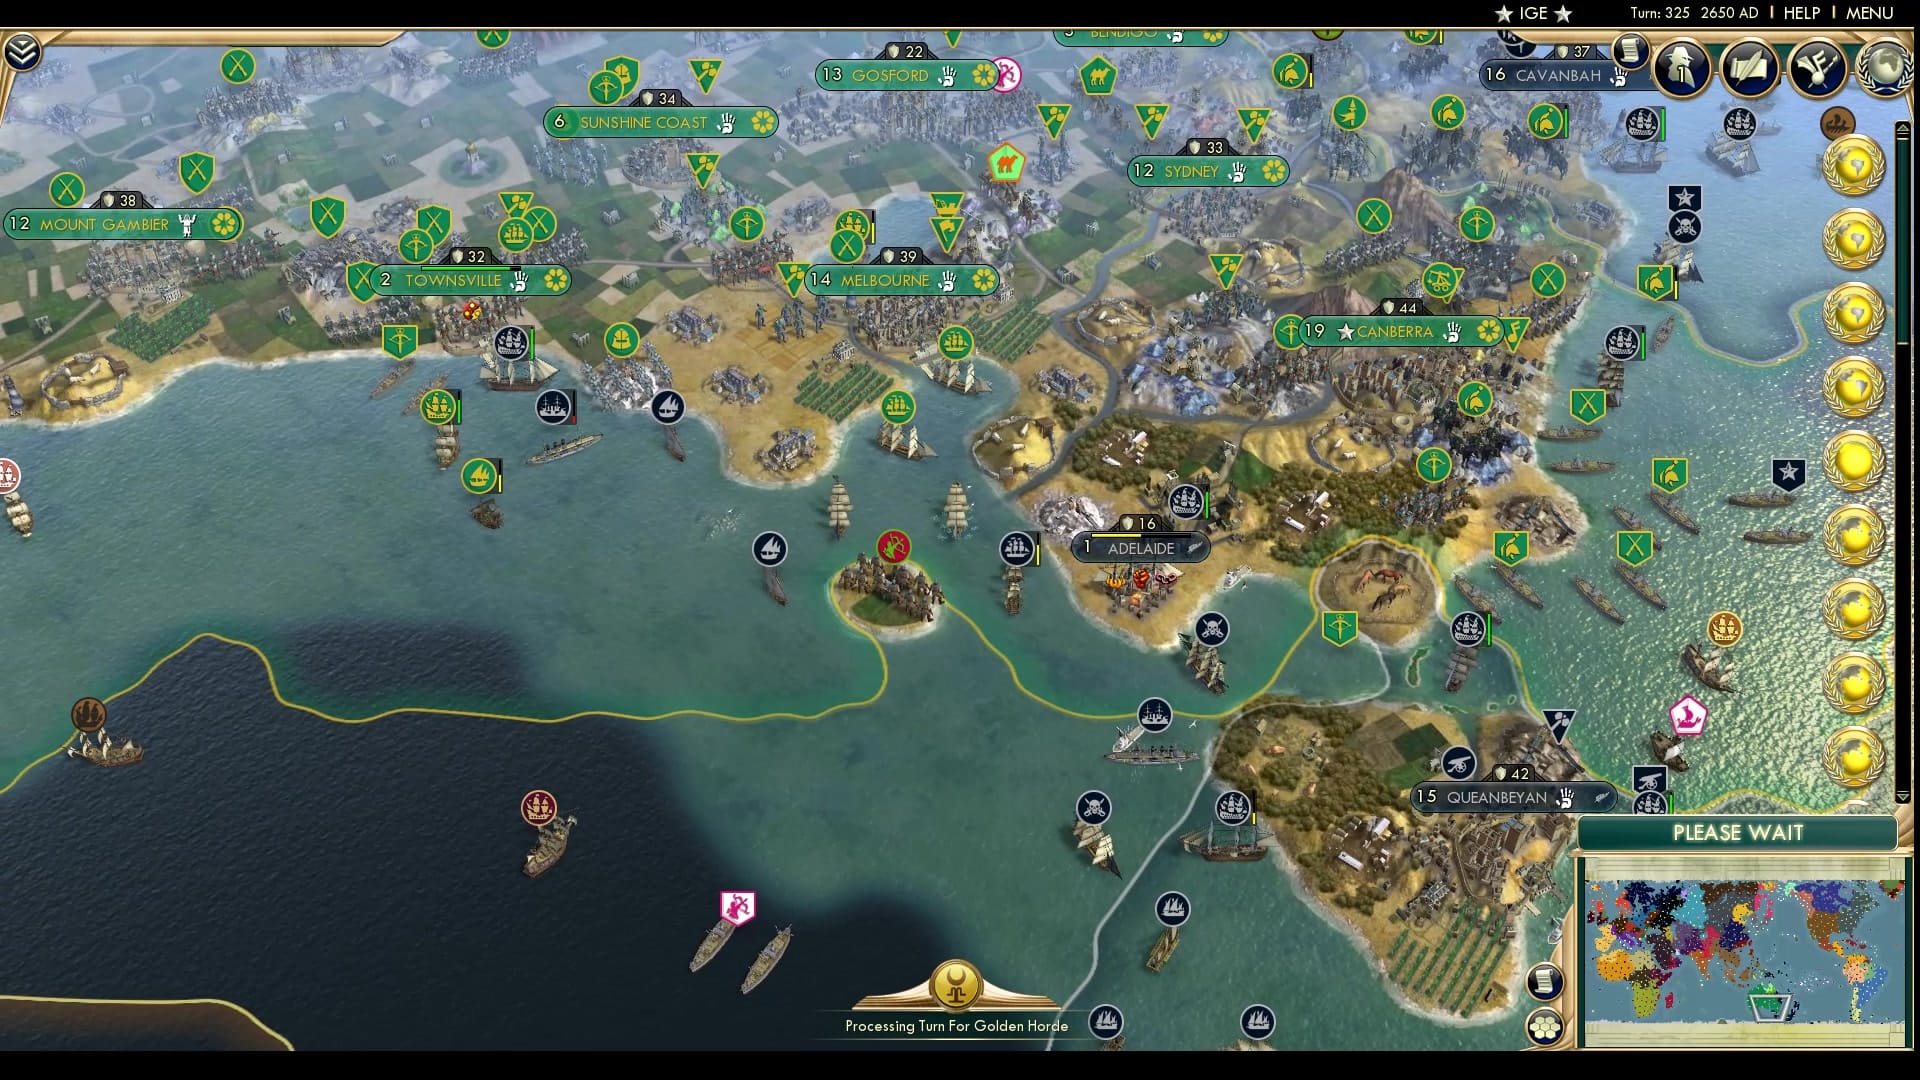
If you saw the Director’s cut last part (go donate on Patreon to get it earlier), you’d know that Adelaide seemed like it was going to burn down at the start of this part. This time, it looks more certain as those frigates and crossbowman won’t let Australia retake Adelaide. If New Zealand keeps it, it’ll be difficult for Canberra to be defended from a full land invasion.
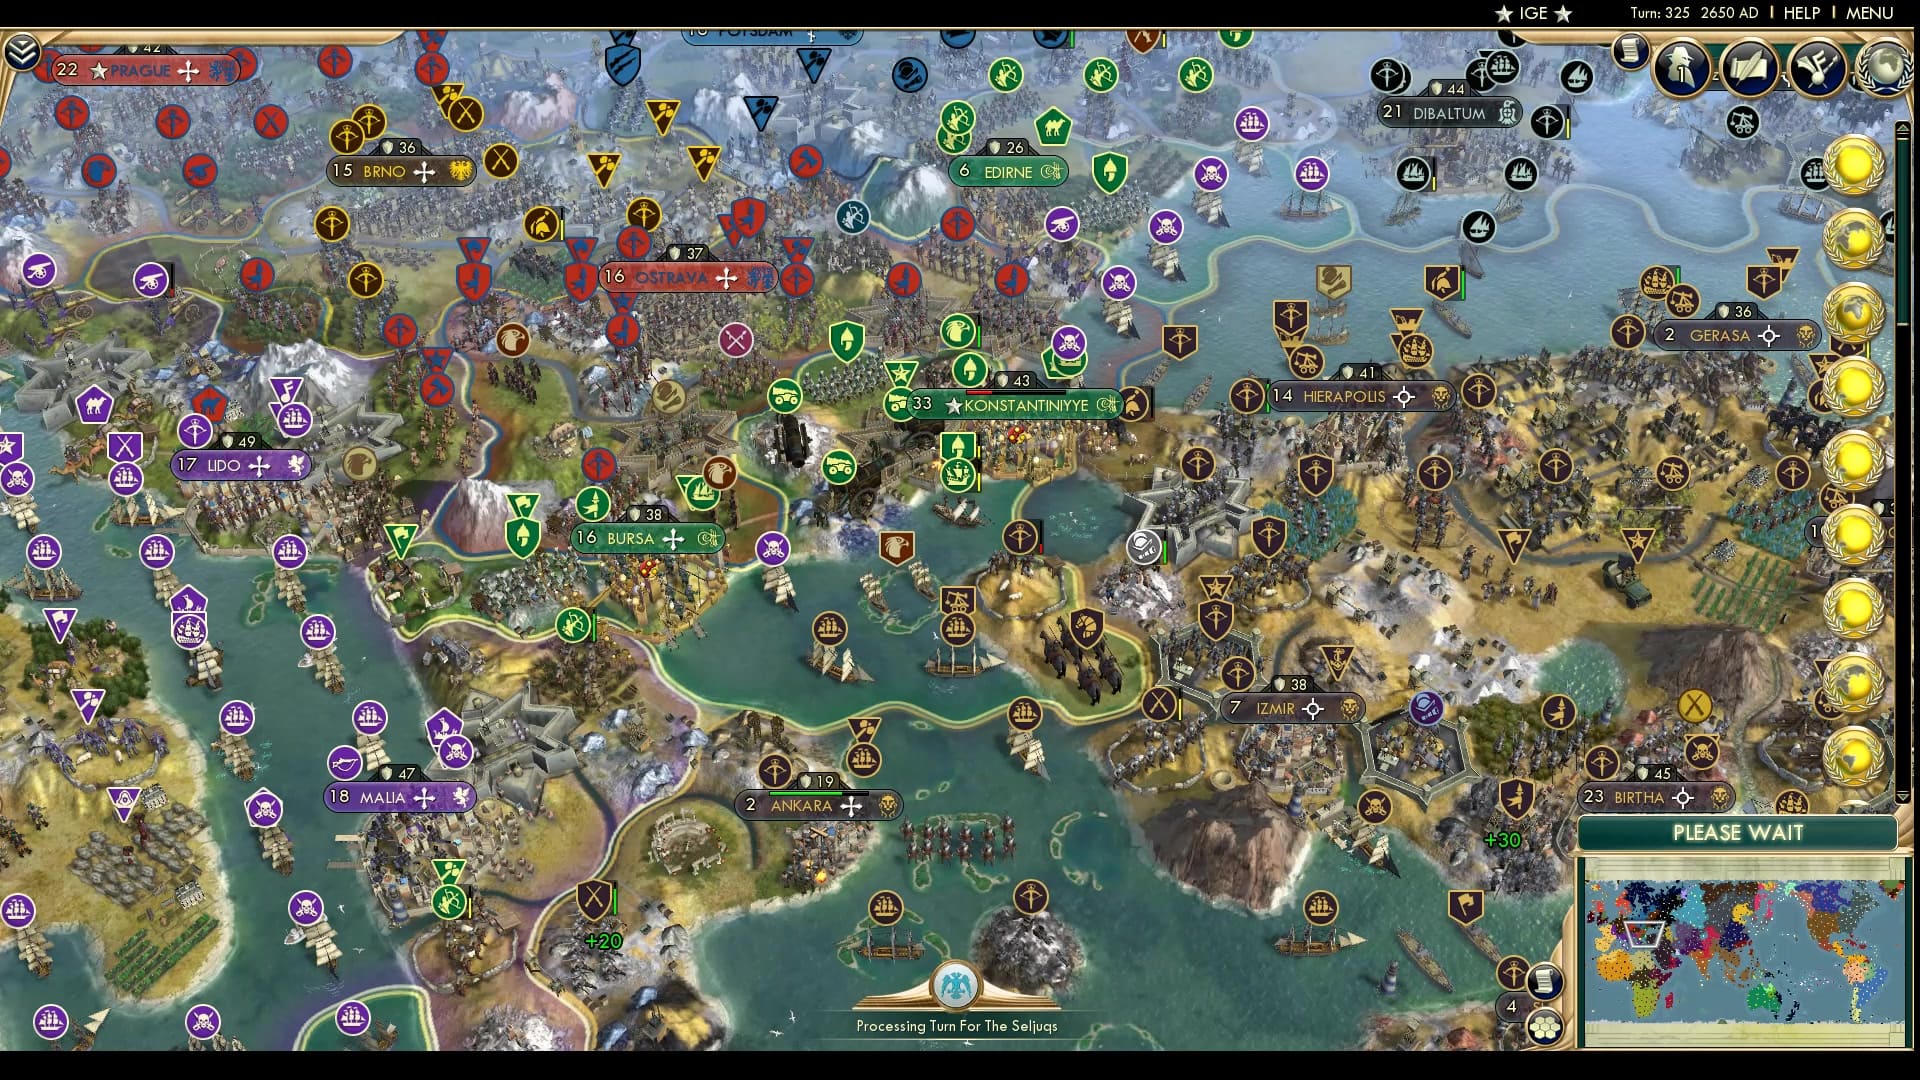
Konstantinyye falls to the red as the Palmyran forces continue pushing on the city. The entire Ottoman navy has been decimated, but Ottomans have ample melee units to retake the city. If Palmyra doesn’t replace that Curaisser in front when it dies, it might be hard to actually take the city.

The southern coast of Australia remains defended somehow. Despite the ridiculously sparse nature of the Australian carpet and the seemingly lackluster units around Adelaide, Hawke has somehow sent in enough units to save the Adelaidean residents from sure death.
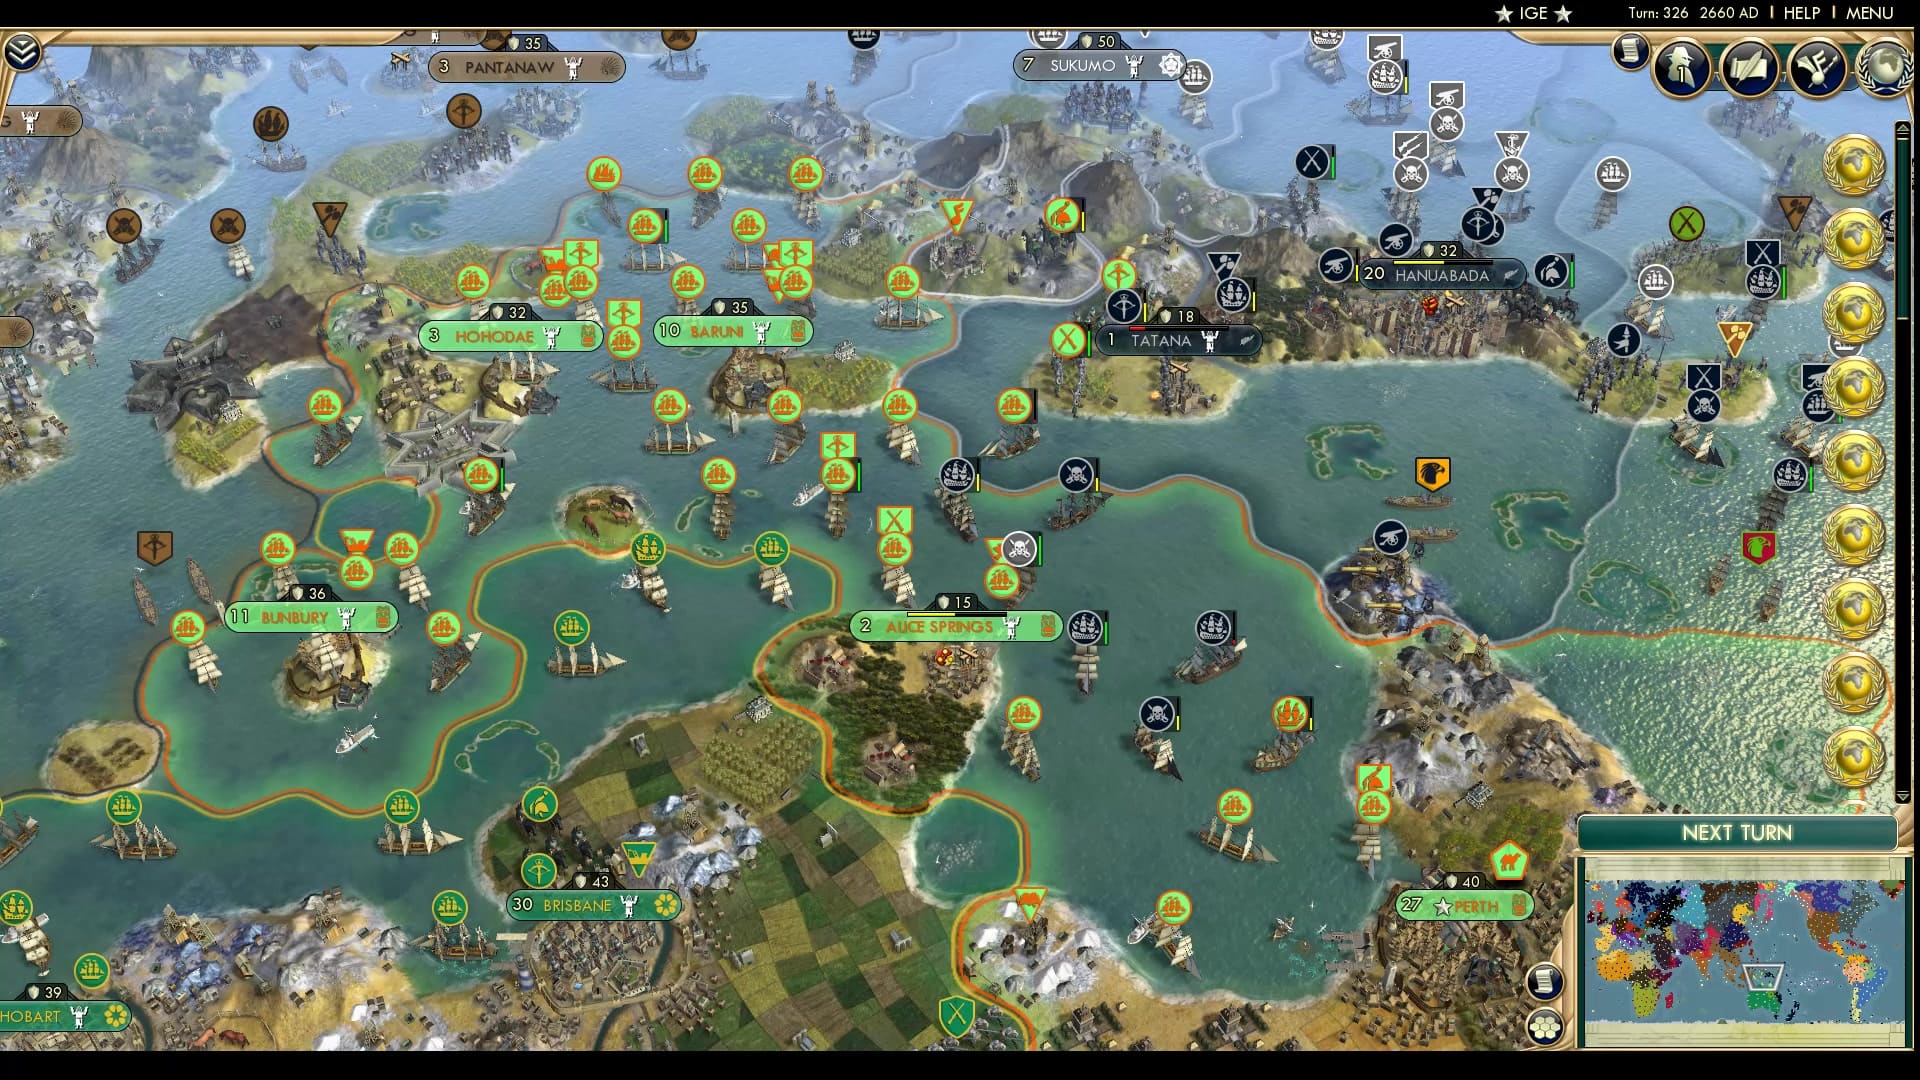
Seddon continues attacking the Australian continent from two sides and somehow seemingly being able to sustain it to some degree. As the New Zealanders move into attacking the now small town of Alice Springs, it seems like the Papuan navy would be able to push them back and keep New Zealand off the Northern Coast. To the north Rajapapua launches an offensive against Tatana with a high chance of taking it back, with little chance of keeping it.
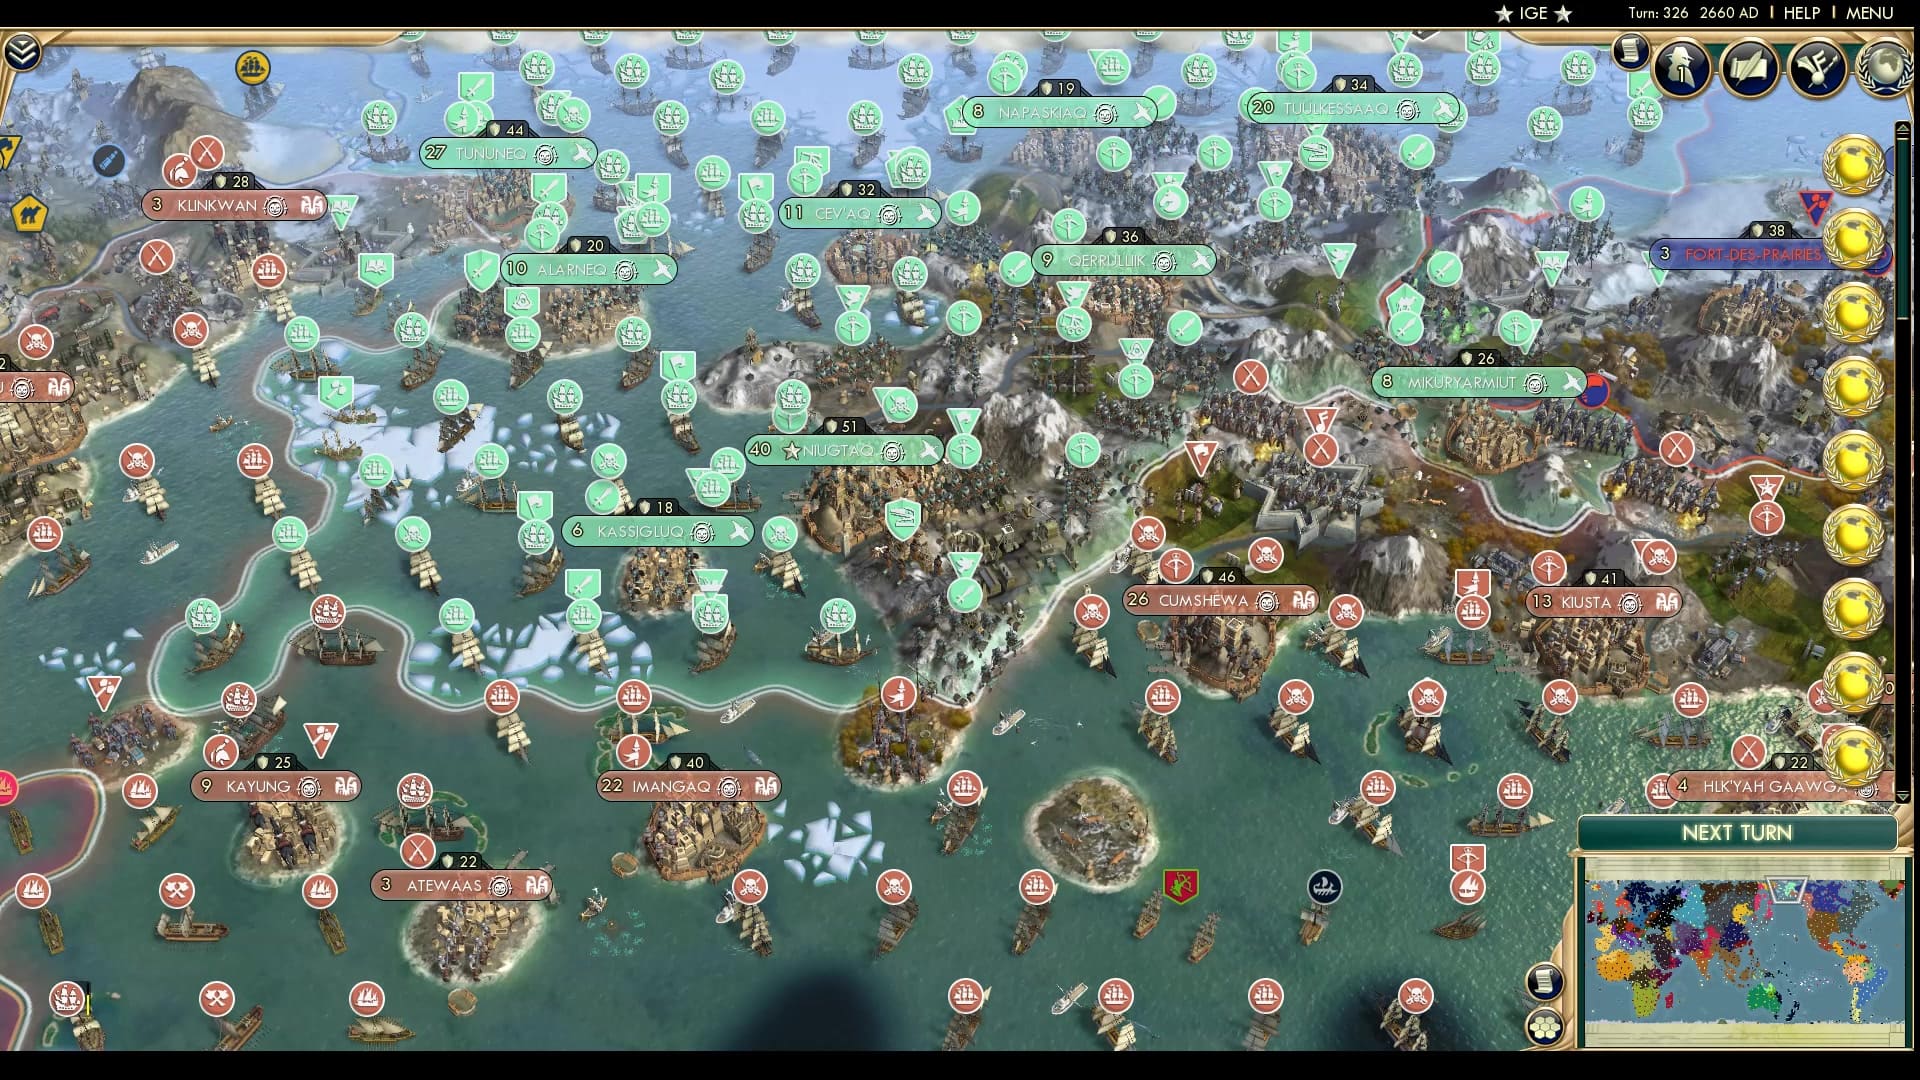
We see a rare glimpse of the Haida-Yupik front, where we see the Haida naval core blocking Yupik off but the Korean and Yupik sea borders blocking Haida from their Asian colonies.
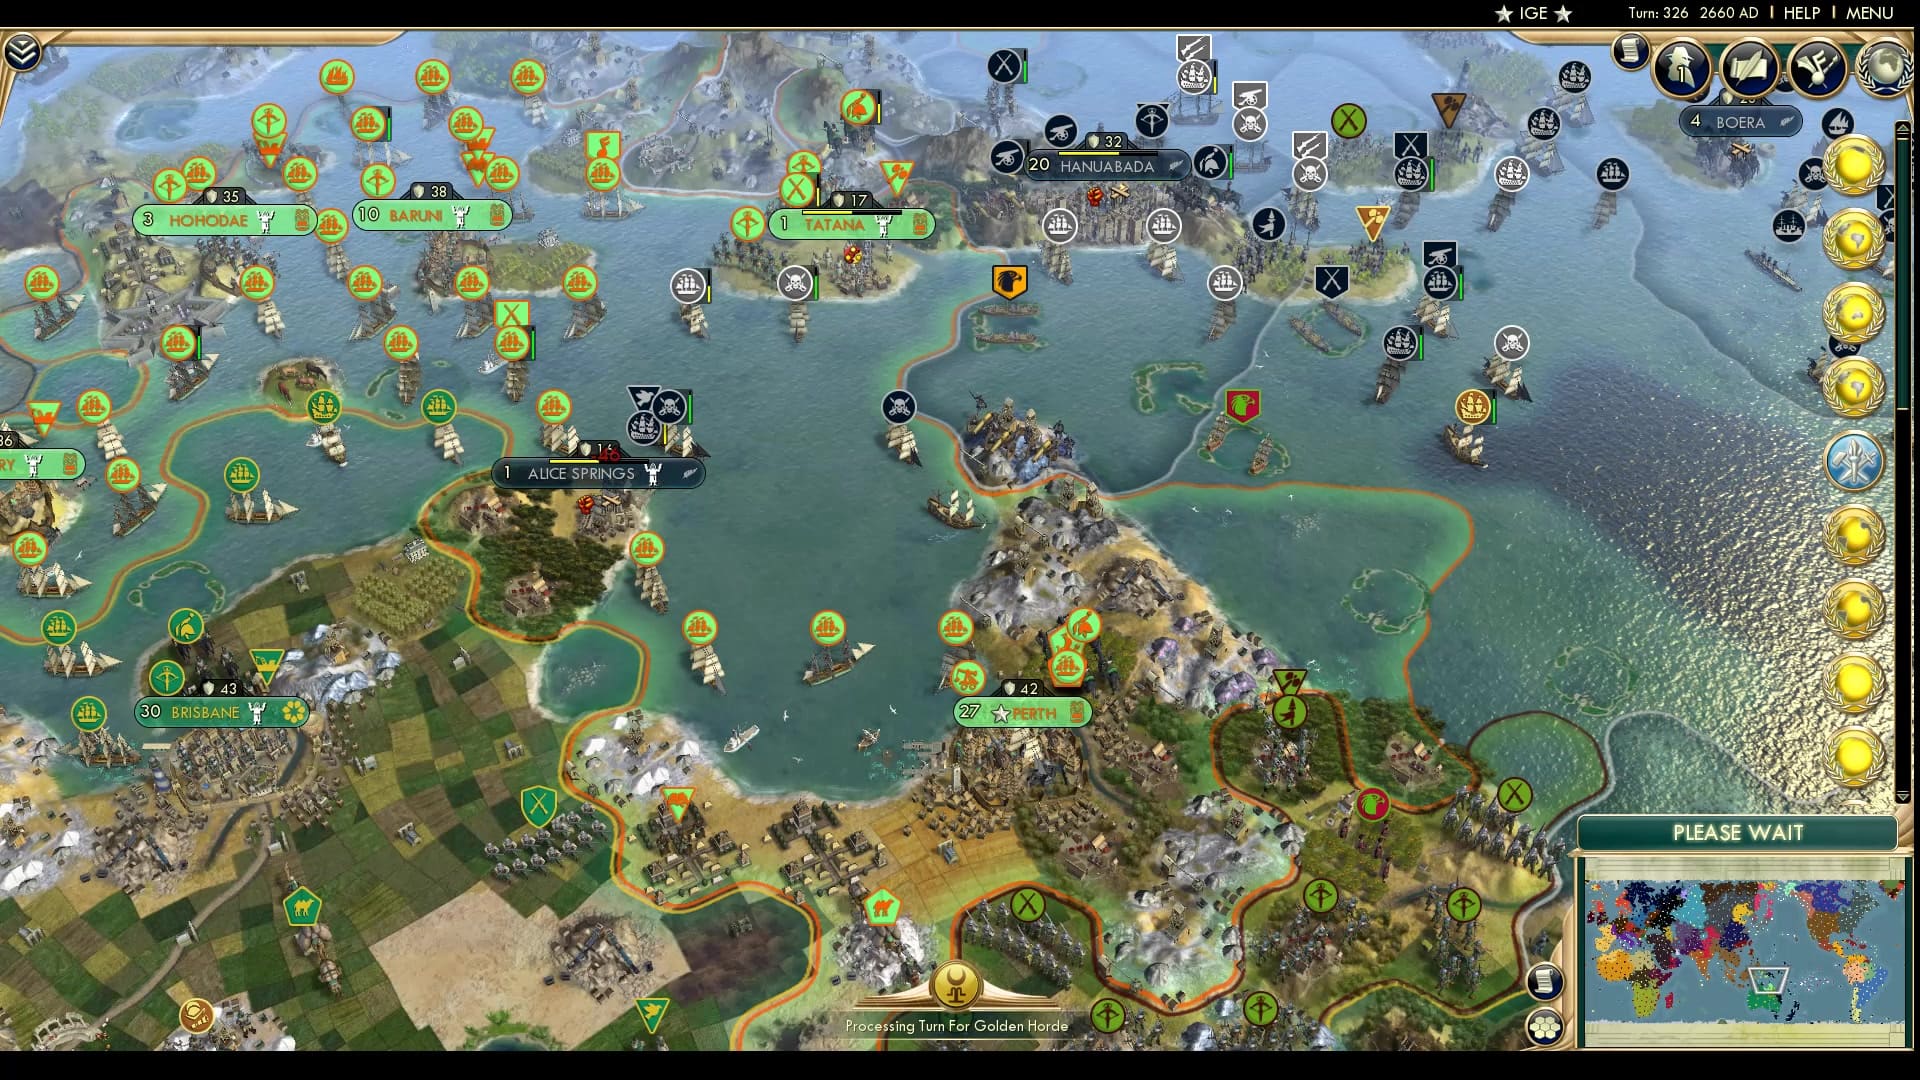
New Zealand’s navy disappears as they expend it all to take Alice Springs. Perhaps a smart move by Seddon as Papua has few melee units. Will that Musketman take it back? Papua also takes another small city back as Tatana flips. If New Zealand is able to materialise a navy as quickly as they do in some of these shots, they will be able to take things back.
In other news: Shikoku has open borders with New Zealand?
A Shikokuan and Korean ship attack each other at the base of what looks like a new Tongan settlement. It truly is Tonga Time. The Aztecs also look like they are already doing trans-Pacific trade in the Industrial era, good for them.
In other news: Sami peace with the HRE, not that it mattered much.
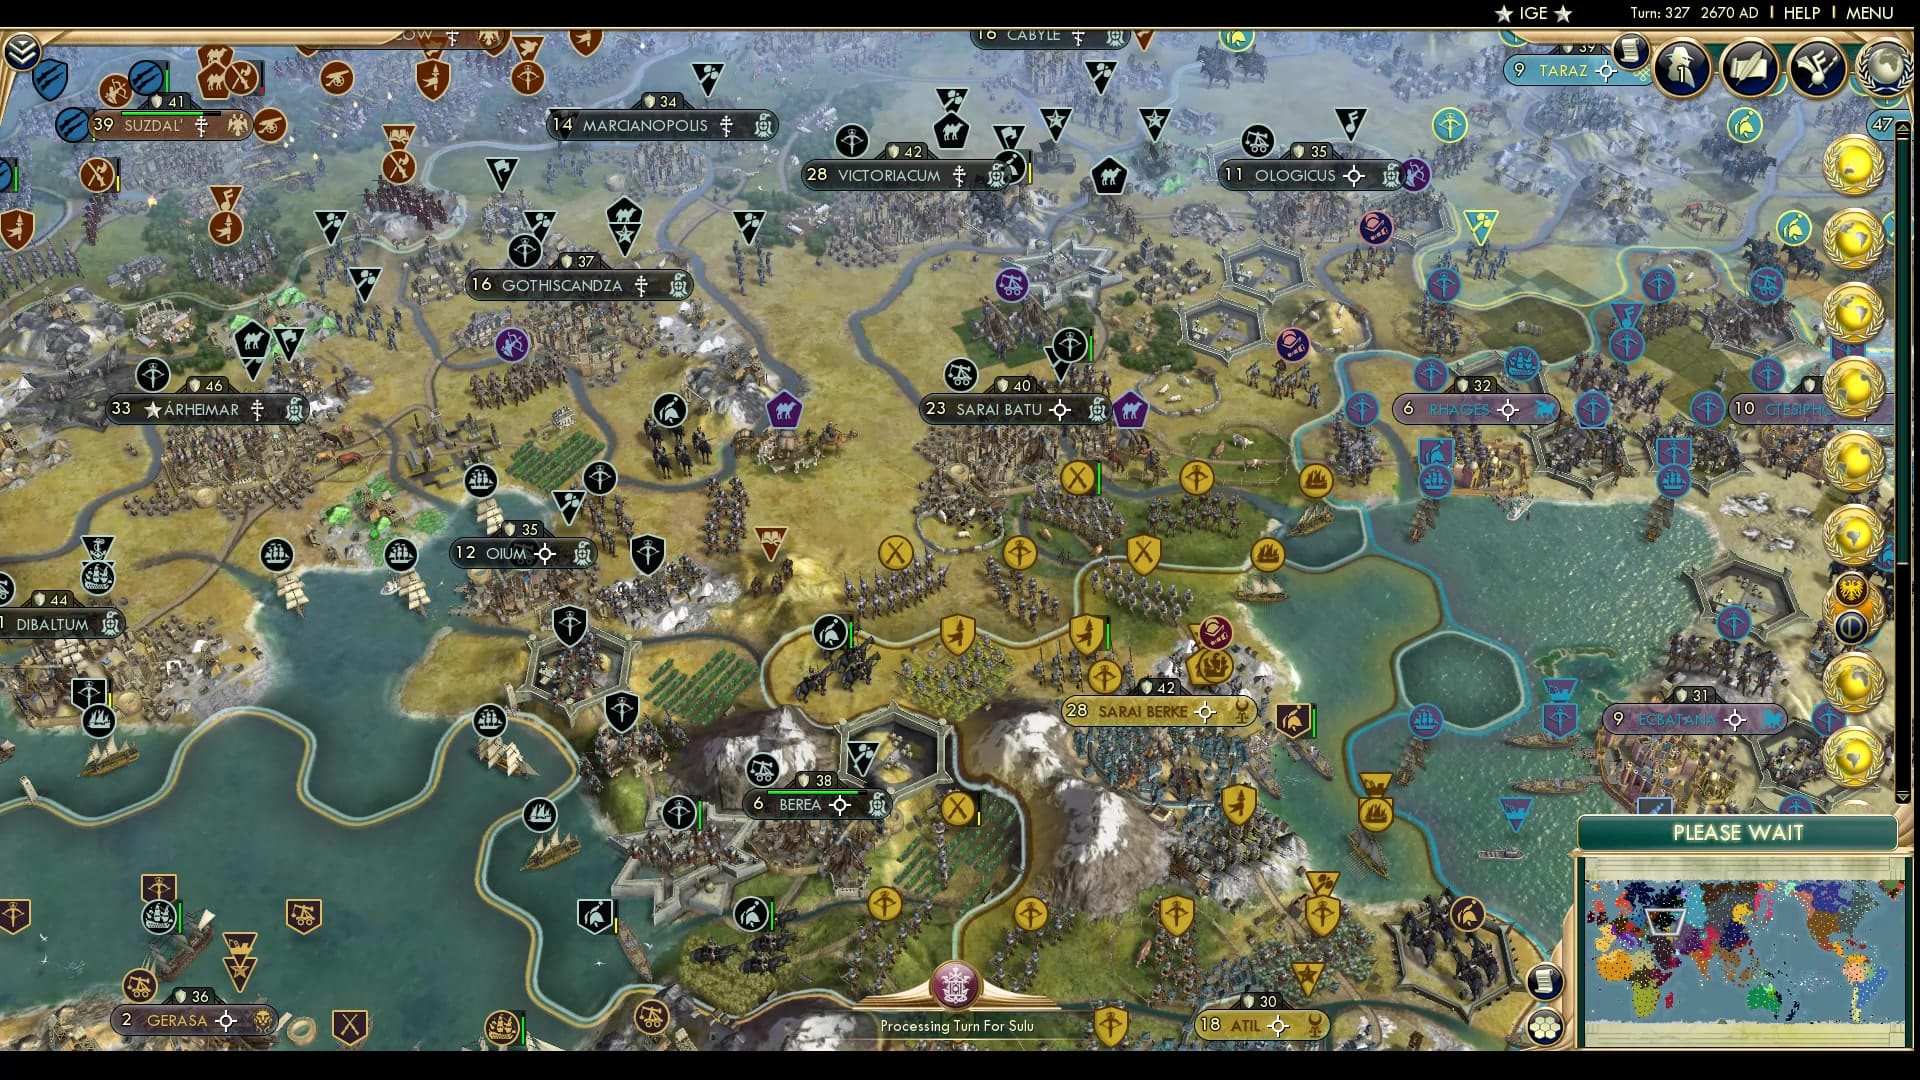
As the Goths were preoccupied defending their northern lands from Eadni, their attack on the Golden Horde has definitely backfired as the Golden Horde manages to mobilise towards Gothic cities. Berea is attacked from the side without the citadel and Sarai Batu is threatened with even more units.

Palmyra takes a capital city, making it their second capital capture in this war, a first for the Cylinder if I’m not terribly mistaken. The Ottoman capital is pushed into the tiny citadeled city of Bursa with two settlers remaining. However, the presence of melee units near Konstantiniyye make it highly likely to see another flip flop.
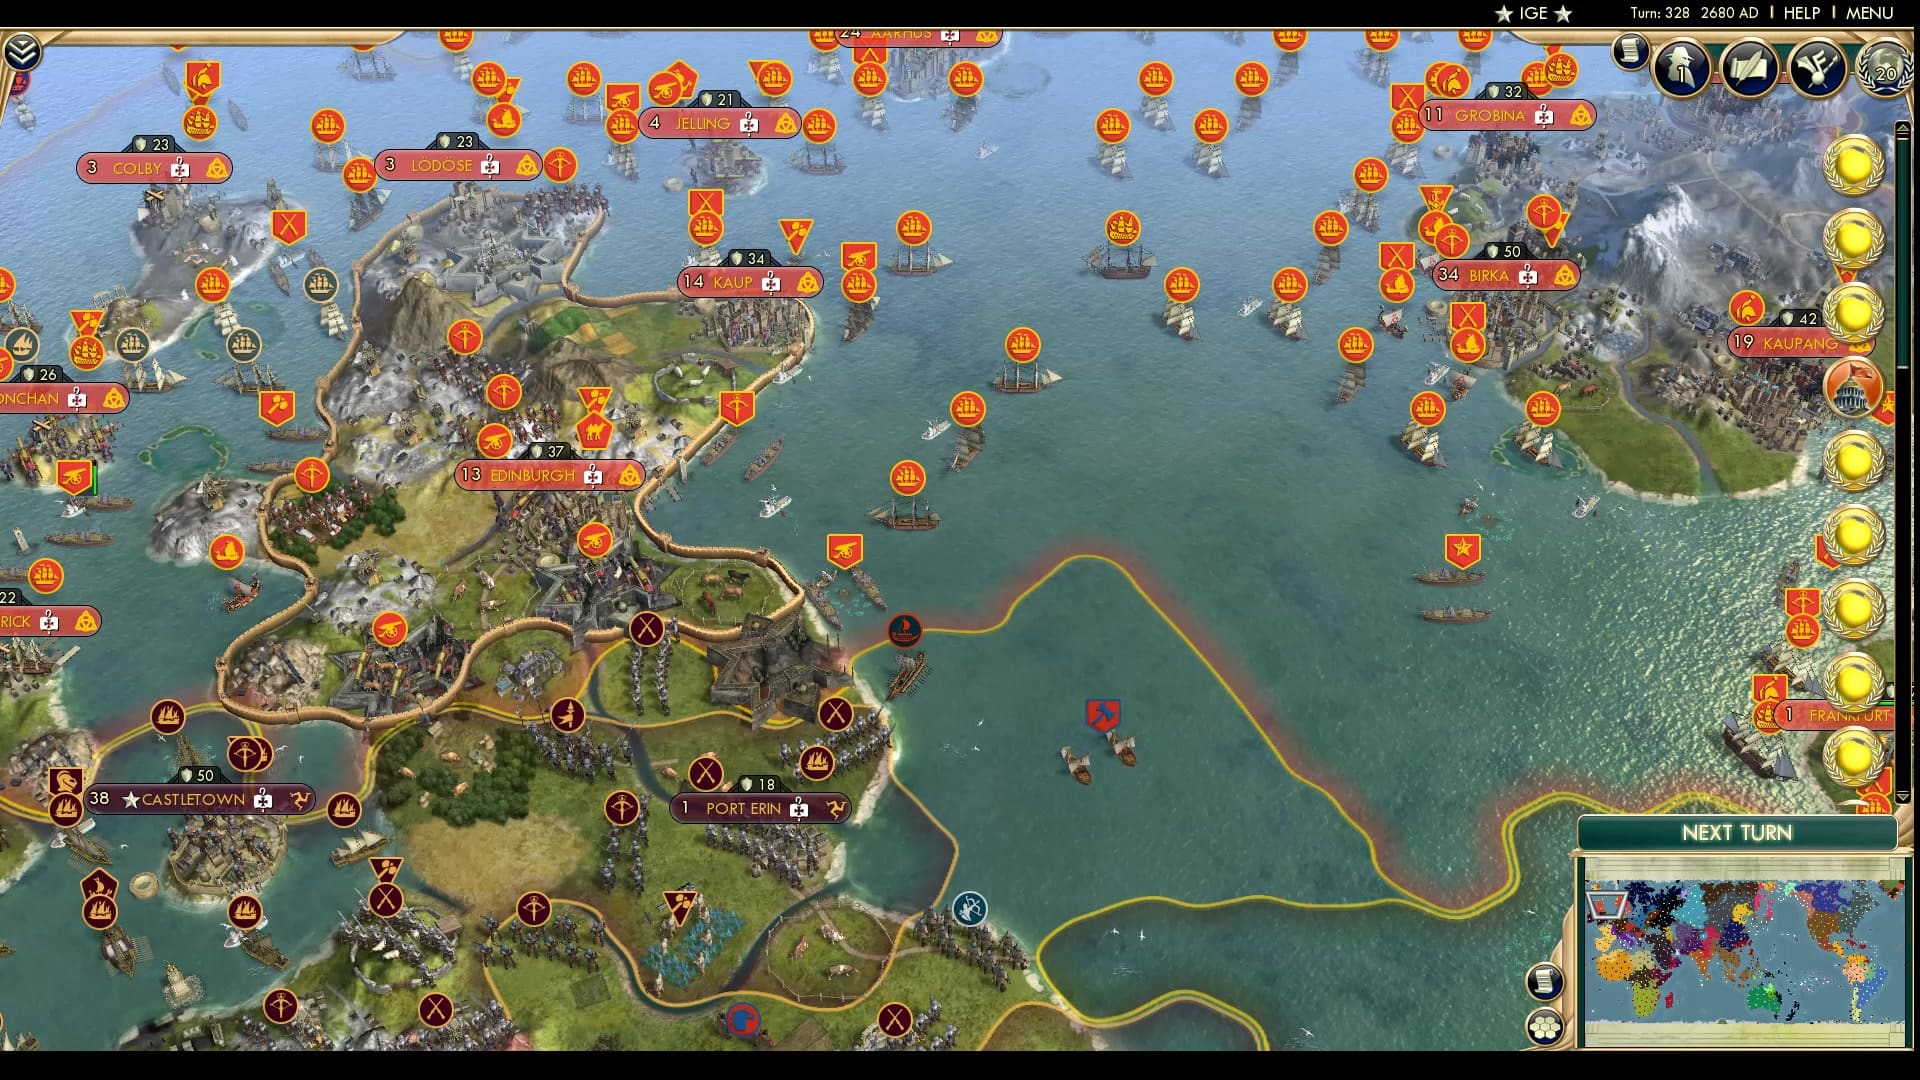
This is what happens when you burn all the gains you get in a war: the Manx resettle the lands of Glasgow with the city of Port Erin, another city destroyed in recent conflict. To the side, we see that Frankfurt has been totally secured, or so it seems.
Here we see the great Selknam nation’s colder frontiers in the ocean. Their core looks decent and their ships look okay, but they are menaced by the Uruguay to the north. They seem to be on great terms though as a lot of Uruguayan units spill into Selknam lands, with no space left within Uruguay to use.
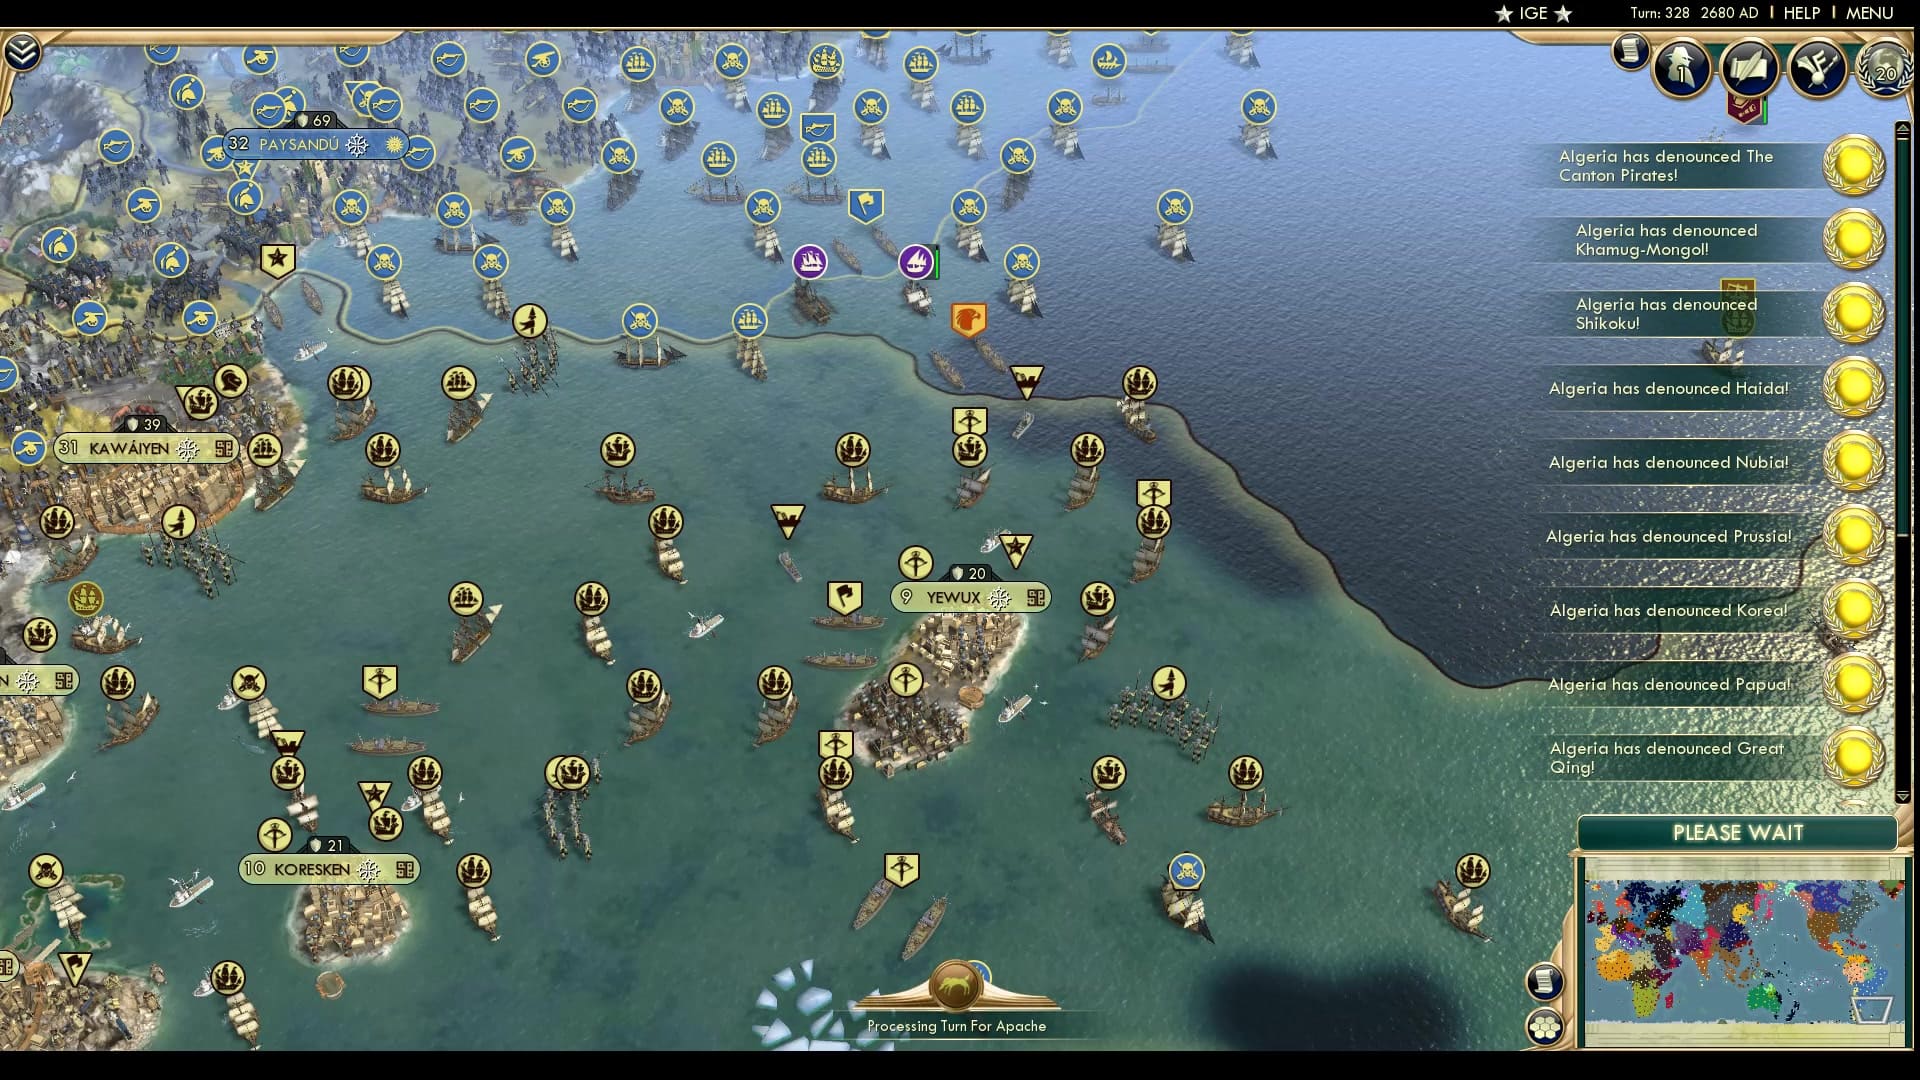
In other news: Algeria denounces a lot of people.
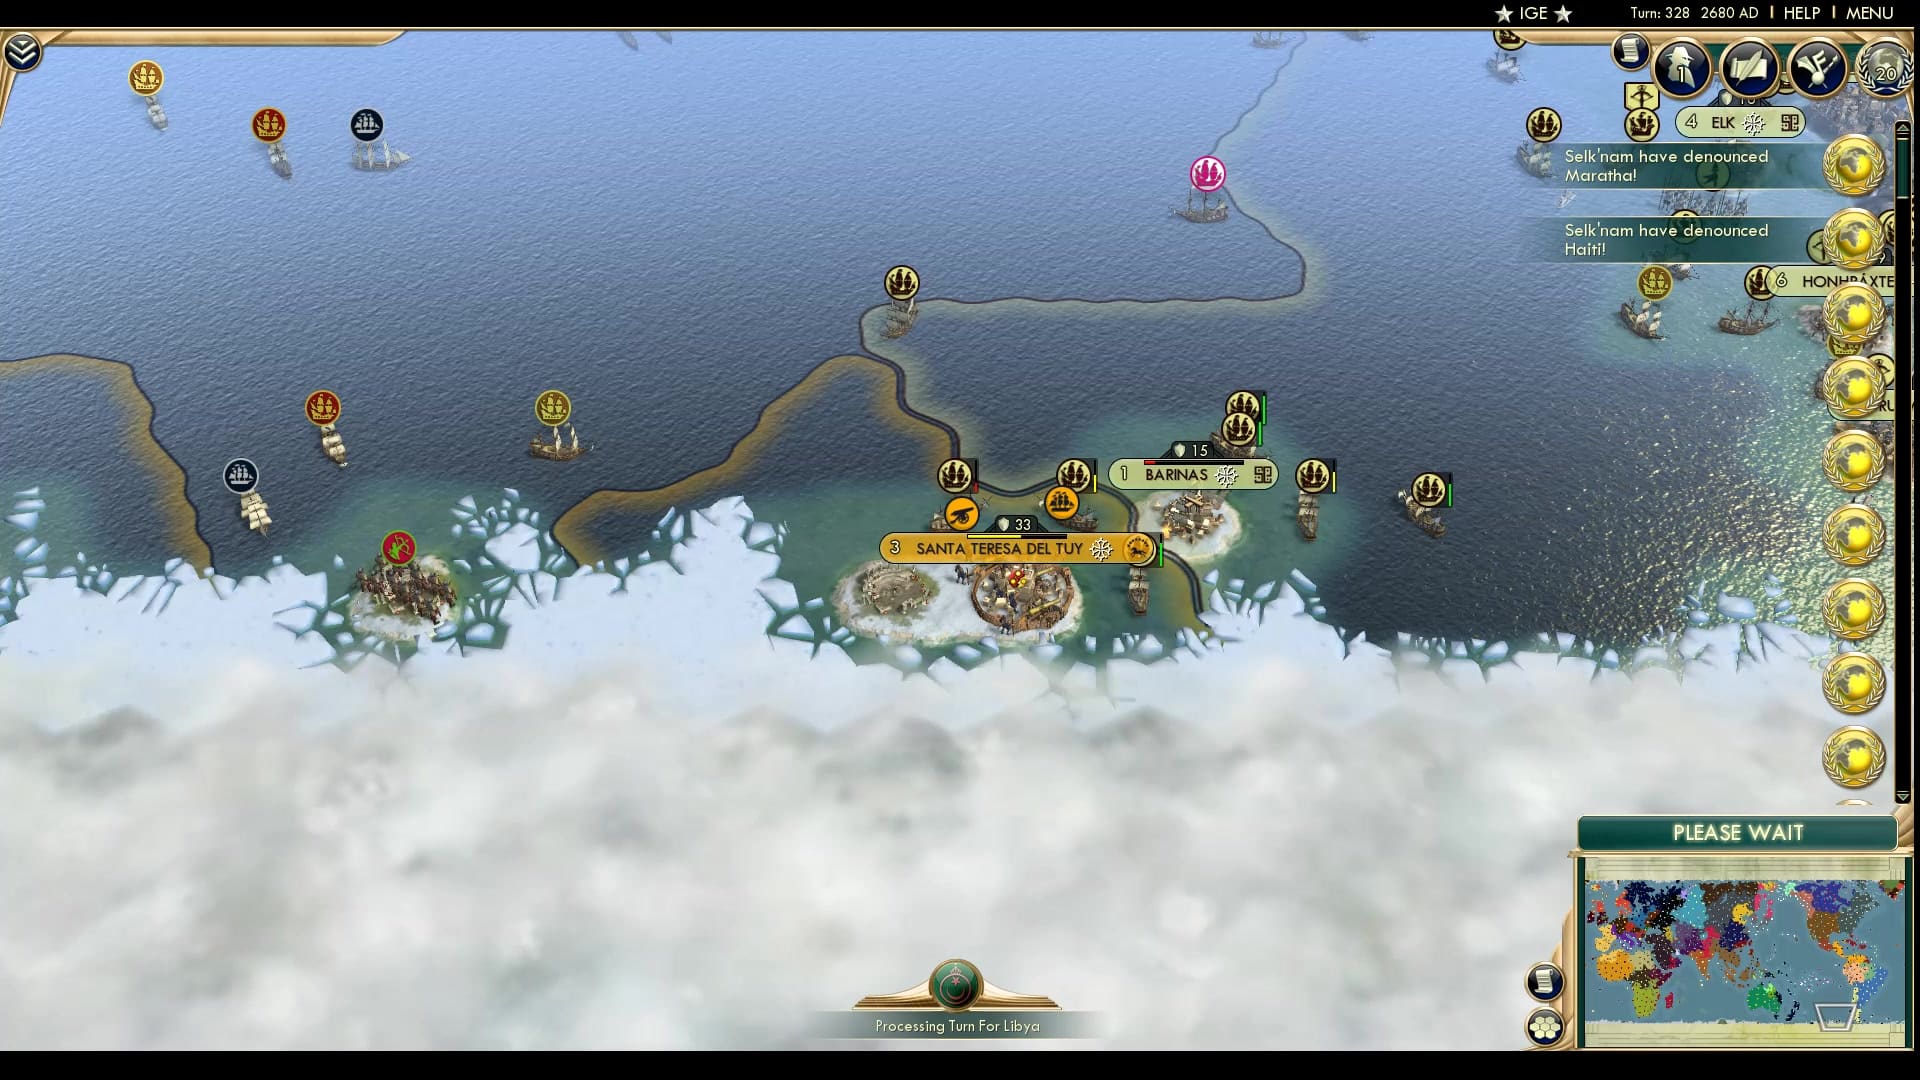
Selknam takes the unfortunate Venezuelan colony of Barinas in an Antarctic battle and look posed to also take Santa Teresa Del Tuy. Venezuela has no way to get these cities back, unless there’s a large force hiding off-screen to the left.
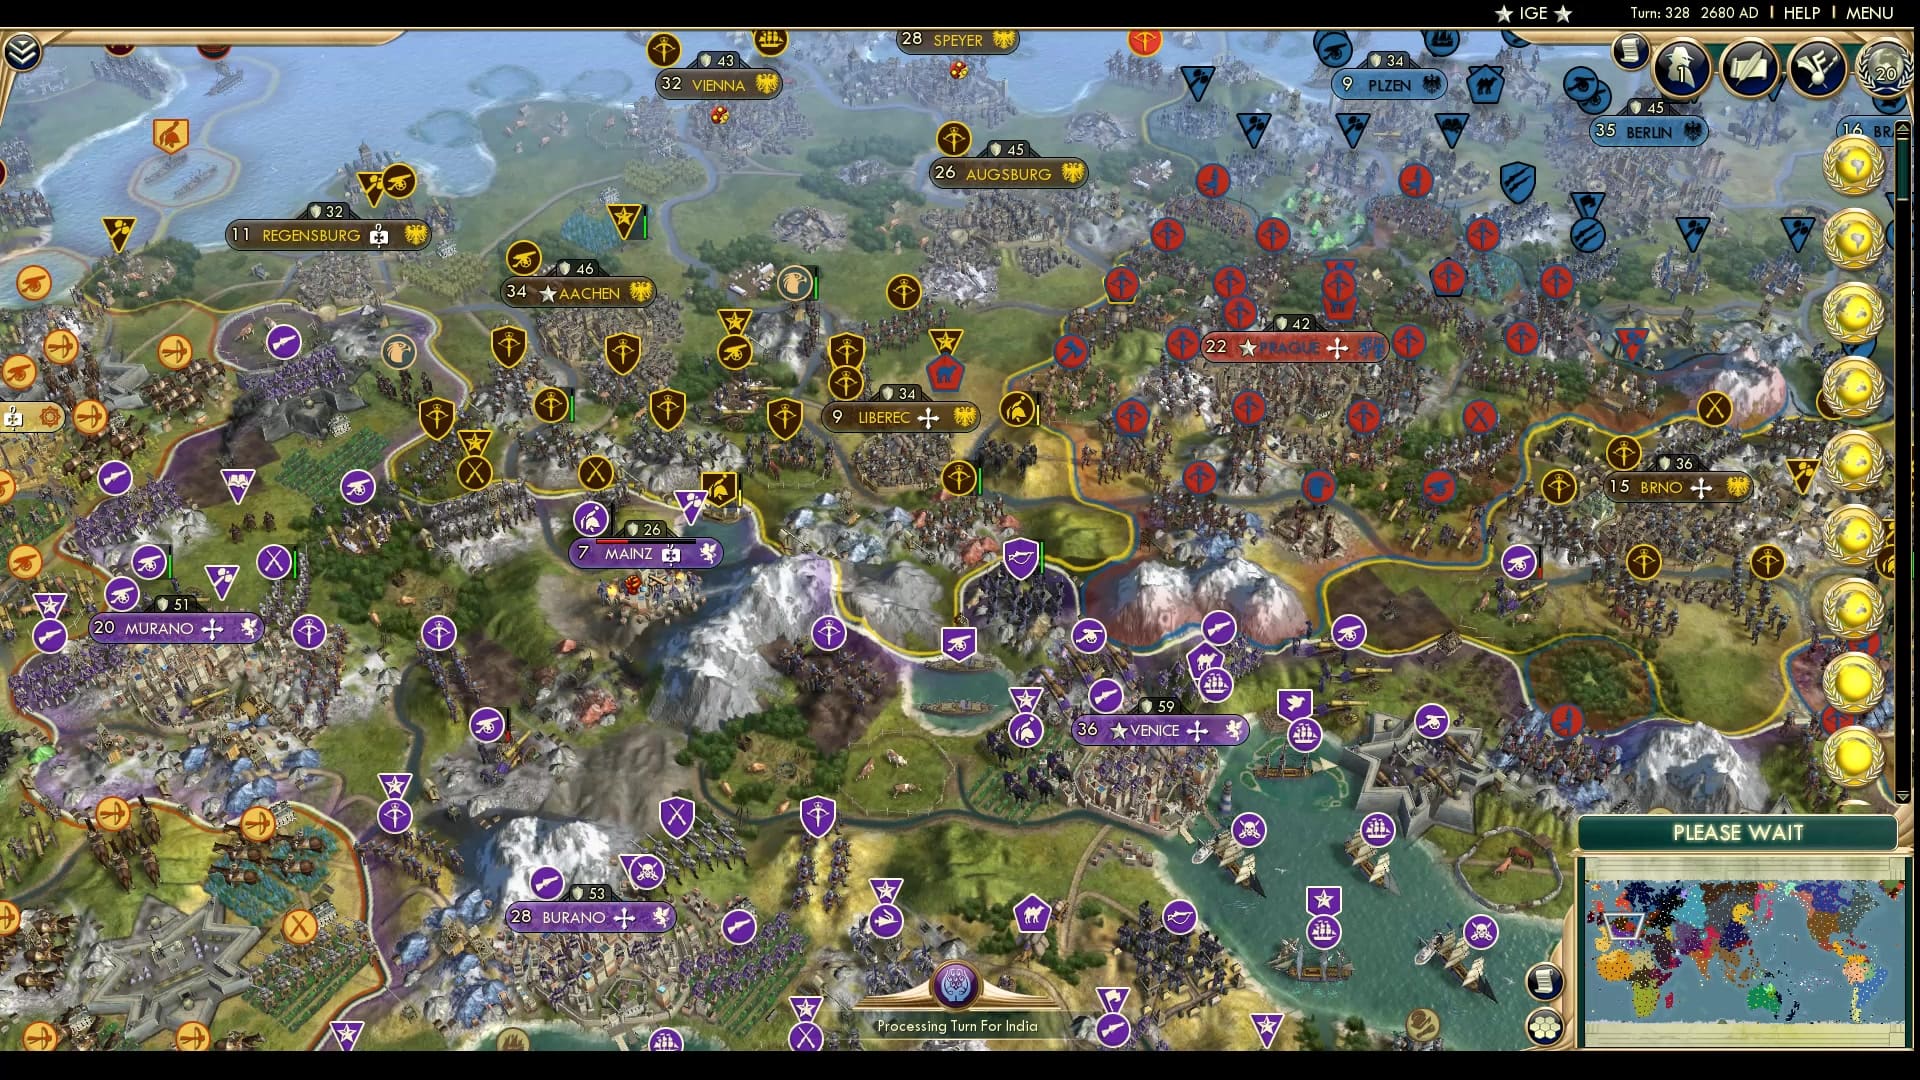
Venice takes the city of Mainz in the Alps. It looks temporary; the Venetian forces have thinned and the HRE troops look strong. Nonetheless the Holy Roman Empire is looking more like a Holy Roman Sandwich as they start getting attacked from both sides. It’s hard to see but Denmark remains Viking.
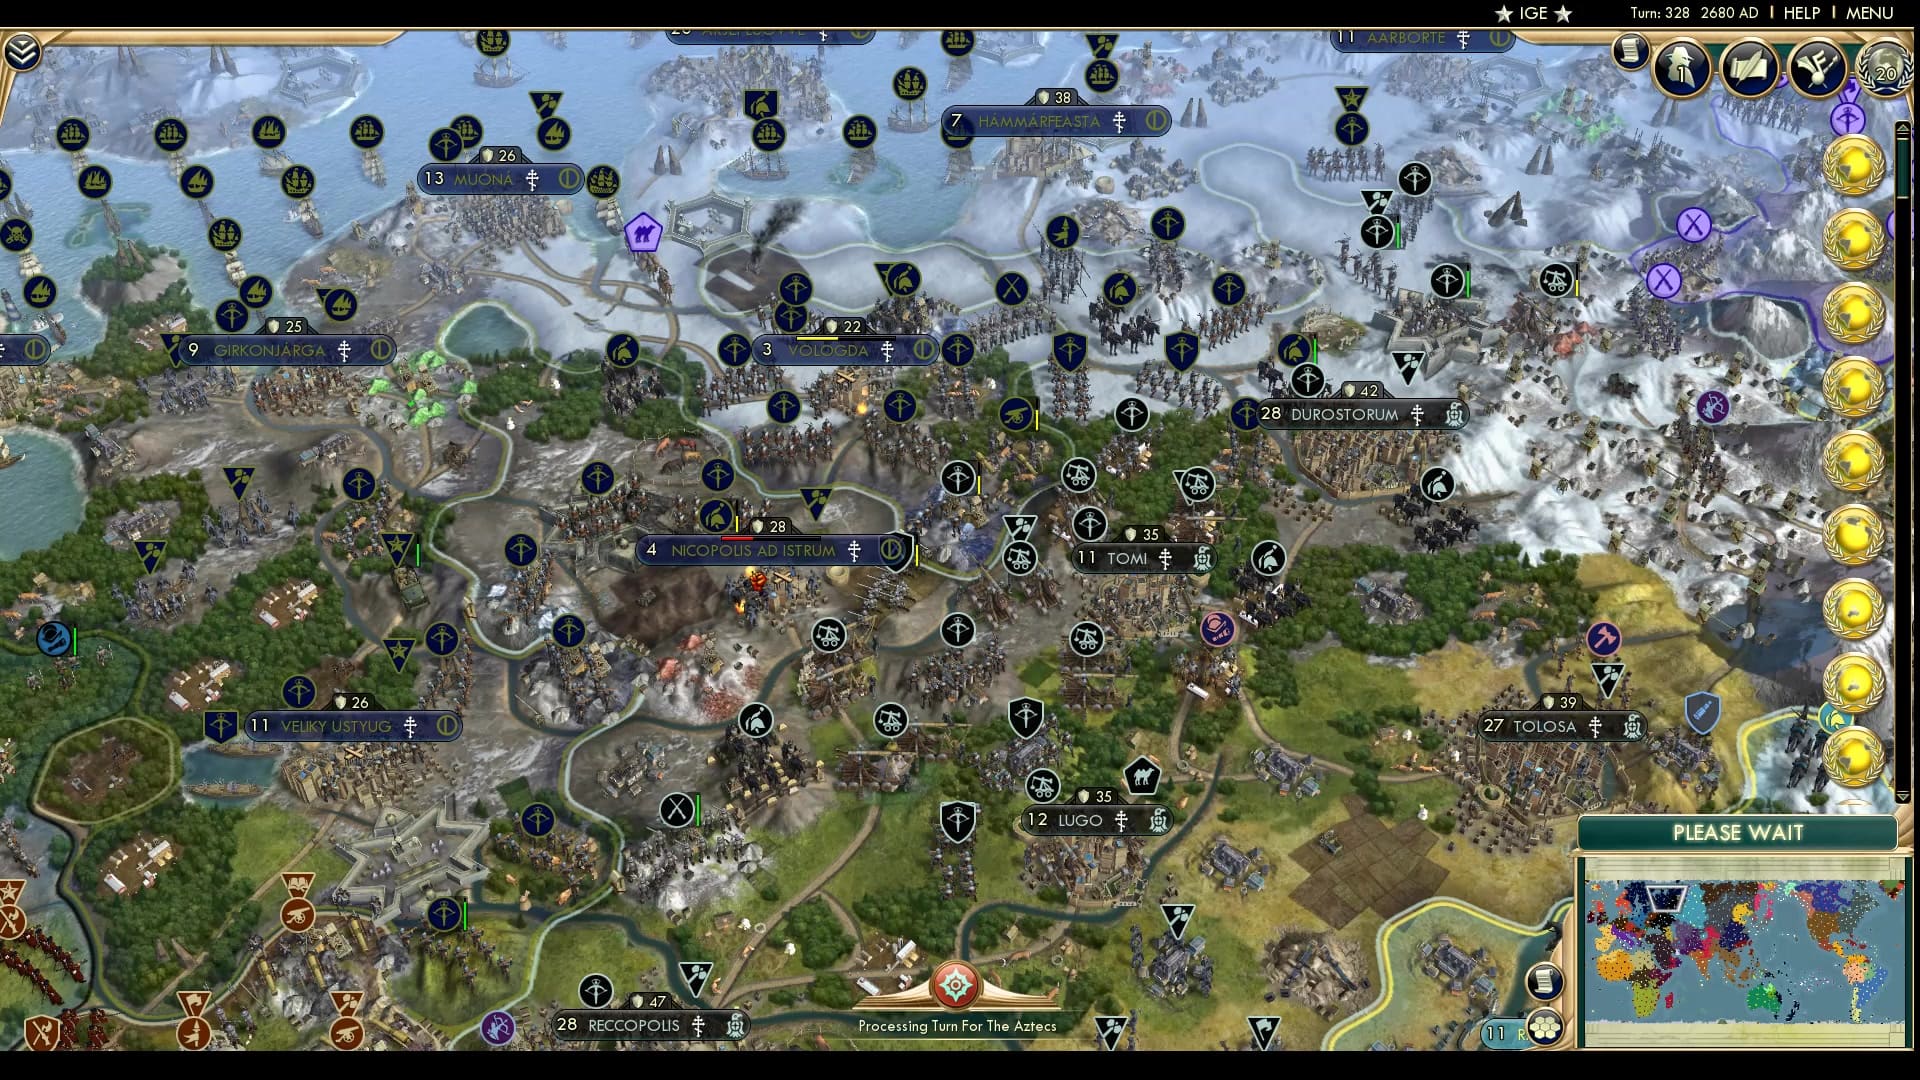
Nicopolis ad Istrum falls to Sami hands and their initial war of this part gives them a gain, if you don’t count the razed cities to the east. Still, a gain is a gain and both sides look even, but we know that the Goths are being pushed from the South by the Golden Horde and that the Sami have a better core to supply their production with.
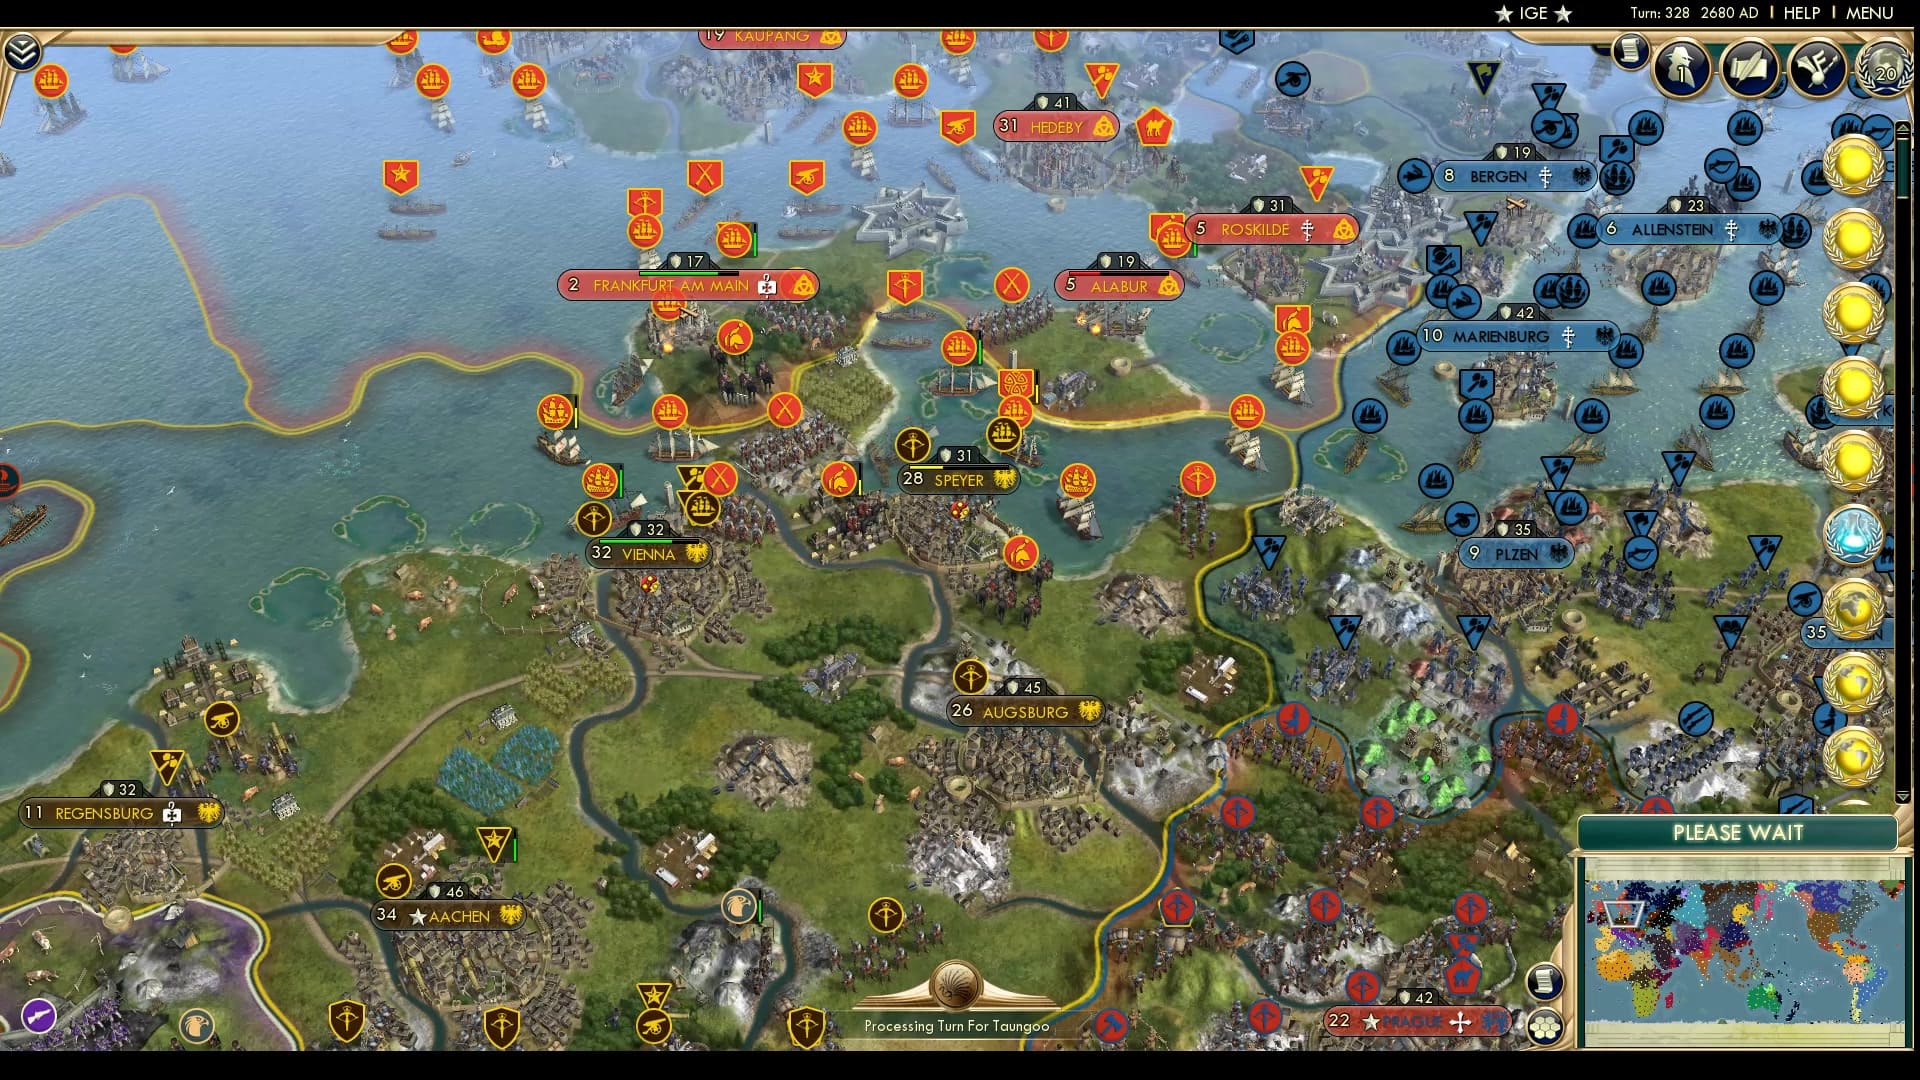
The Viking forces move past the meat grinder of Denmark and move towards the large HRE core cities of Vienna and Speyer. The HRE core looks very sparse and whoever gets elected soon will have a hard time taking the cities back. It’ll also be quite a blow to the HRE core.
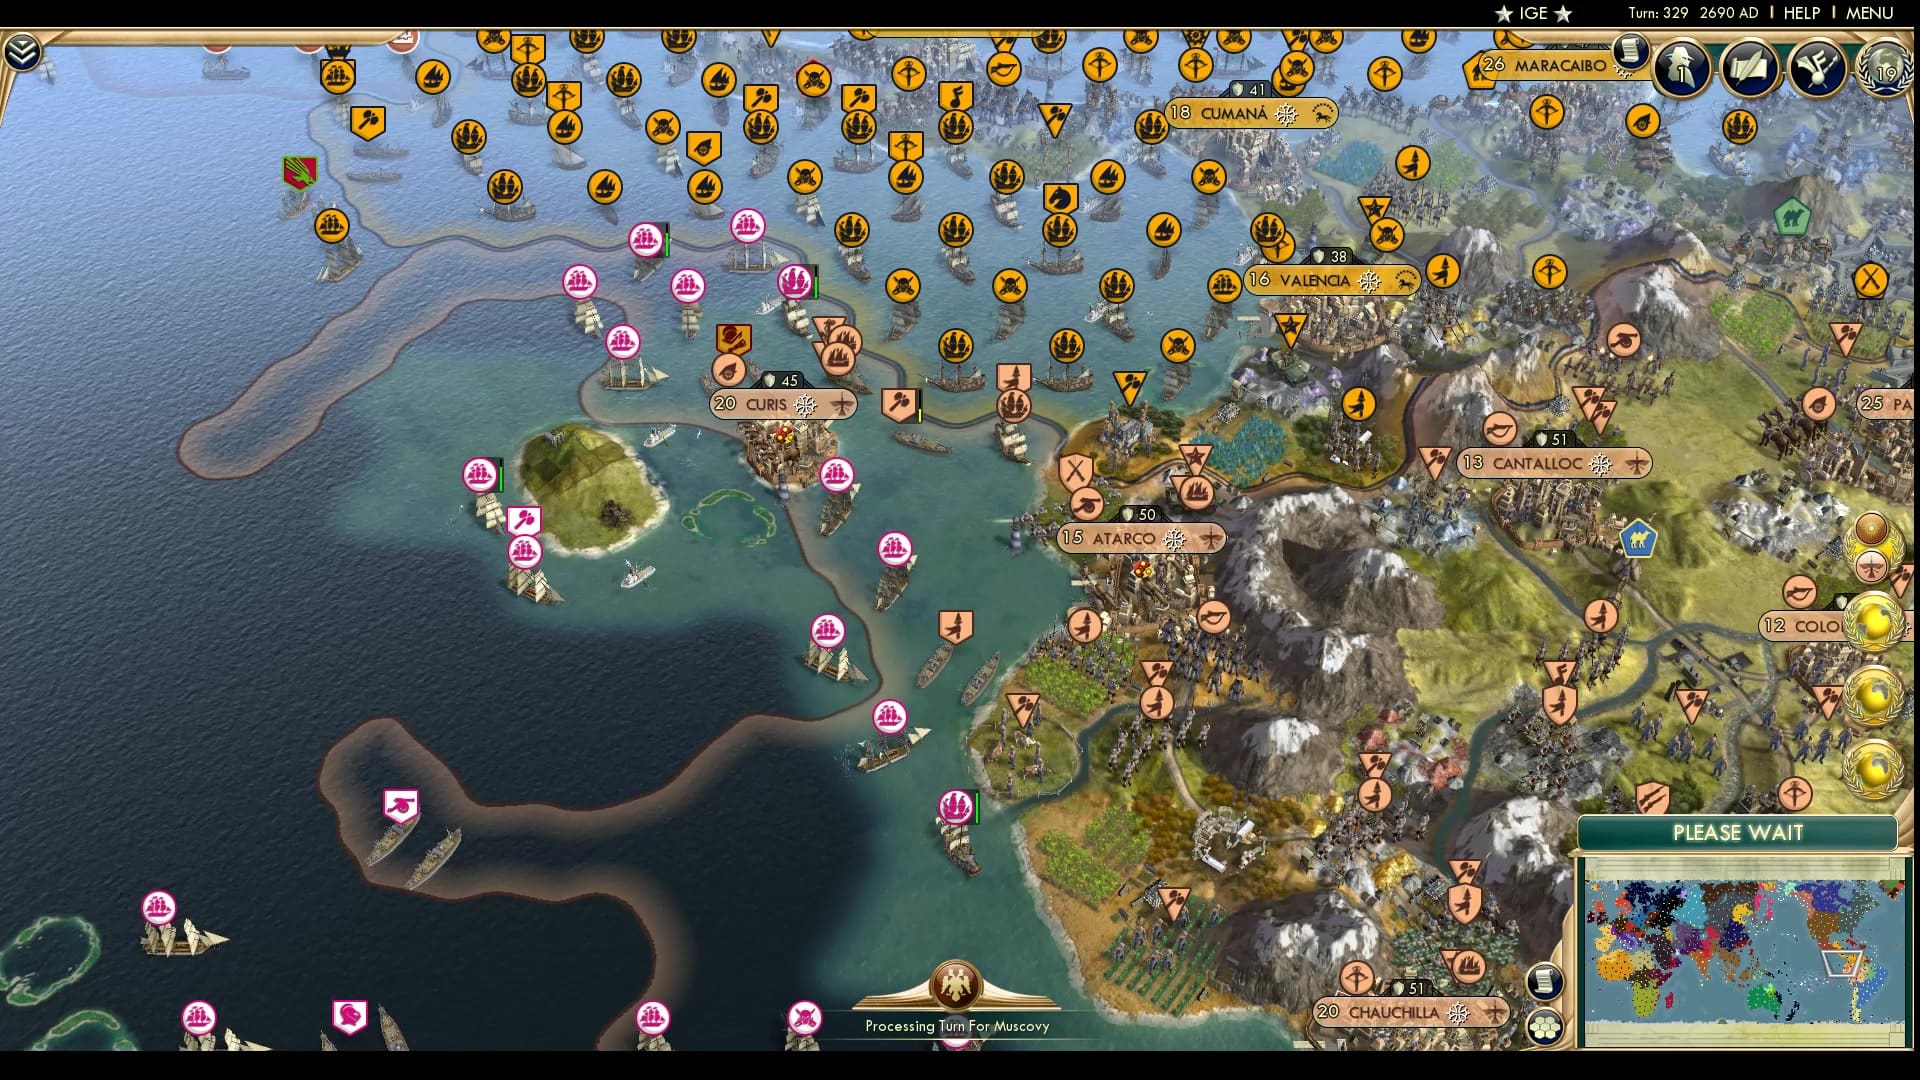
After the great Tonga Time of burning trans-pacific gains, Tonga moves their navy into two directions seemingly trying to attack Venezuela, even though they are just at war with the Nazca? Curis seems like it’s heavily in danger if only if Siaosi was competent for just a while longer.

Venice loses Mainz but the city has been destroyed through and through. Its defences seem like they will be breached very soon but it doesn’t look like Venice will be able to keep it after they shove that Lancer through. HRE has too many units there, perhaps too many given the threat to the north.
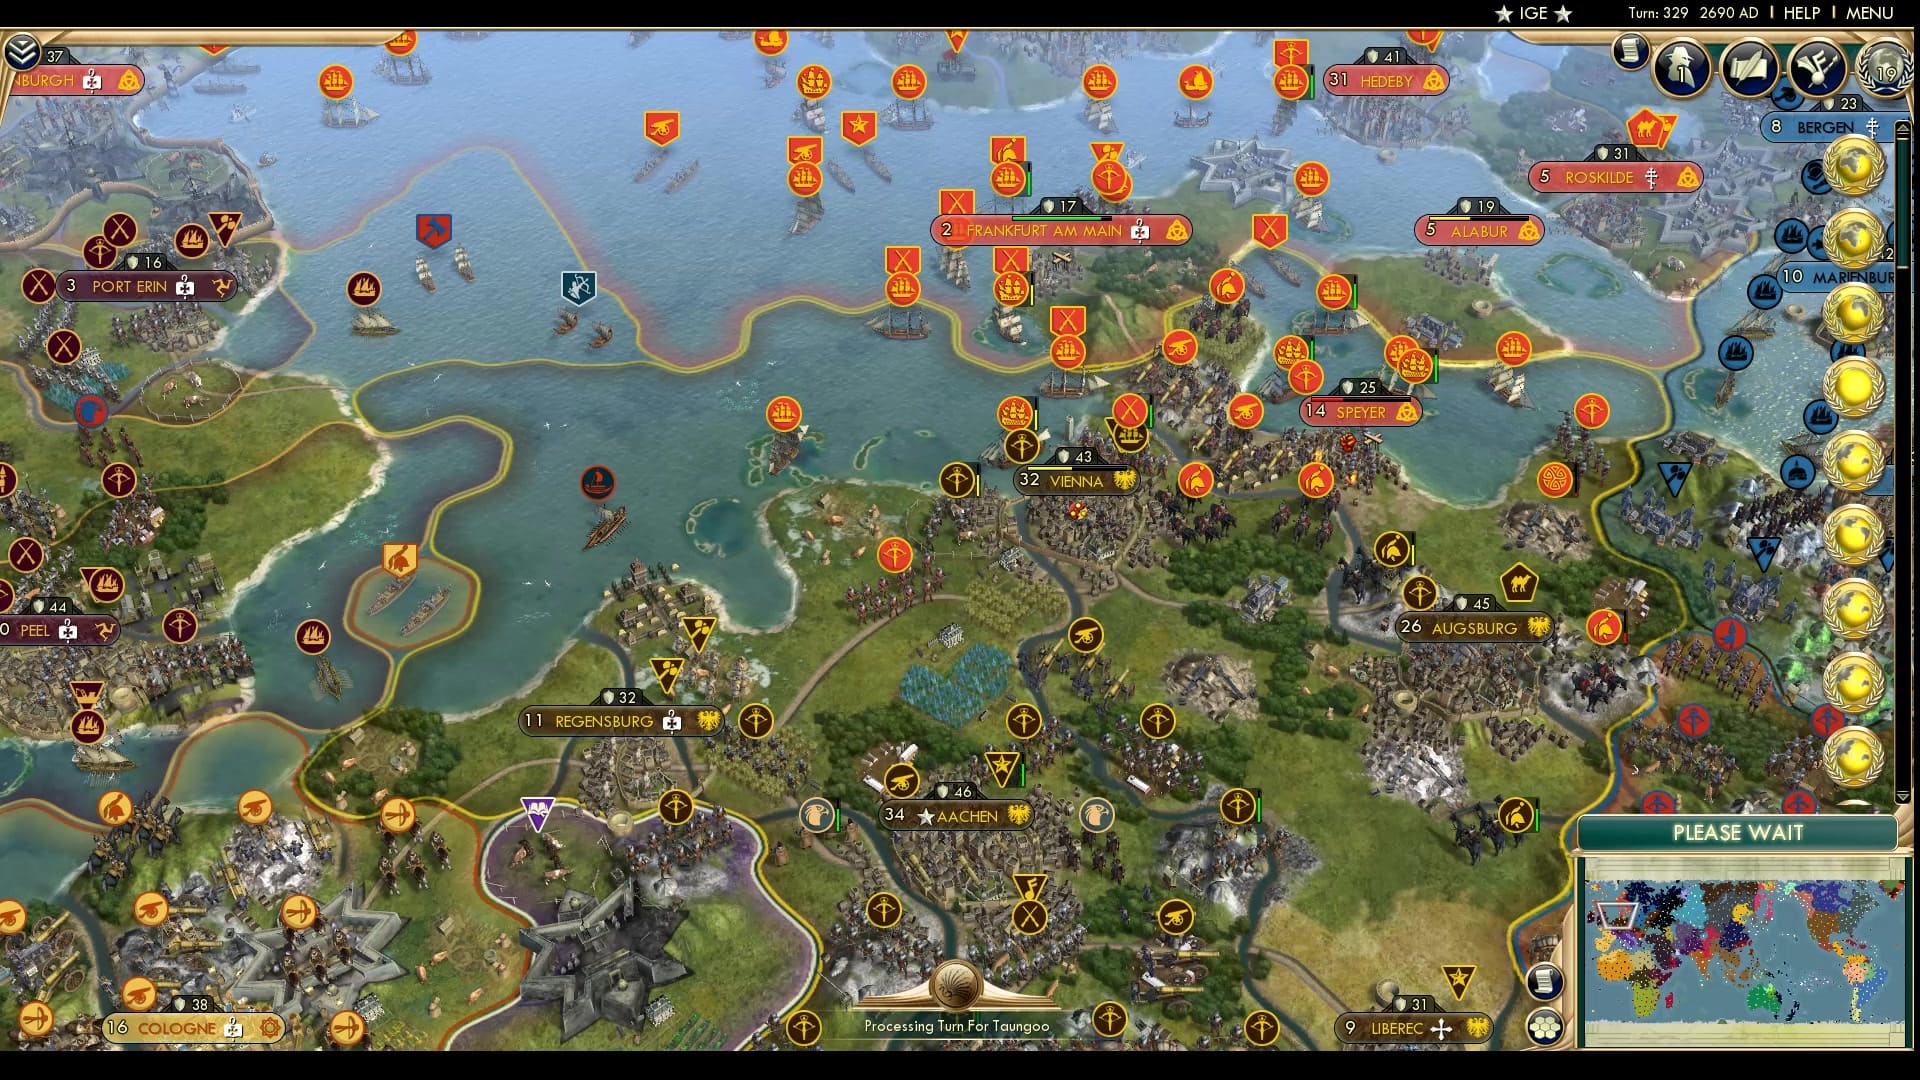
Speyer falls to the Vikings, who use it as a ground to attack Vienna, which also looks quite poised to fall. With one Curaisser in the area, it seems unlikely for the HRE to take either city back.
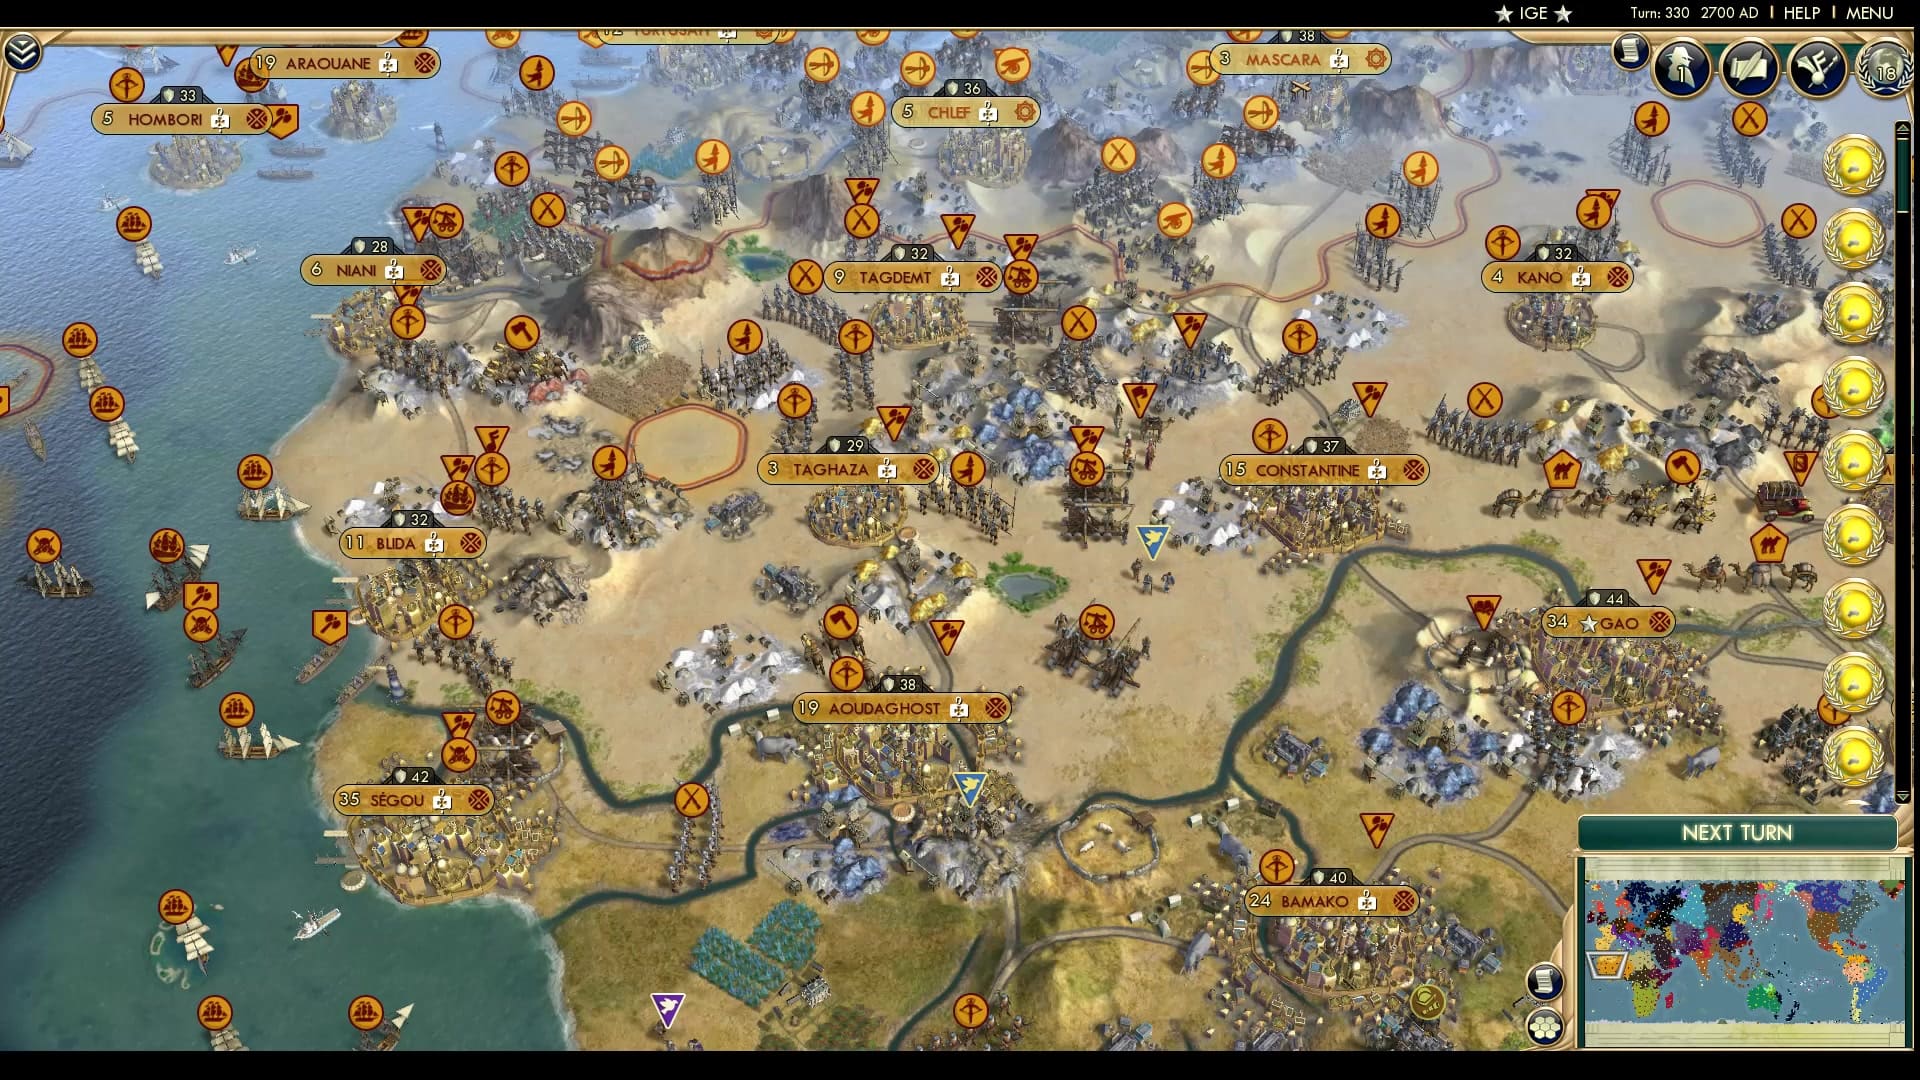
We get another core shot for all the analysts and Songhai fans. They look mighty strong, but beware those desert tiles lie. In either case, Gao stands at a mighty population overlooking the sparse and wide Songhai core.
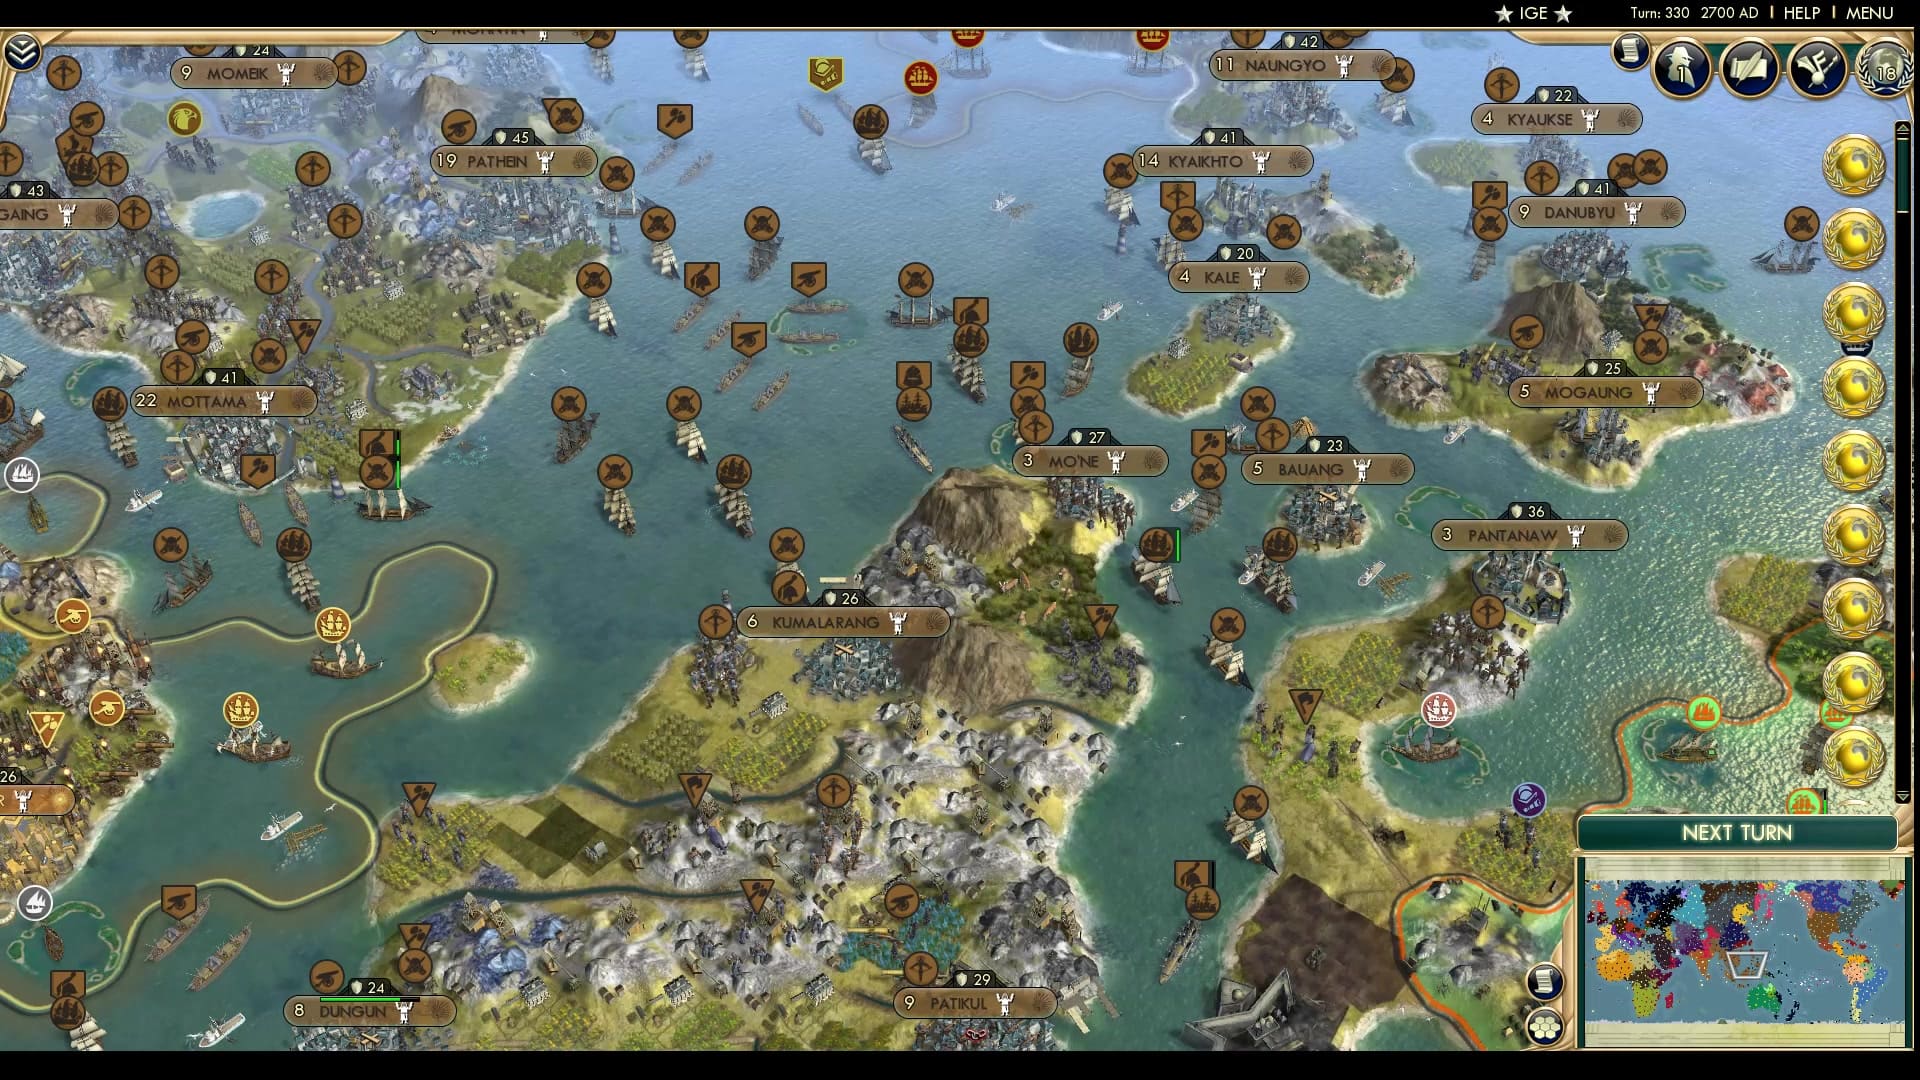
Another core shot, this one of a very recent war that eliminated poor Sulu in two parts. The populations have been greatly destroyed, but Taungoo has gained about 6 puppeted cities and a hell of a lot of Golden Age Points to churn that snowball. Good job Bayinnaung. Go insettle even more.
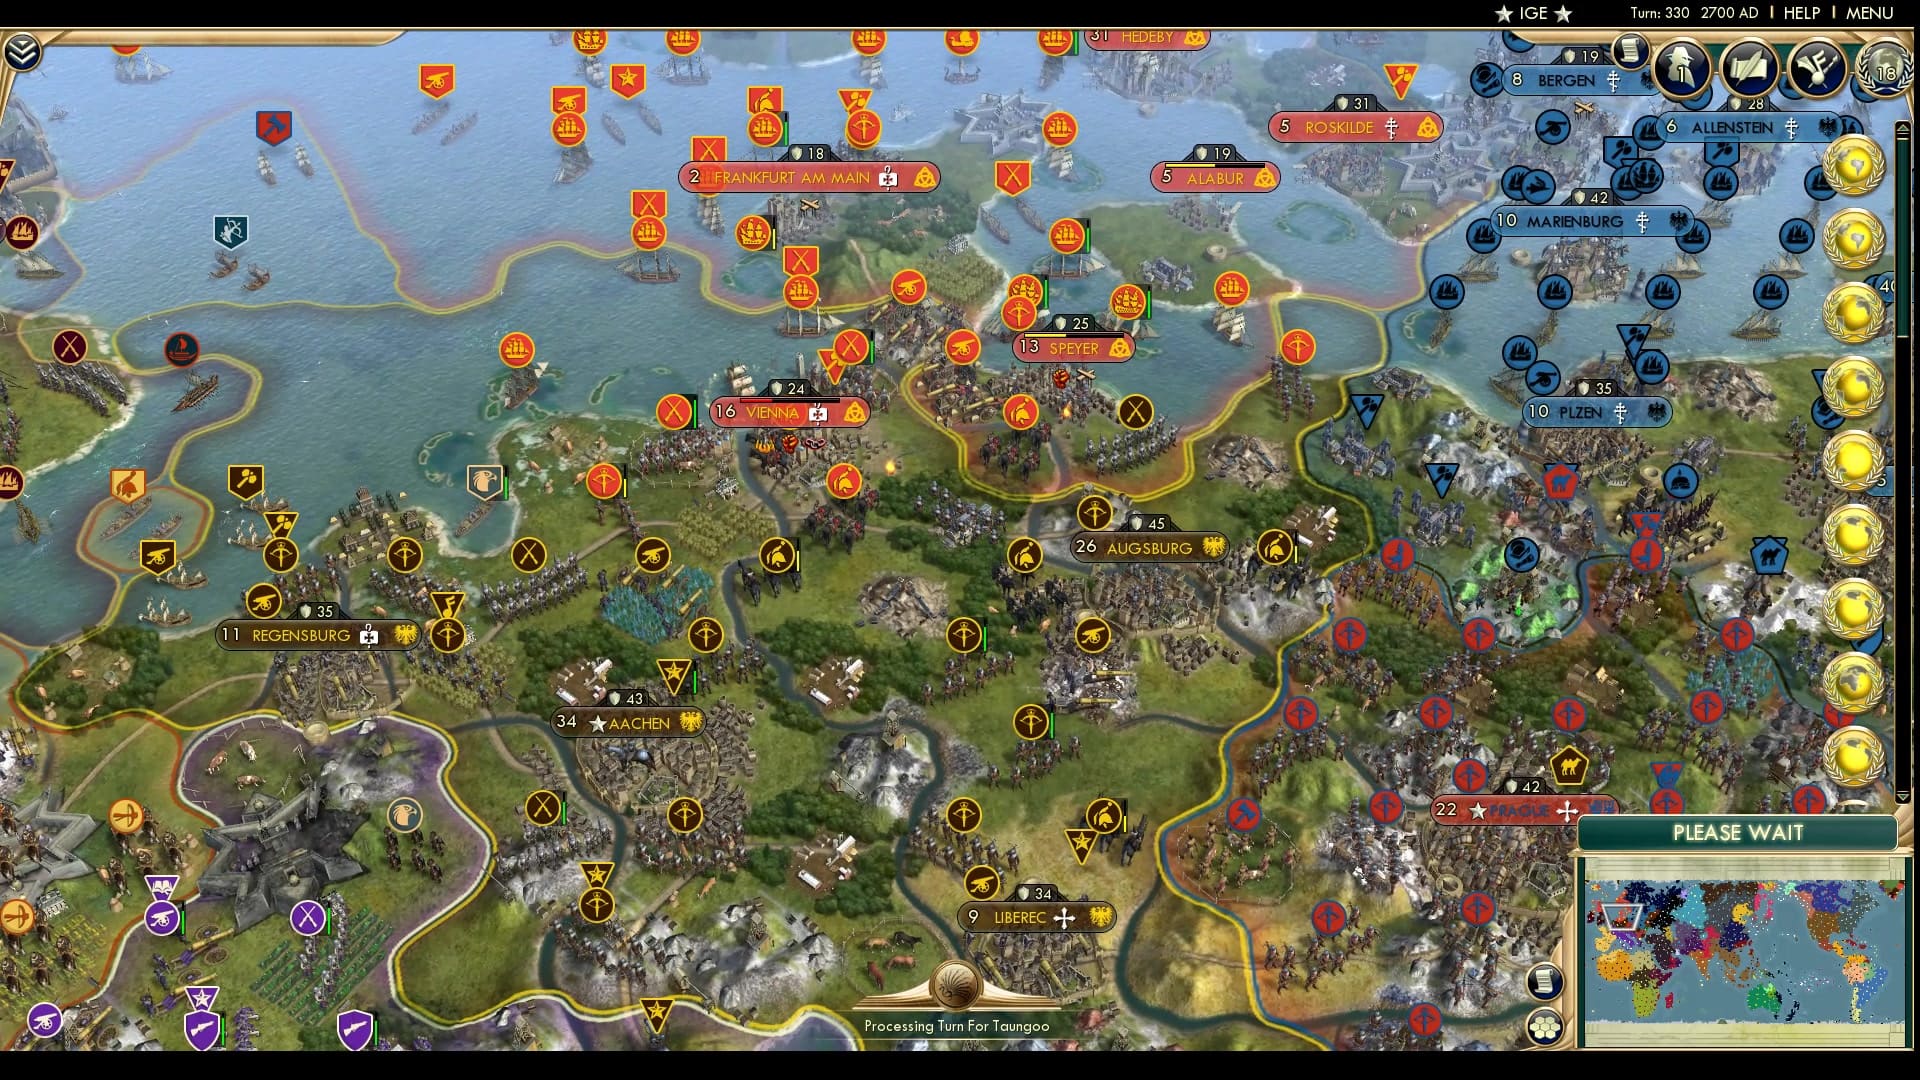
With the fall of Vienna, the Vikings have rid the HRE of all of its coastal cities. Regensburg holds some coastal tiles but with no more naval production locations in the core. It looks grim as the entire HRE army looks about as strong as the Viking armies in continental Europe. To the south, we also see that Mainz has fallen again, closing the sandwich in even further.
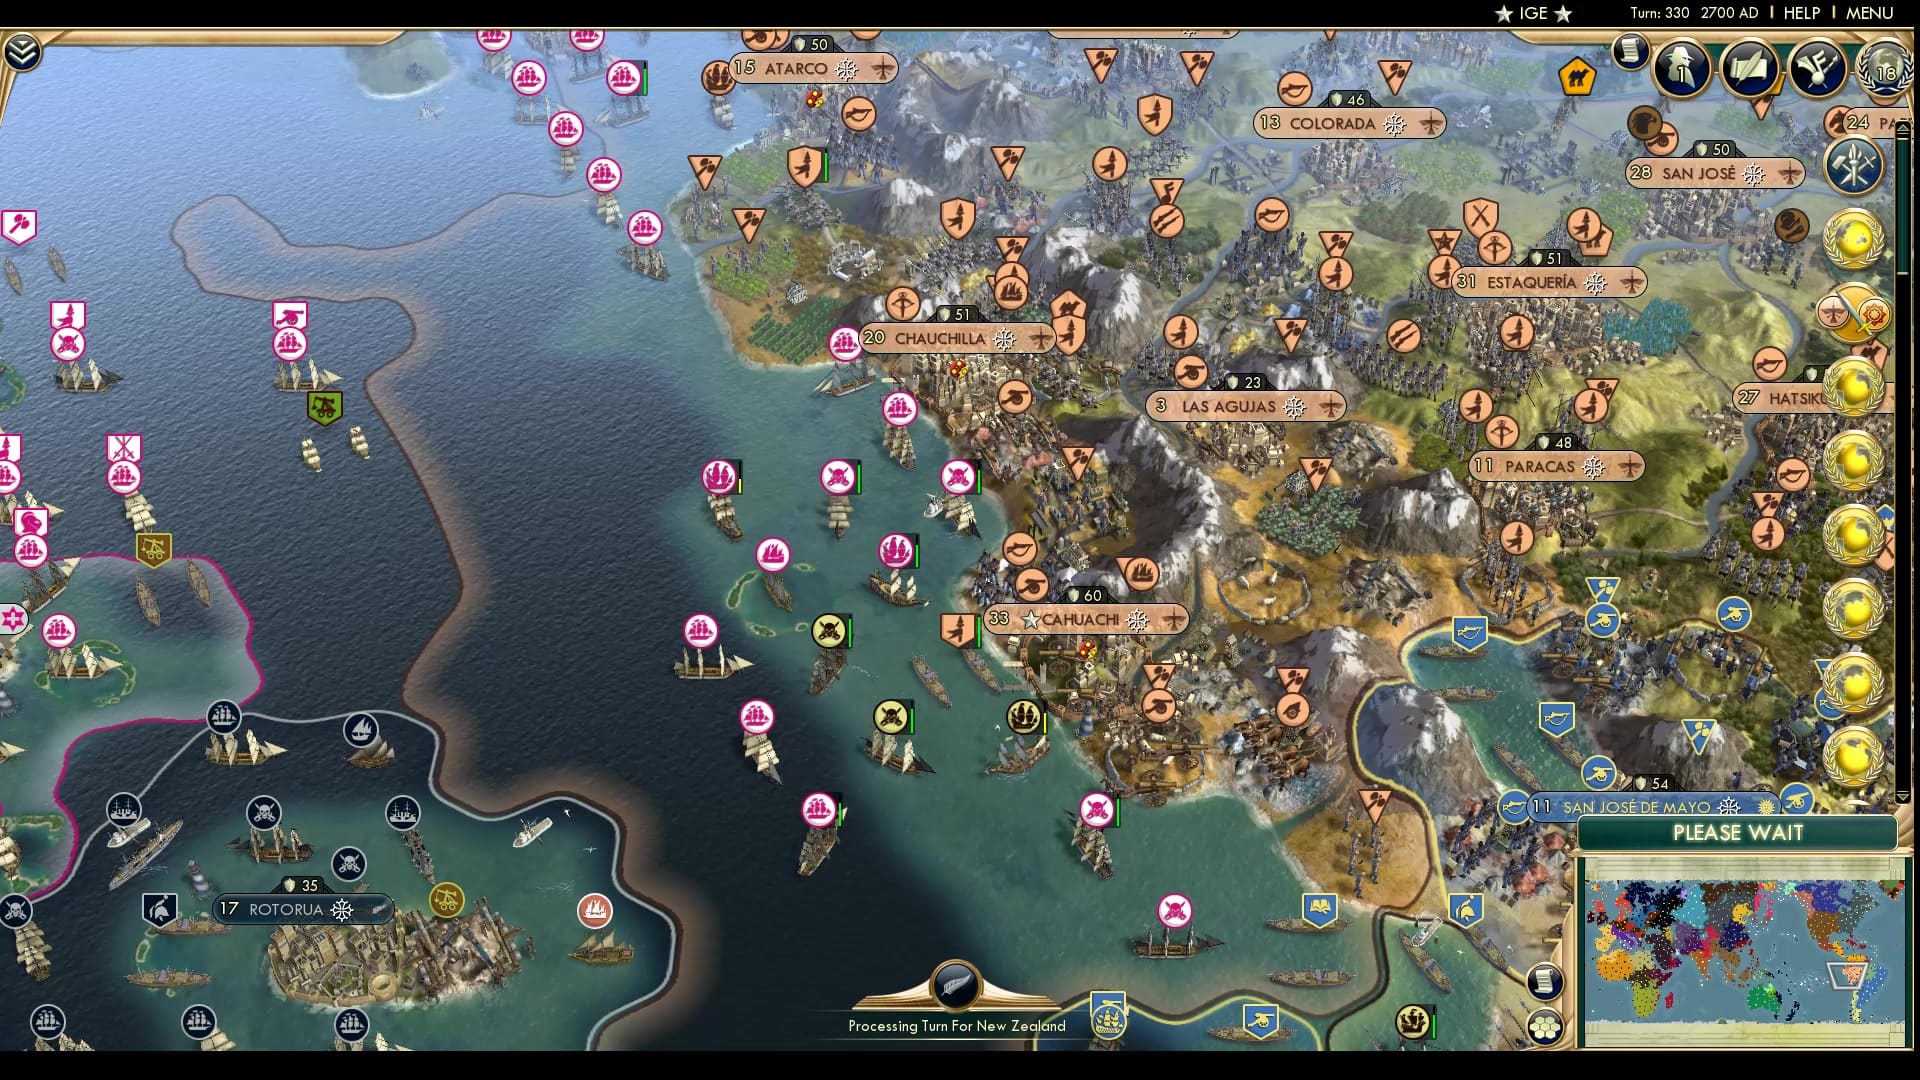
Turns out Tonga also sent a fleet to Cahuachi to try and get the capital. The Nazca’s capital is quite undefended to oceanic invaders, but the Selknam look to be blocking Siaosi’s attempt, but their presence might help the fleet remain intact by the time they can attack, as ranged units from the mainland attack the ships. To the North, Tonga seems to finally have gotten its act together to attack the one-tile island
The Khamugs have been sleeping for quite a while, but this shows us a rare glimpse at them as they amass a strong carpet. Kazakhstan’s lands look juicy and bare in retrospect, but the Khamugs could probably even take the Evenks on.
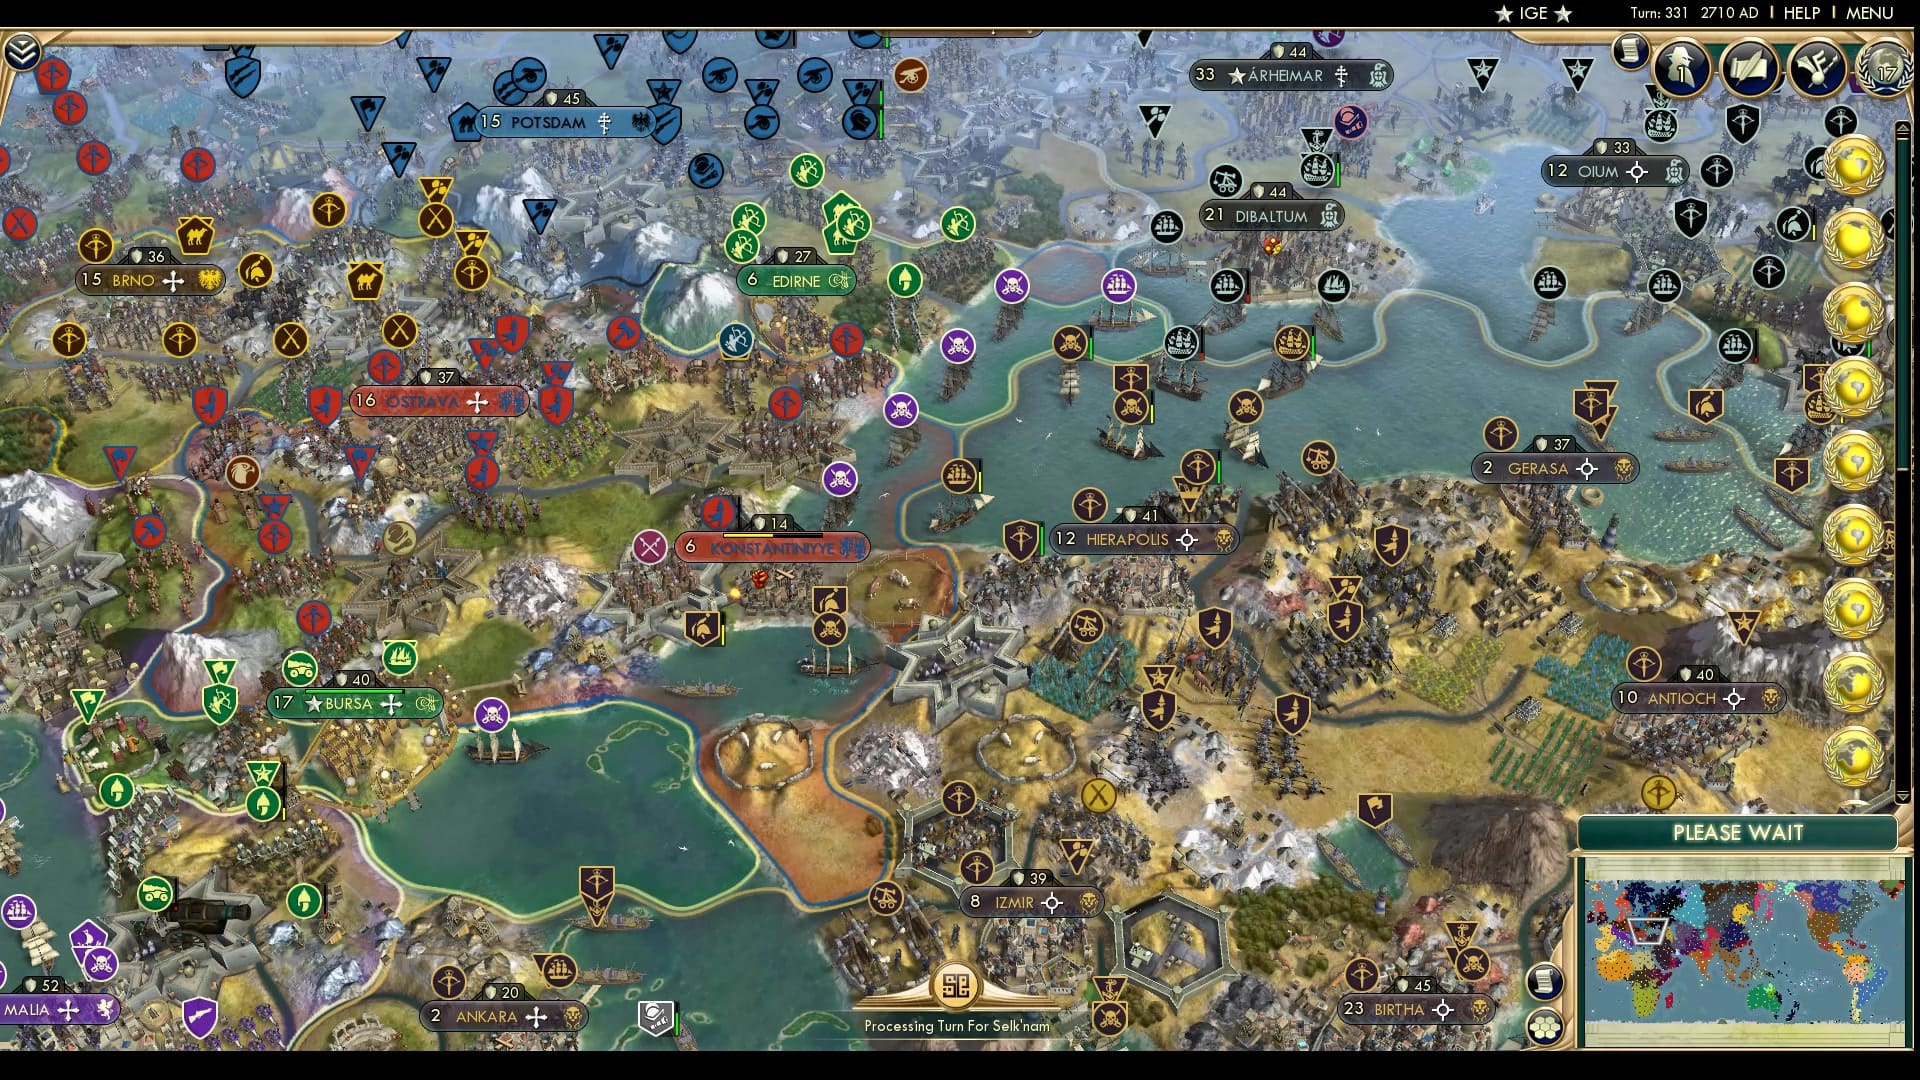
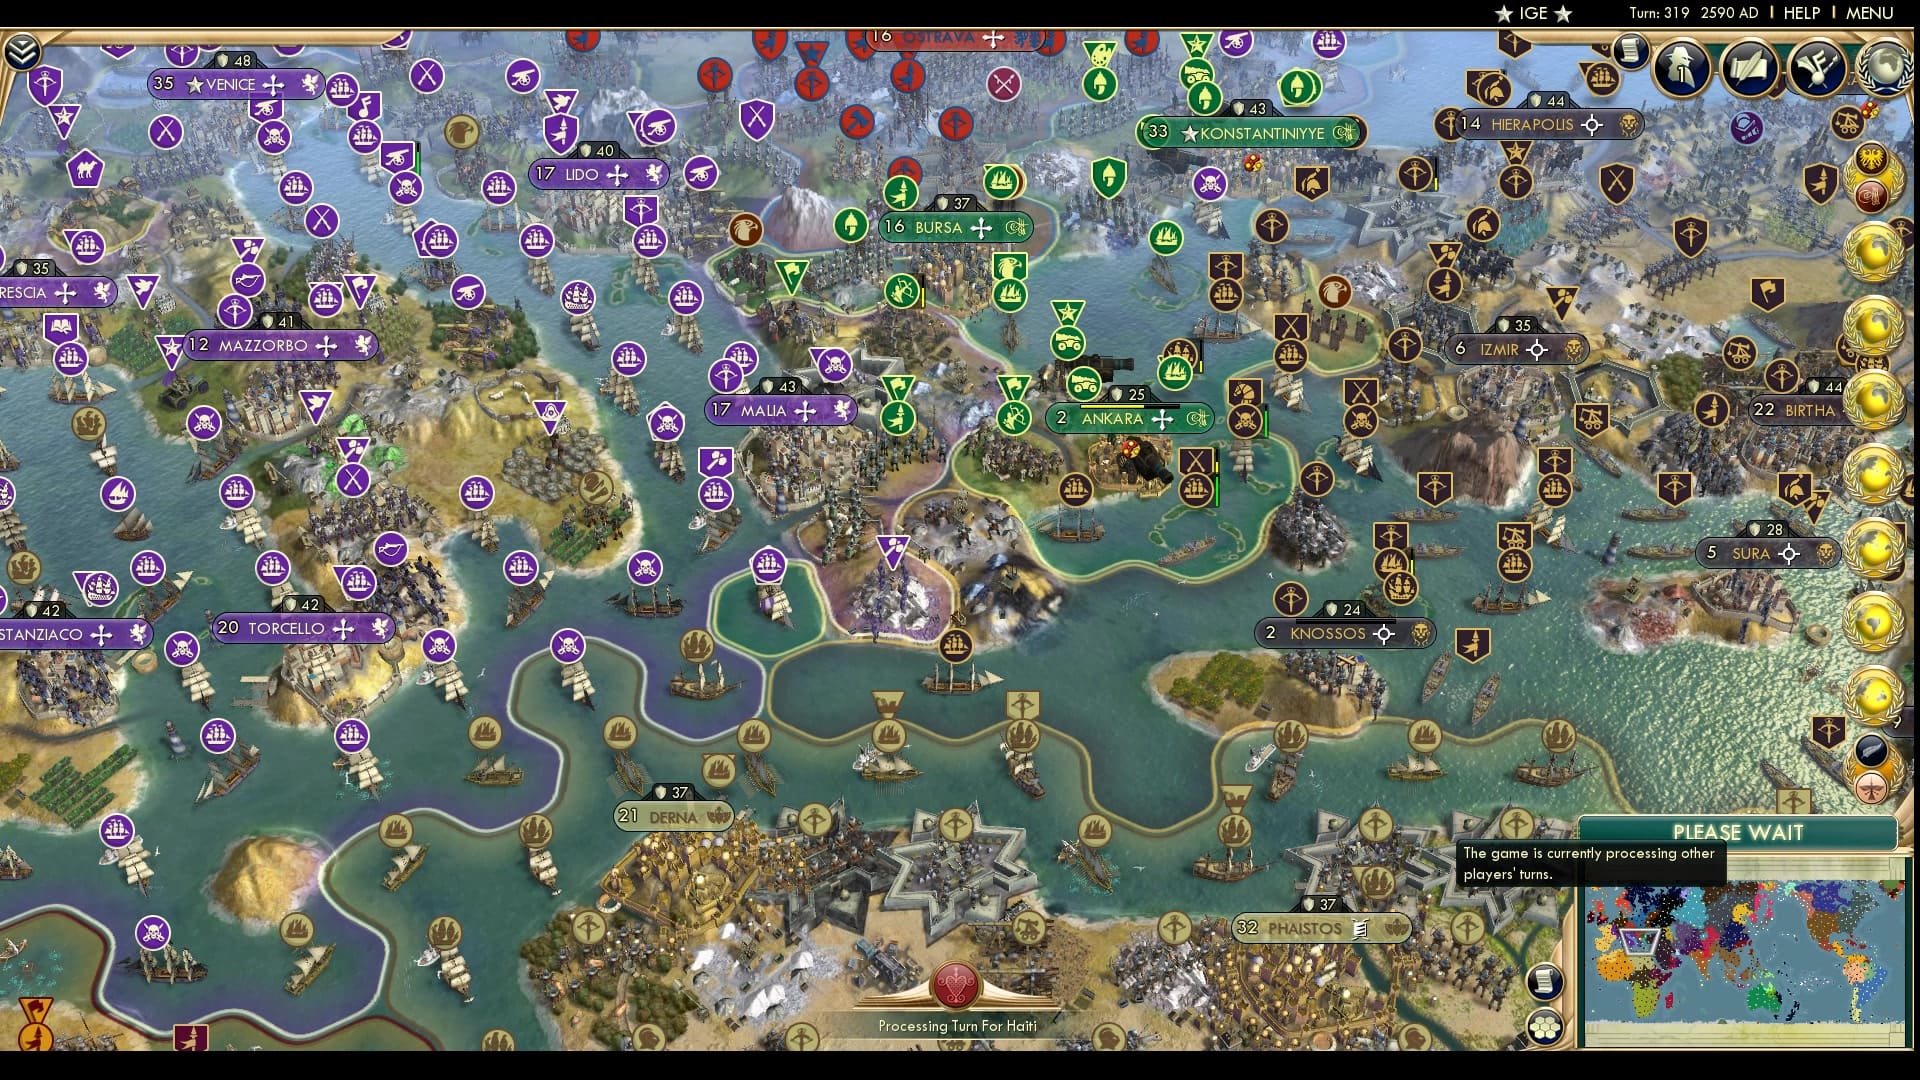
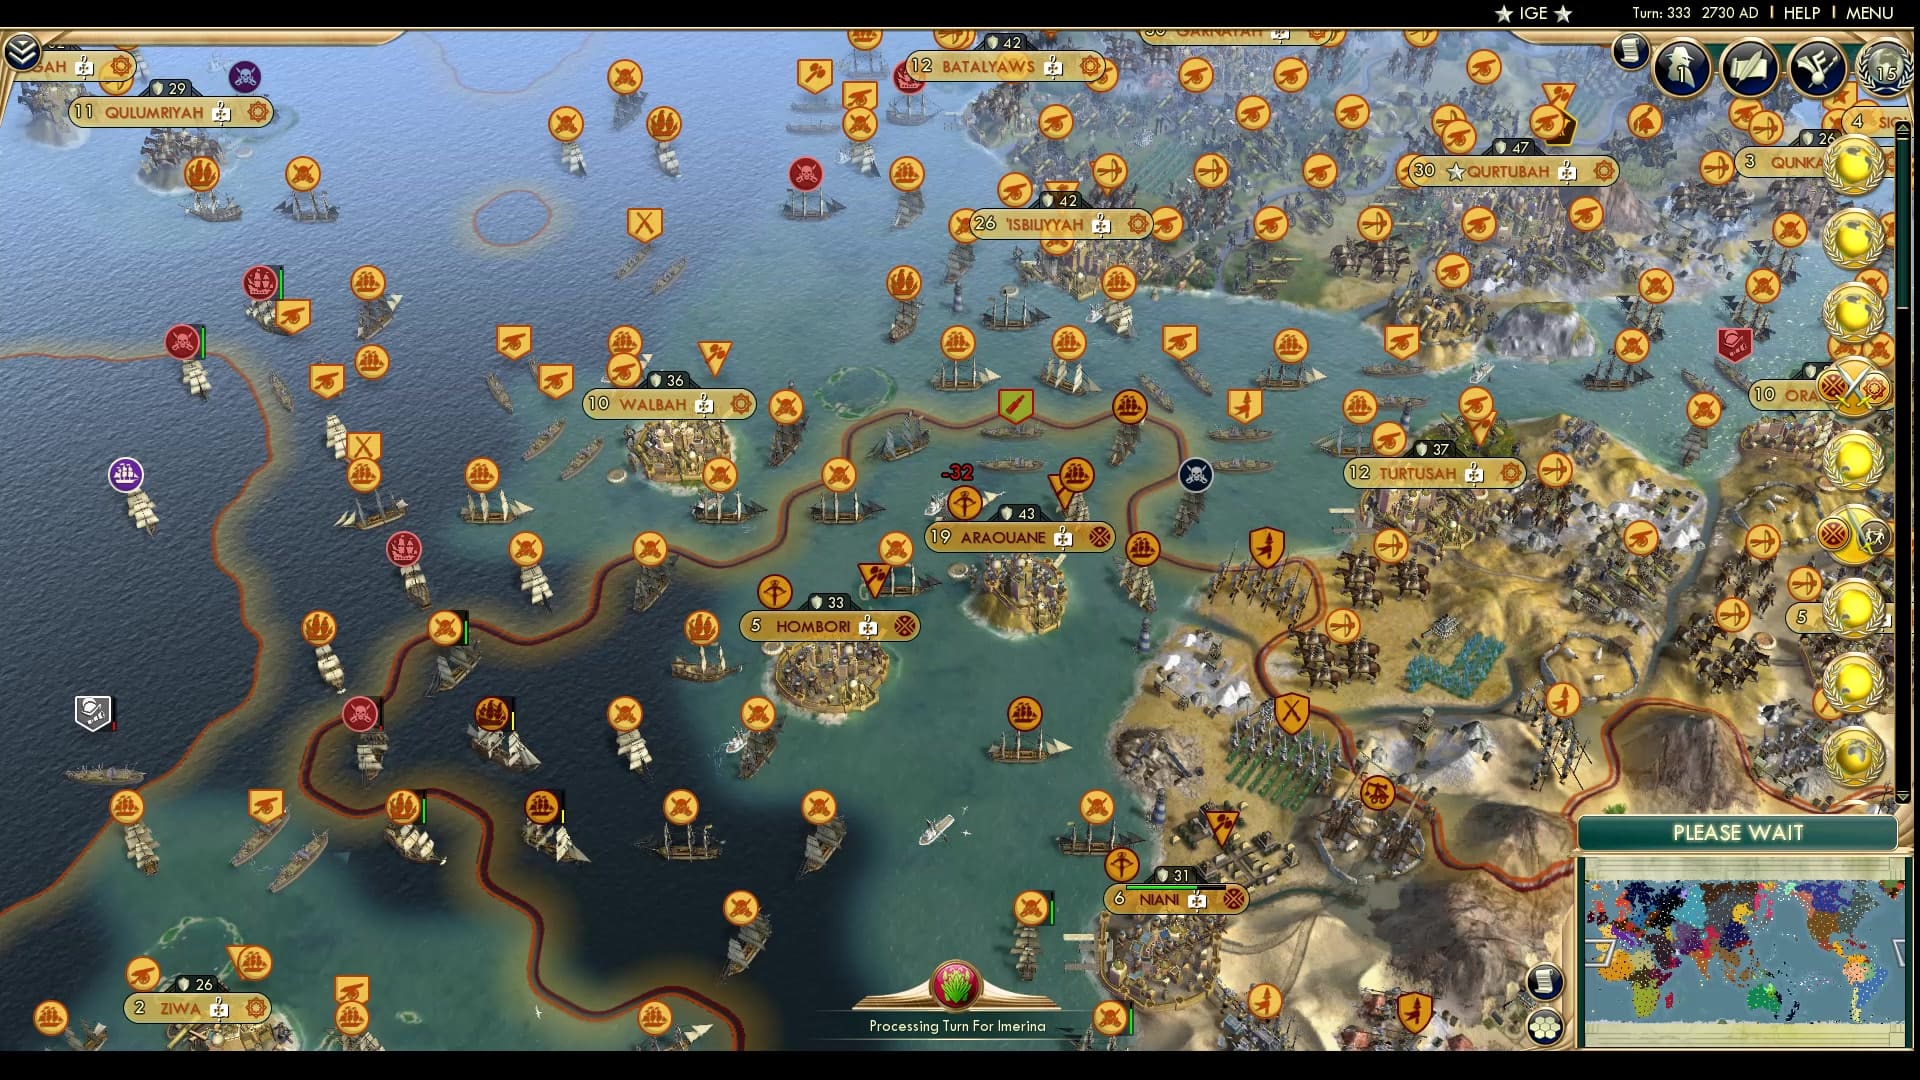
In a sudden twist of faith, it seems like the Czech have broken out of their shell and taken Konstantiniyye from the Palmyrans. (They had declared this part without me noticing). Palmyra seemed to have made the mistake of moving their land army away from the Bosphorus and the only hope for Palmyra to gain this crucial city back are those embarked units. Luckily for them it’s a pretty easy hope that they can flip it back.

The Metis are thrust back into war as the Haida make peace in the incredibly relevant Haida-Goth war and instead join up with the Iroquois to attack the Metis. We see here the Western front, but we know in our hearts that the Iroquois are using their great positioning to attack in the East.
Haida, however, looks unprepared to attack as Metis units move into Haida instead of the other way around.
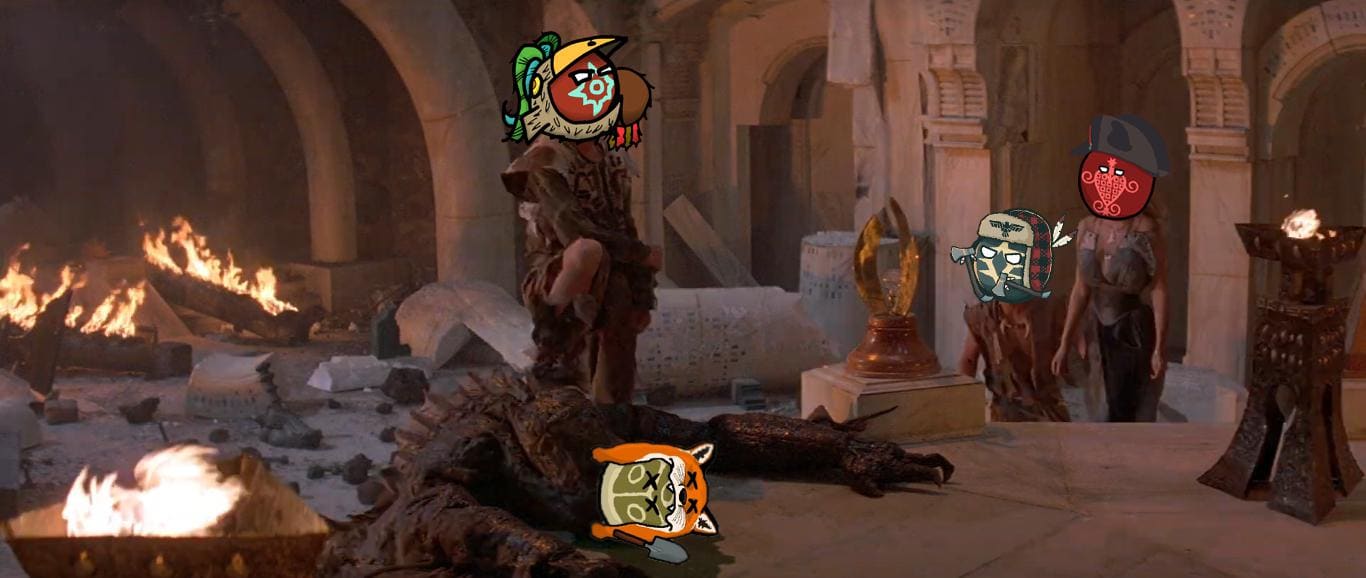
The big Guay attacks the Kuikuro again, but this time manage to find themselves actually attacking a city. And my, that is a large city to attack. Hopefully the citizens can defend against the Guay menace. The Kuikoro units seem to be rather thin, but that hasn’t stopped them from defending against the #1 somehow. They remain #1 because they can probably take it.
Of personal note: look at that Taungoo Explorer. Was it the one that founded the World Congress this part? Oh yeah, not pictured in this part: Taungoo founds the World Congress. Taungoo proposes Autocracy as the World Ideology and Algeria proposes Scholars in Residence. They sure could use that help. An image of the World Congress will be released to the sub later this week.
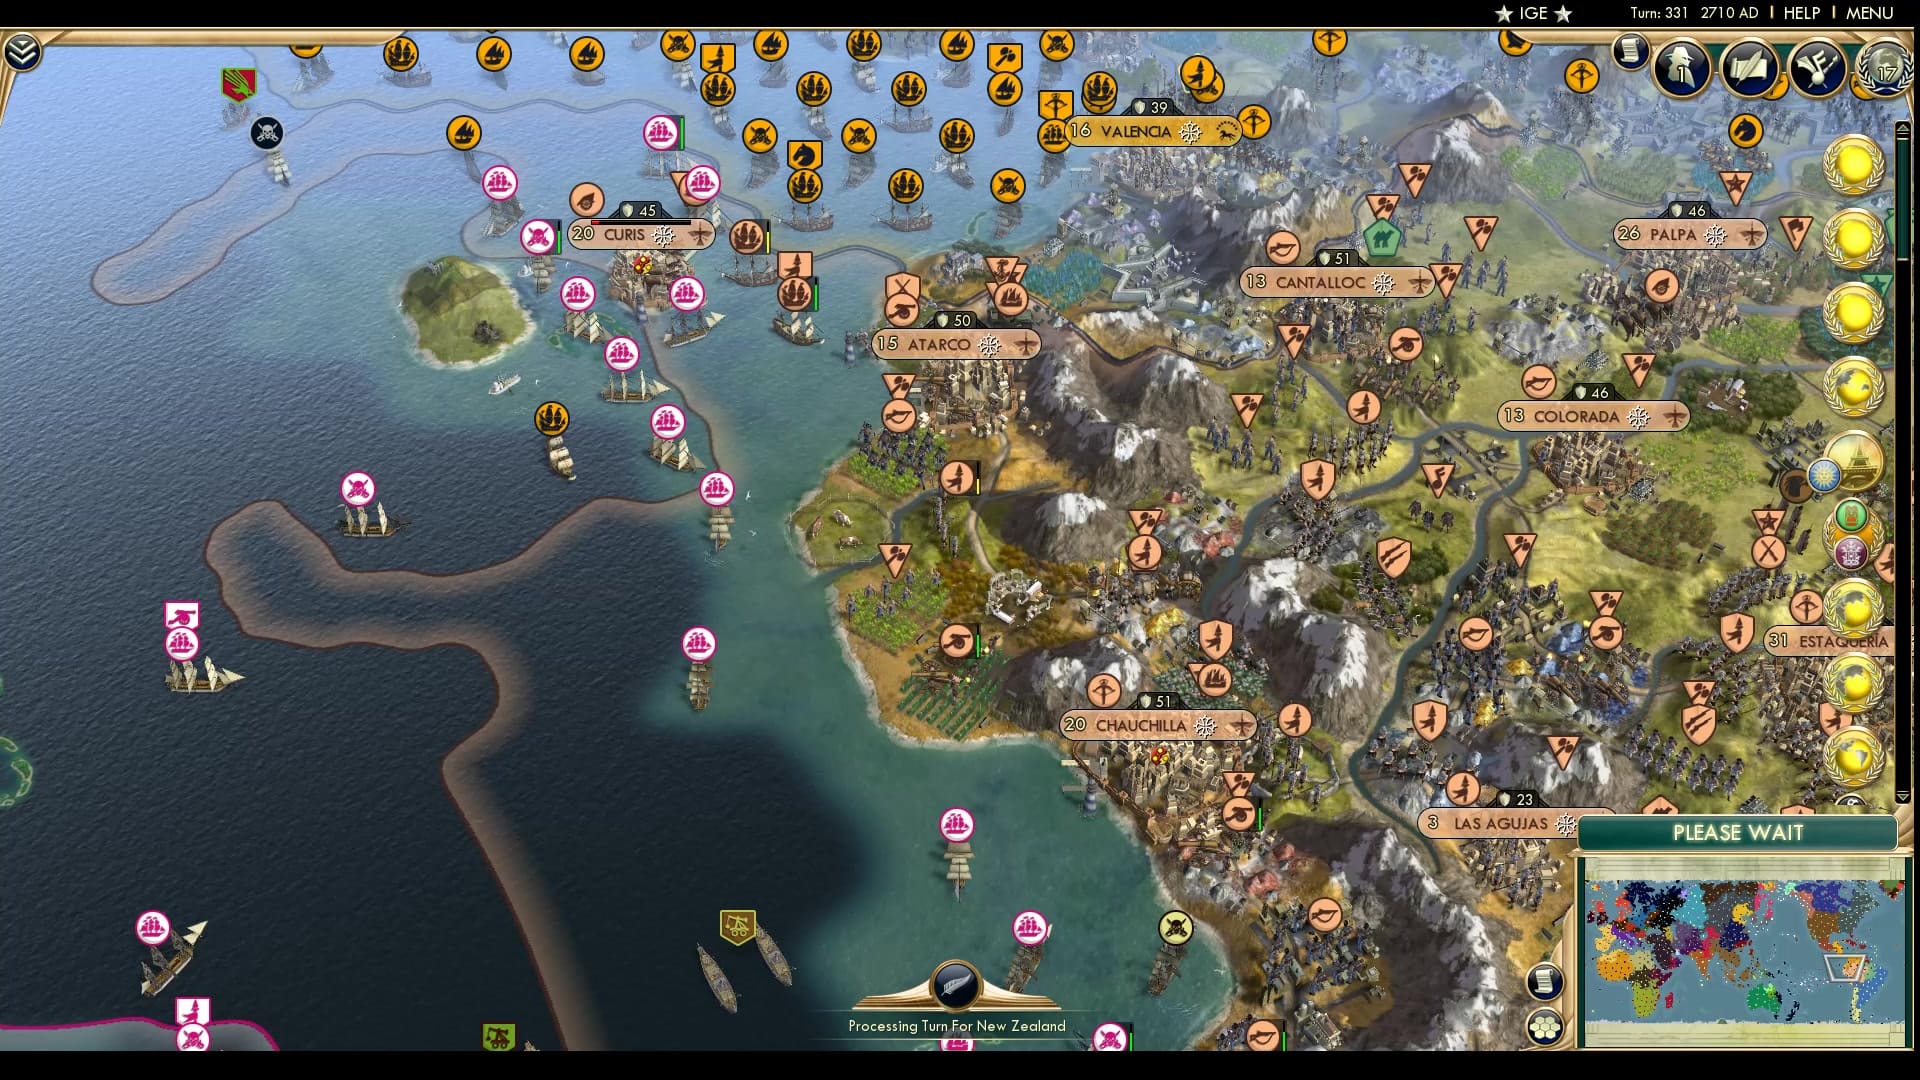
The Tongan fleet thins down, but not in vain. Curis looks ready to flip , and the ships should be able to defend against a flip if they are coordinated. Somehow, I doubt that Tonga can kill those carracks before they batter the city back down.
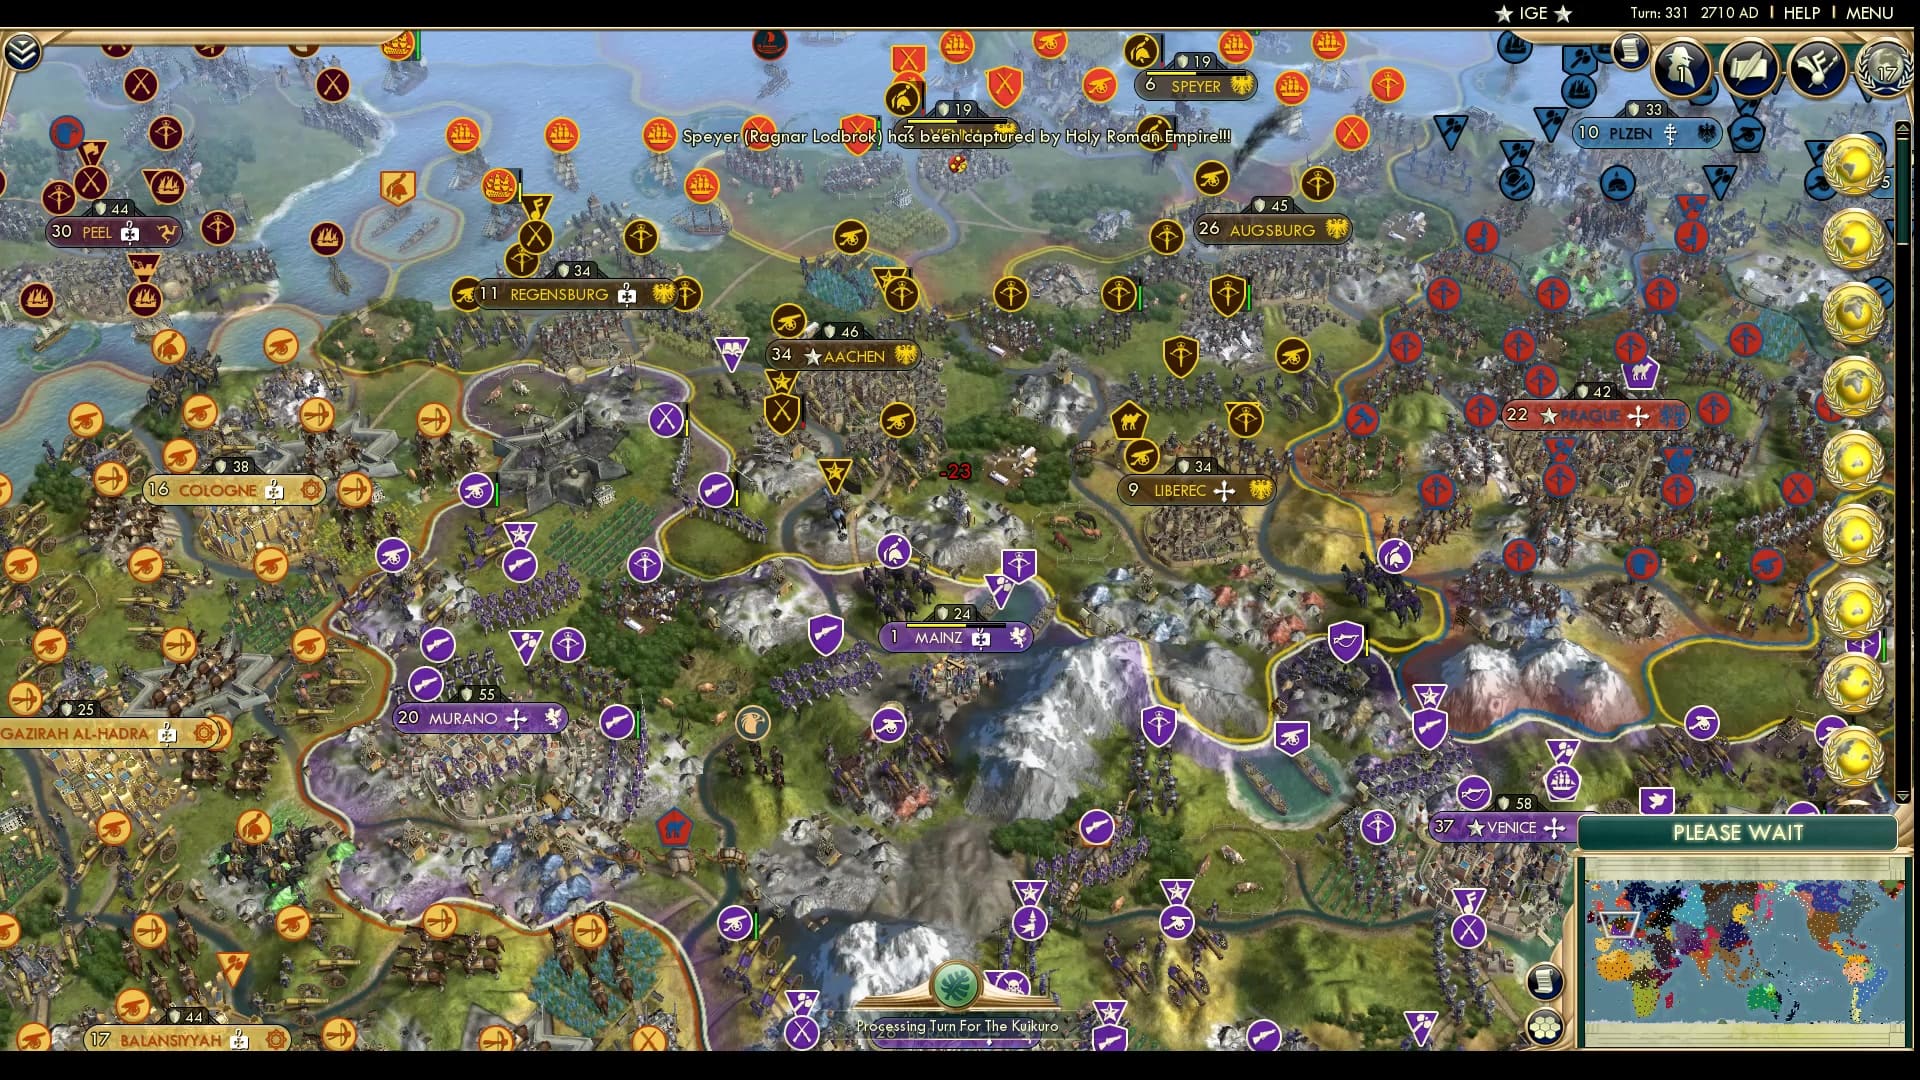
The Vikings make the play of moving their navy to the Lowlands to attempt to attack Regensburg, presumably before finding out that Regensburg is not a coastal city and that they cannot sail through the marshes of the Netherlands. The HRE for its part seems to have successfully stopped the Venetian menace from advancing and managed to momentarily flip their two coastal cities back at once. It looks like a futile attempt to deny the Vikings two easy large pop captures.
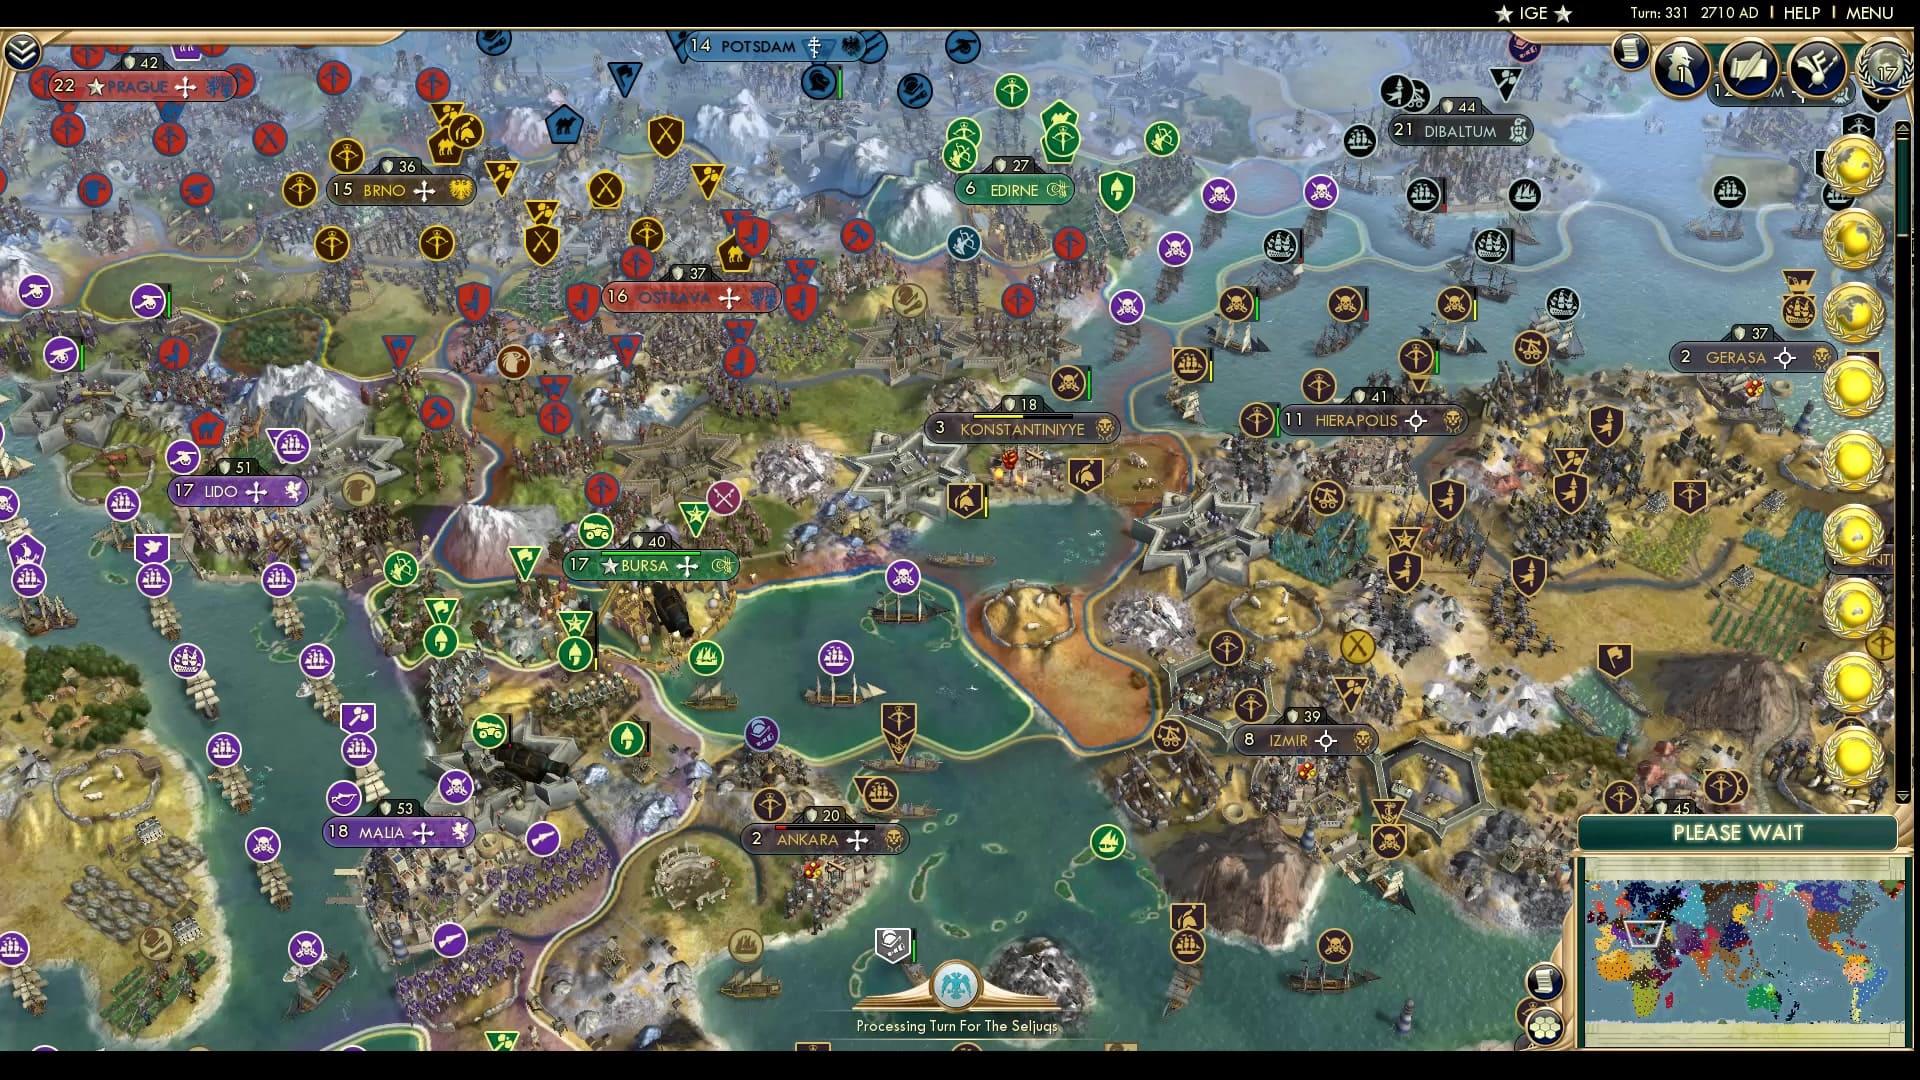
The Czech were unable to move their pikeman from around Ostrava to go towards the front in a stupid inability to commit to an offensive. The Palmyrans regain their hard fought city of Konstantiniyye, now a mere shell of its former self. Meanwhile, Venetian units block any further Ottoman losses.
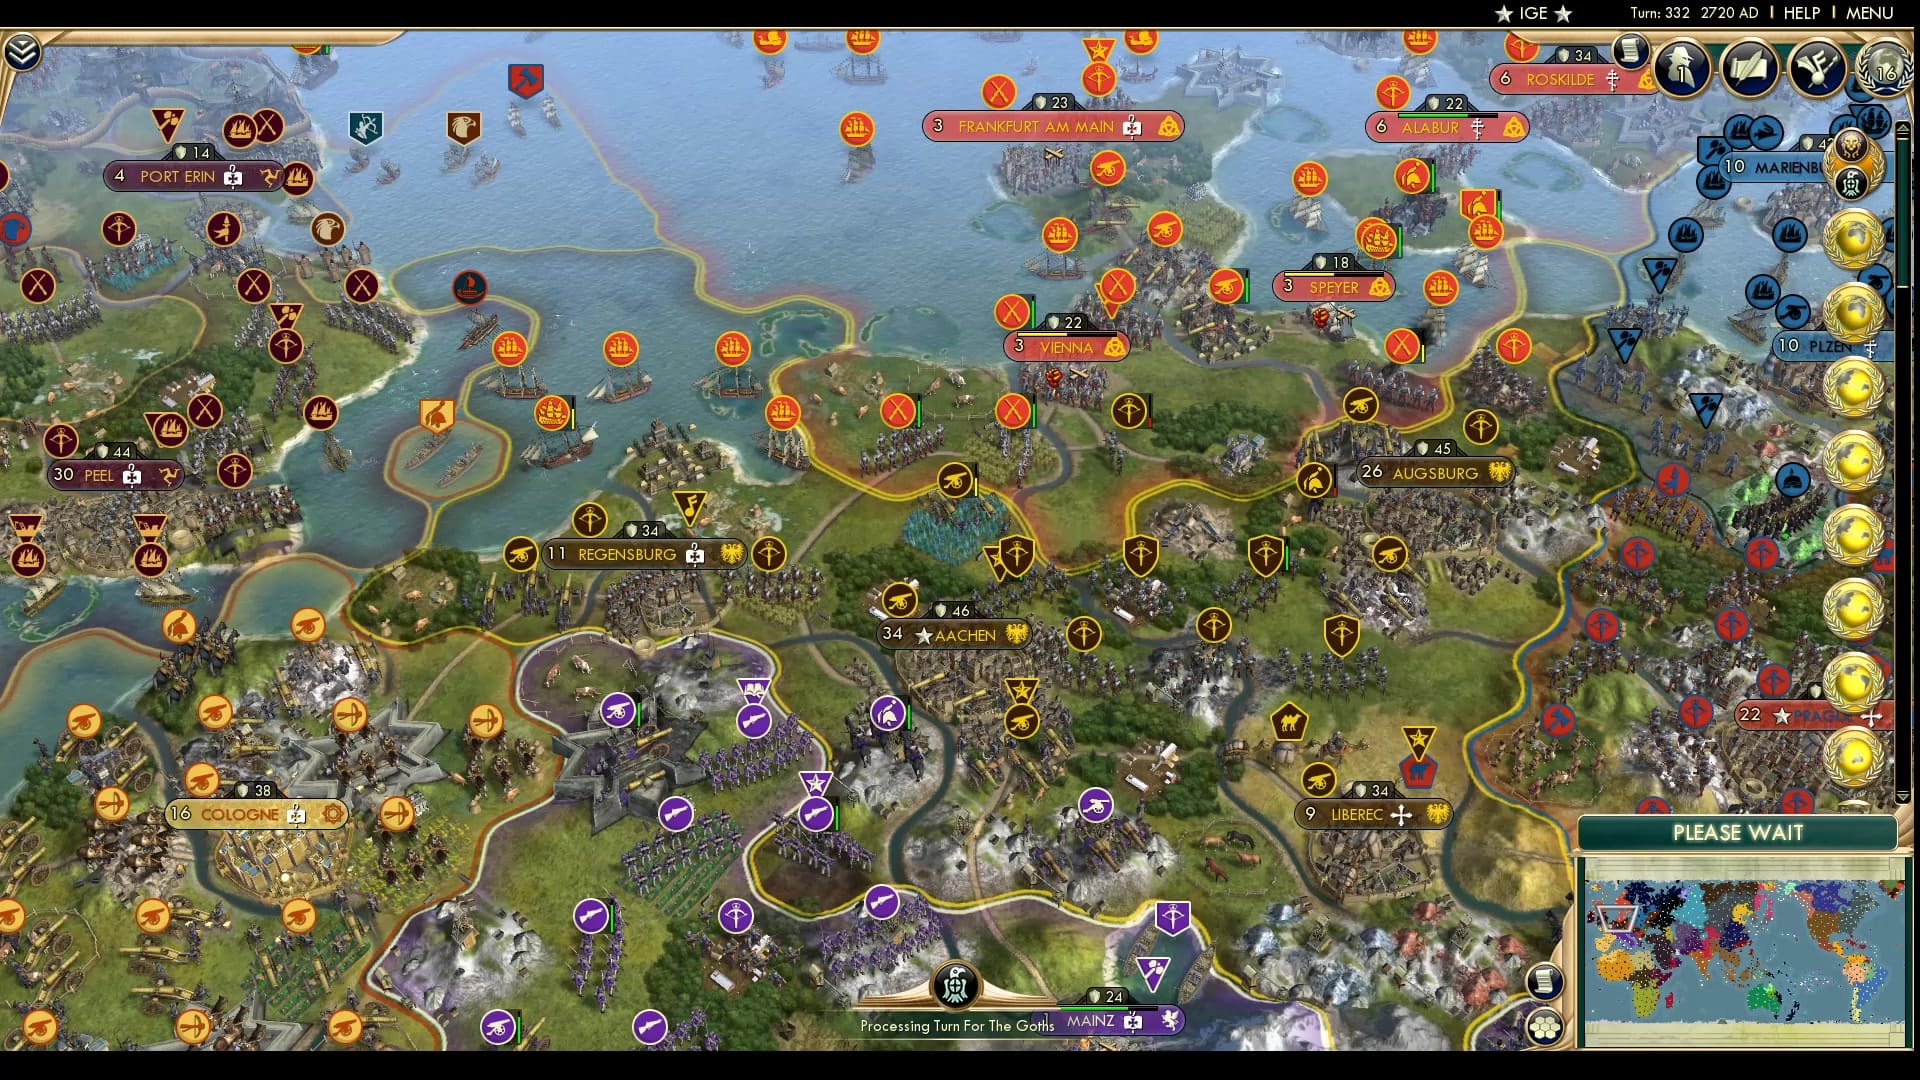
The Vikings regain their continental footholds and the fleet at Regensburg strikes the HRE army down. There’s a chance the Germans can still take those cities back, but it rests on that badly damaged Curaisser.
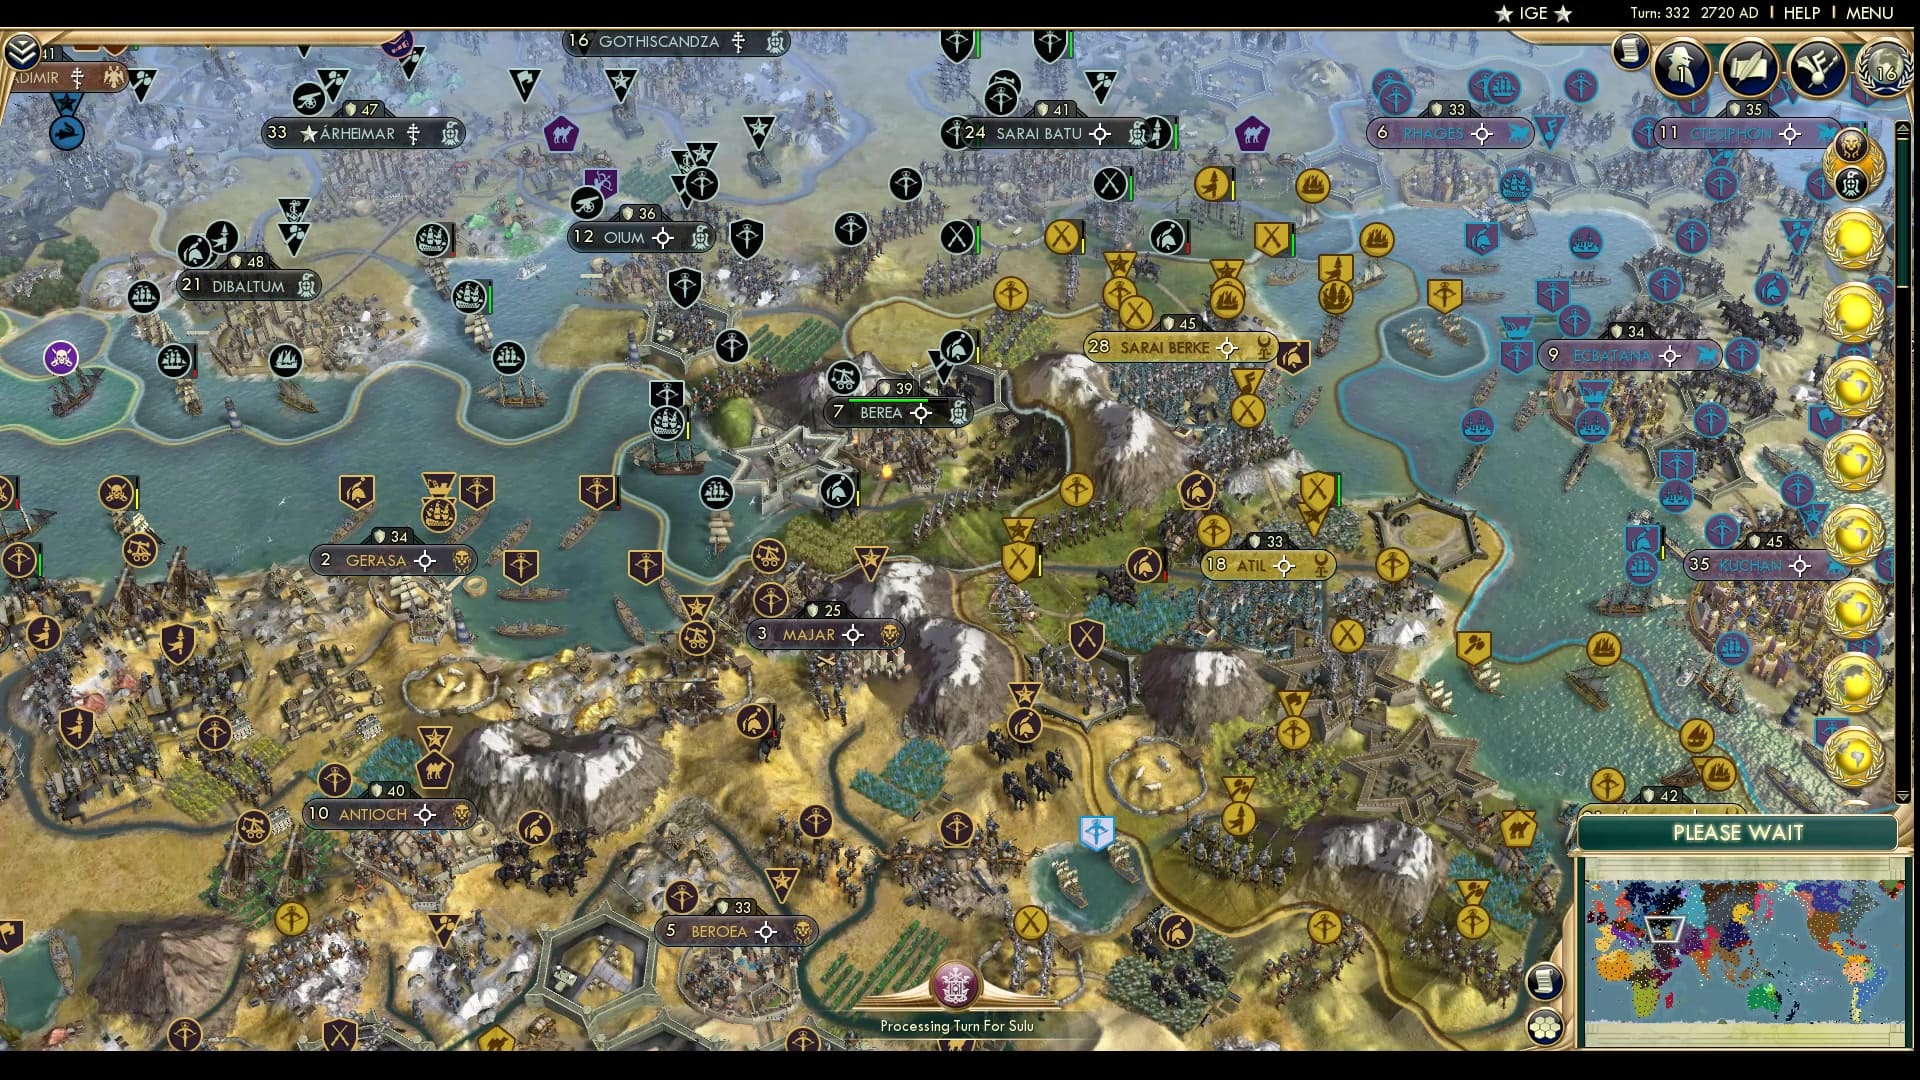
In other news: the Palmyrans give up attacking the Goths. And begin moving in on the Horde. The Goths also have successfully removed the Golden Horde from their lands. It looks grim for the Golden Horde if these wars drag on for much longer. In the short term, those mountains work very well.
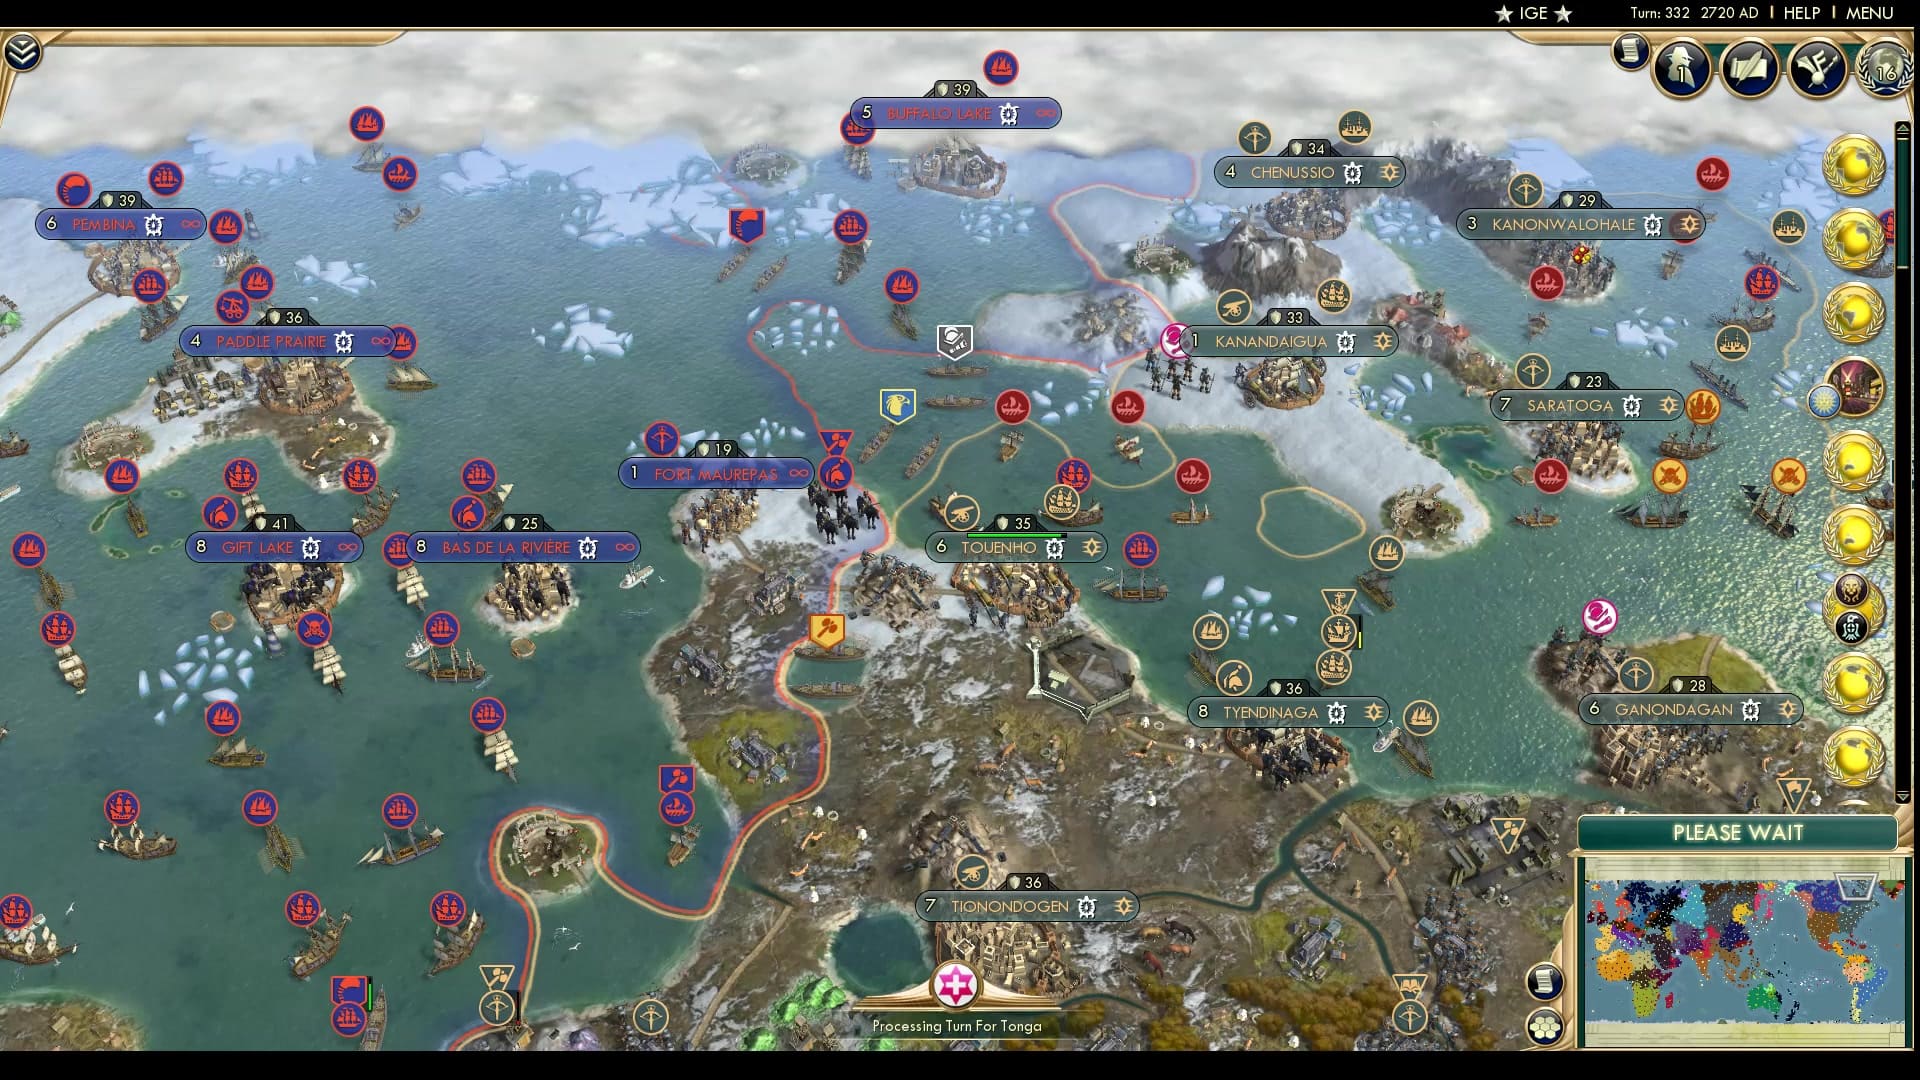
The Iroquois were supposed to have taken several large Metis cities, but it looks more like the Metis are pushing in on the small northern Iroquois colonies. Uruguay builds Broadway, presumably singing about the glories of a UA that everyone believes to be OP in a musical genre of theatre.
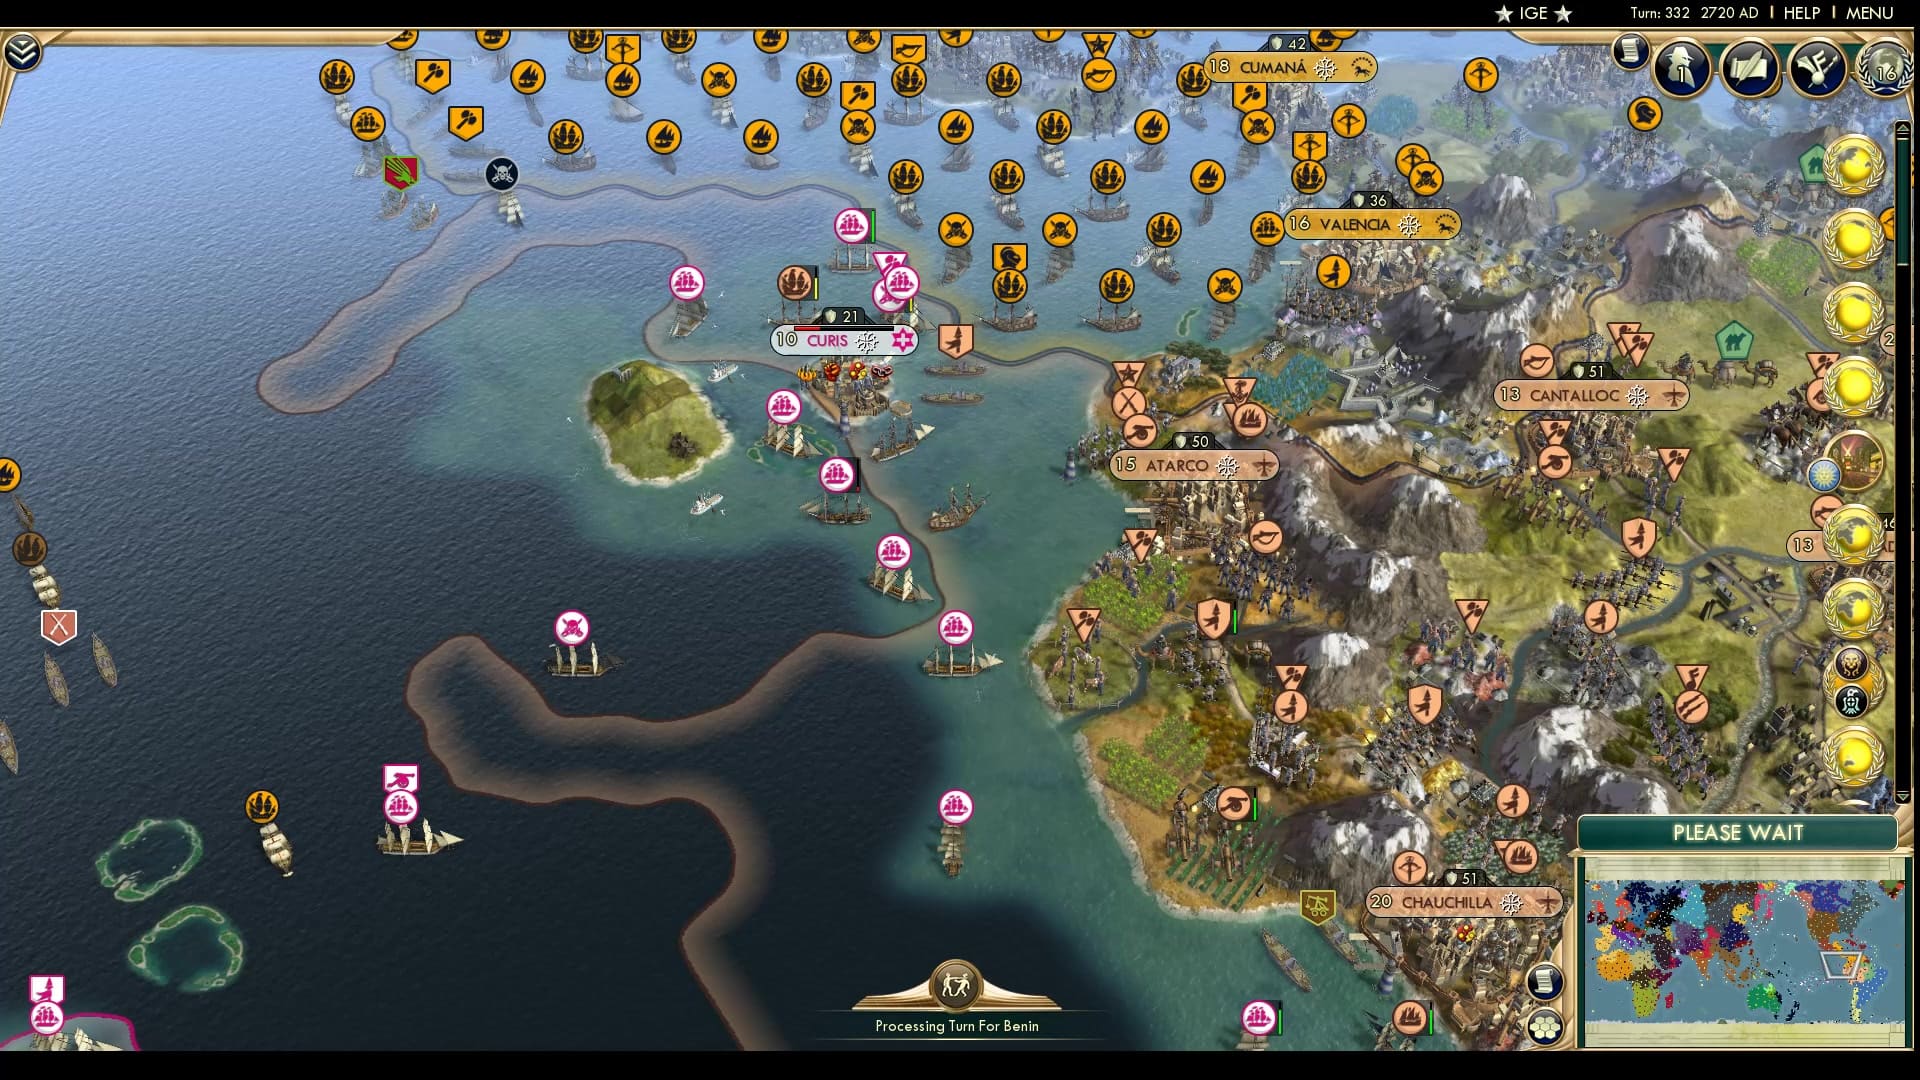
Tonga Time 2.0 goes poorly. I guess if Siaosi couldn’t have been expected to keep a 2 pop city, a 10 pop city is even worse. The city of Curis burns and the diminishing Tongan fleet looks like it will give way to only ashes and memories.

We see a glimpse of Madagascar, the madlads who took a city from the 2nd place Zimbabwe as they declare war on the Songhai for being pesky in their borders. The shot here more importantly shows the large Madagascan bases of production, but a disappointing navy. Perhaps they need more time to build up.
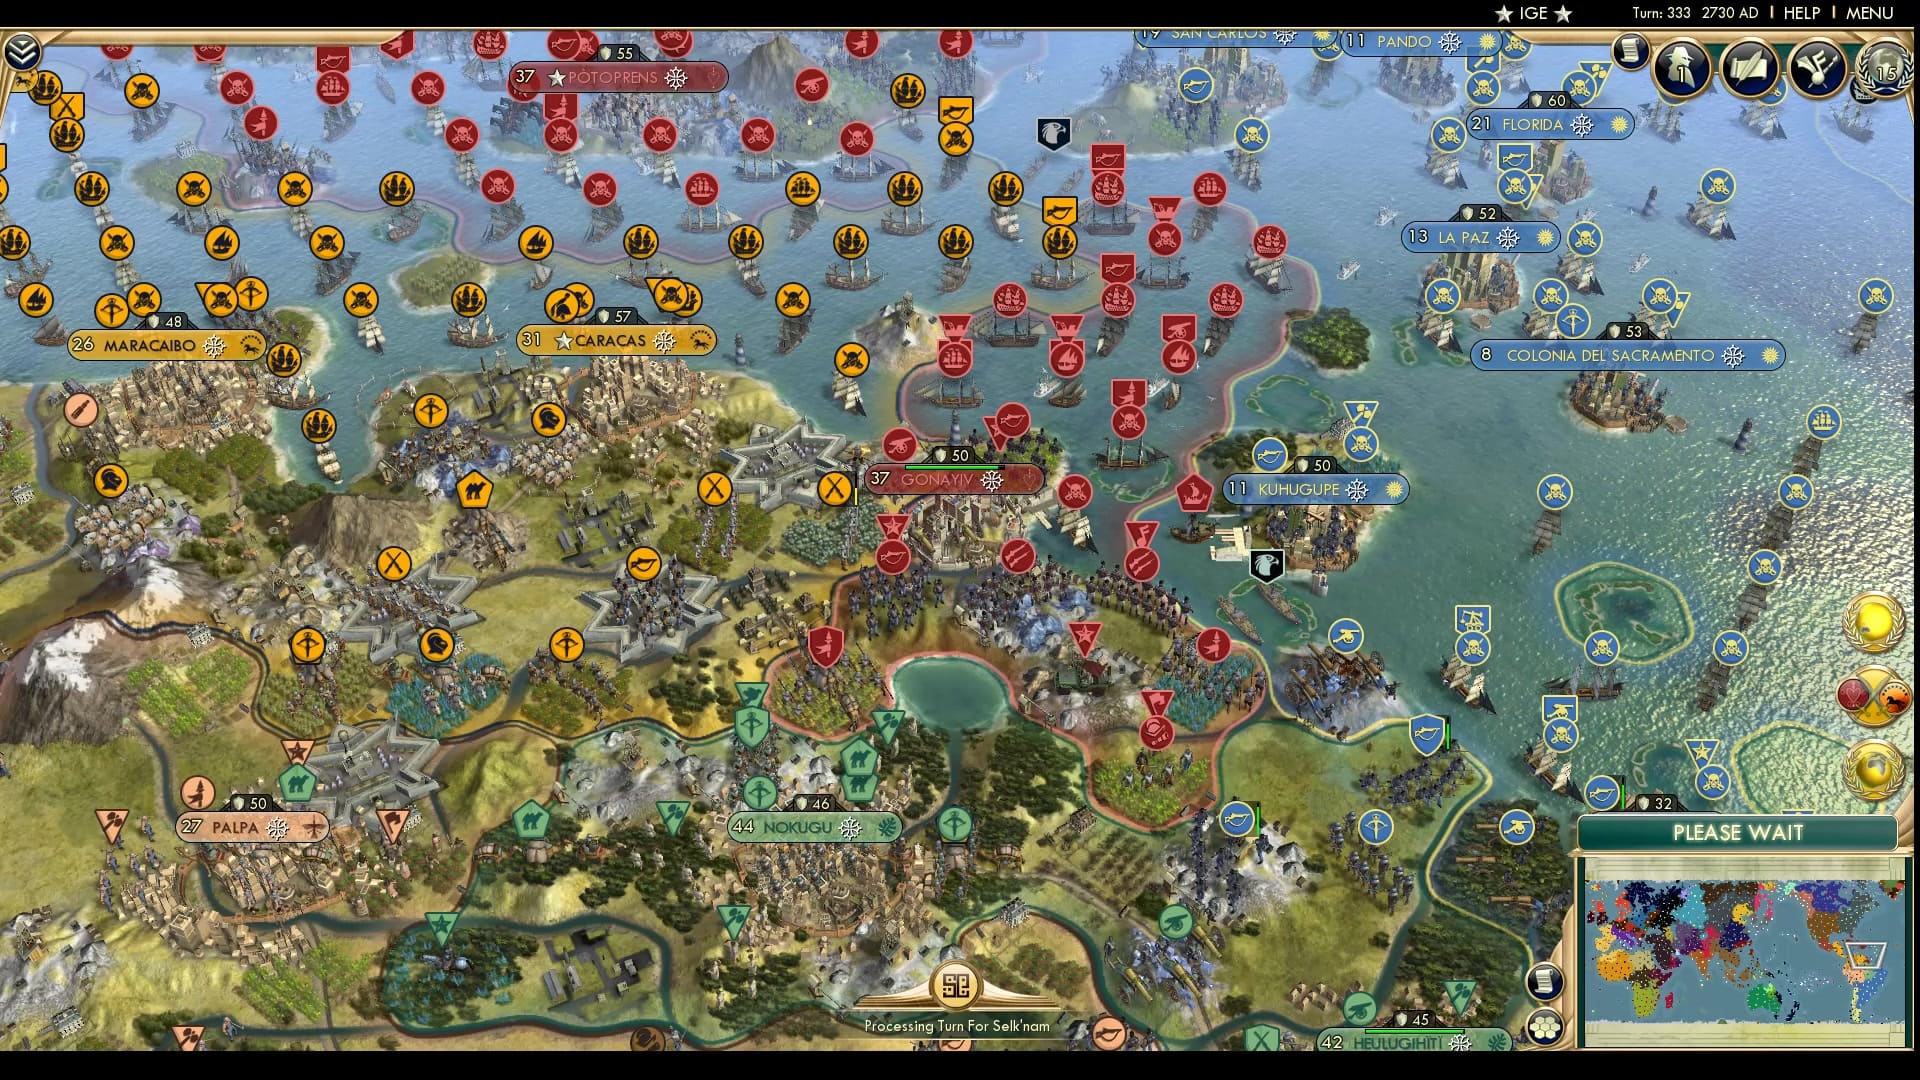
The Venezuelans, disappointed in their short-sighted war with the Selknam overlords, decide to attack Haiti. Gonayiv is even bigger than the Venezuelan capital, so it would be a smart idea to integrate it into the core. The navies look evenly matched, and even possibly favouring Haiti. We will see which of the twin capitals will fall. My bet is on none.
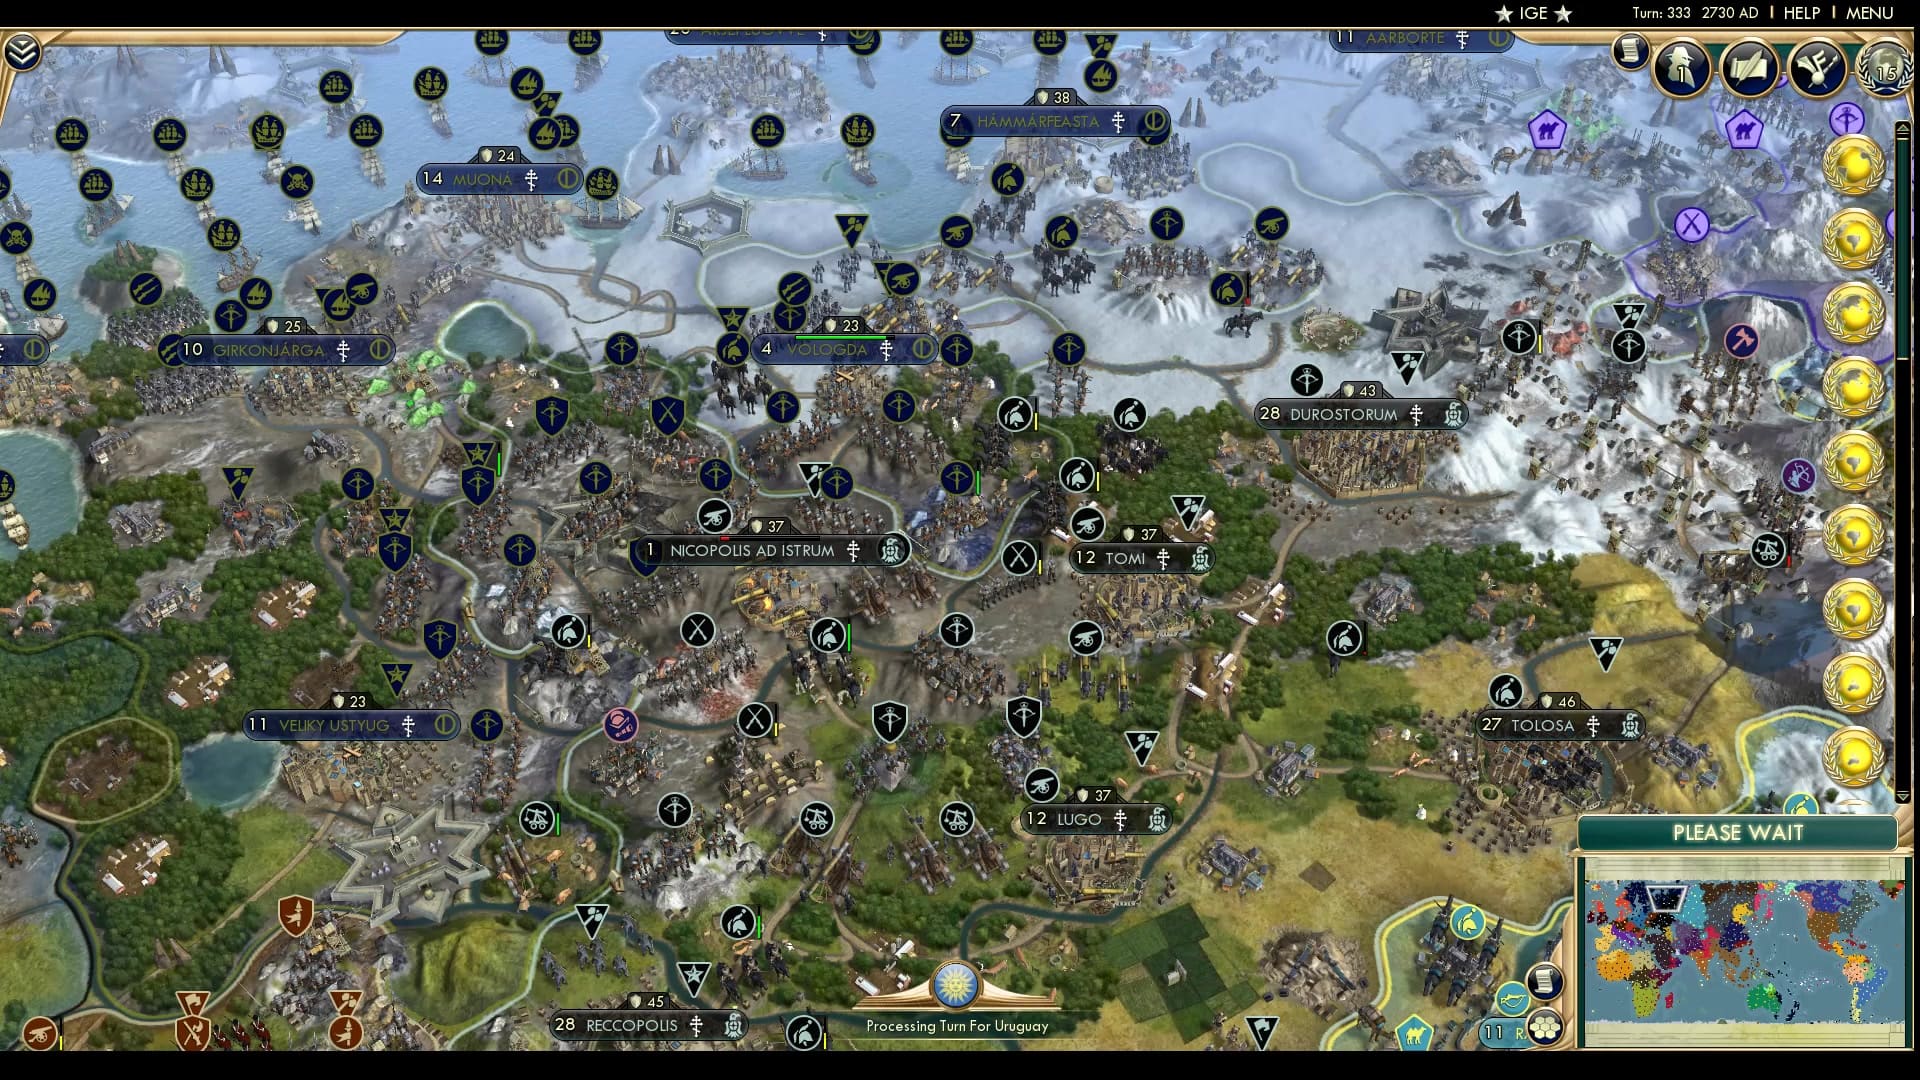
The Goths manage to pull competency out and take back a city. The armies remain looking evenly match, but is Eadni losing her touch? Nicopolis doesn’t look like it will be stably in the hands of either civ for long. It still has much to be seen on if other cities will fall in this war.
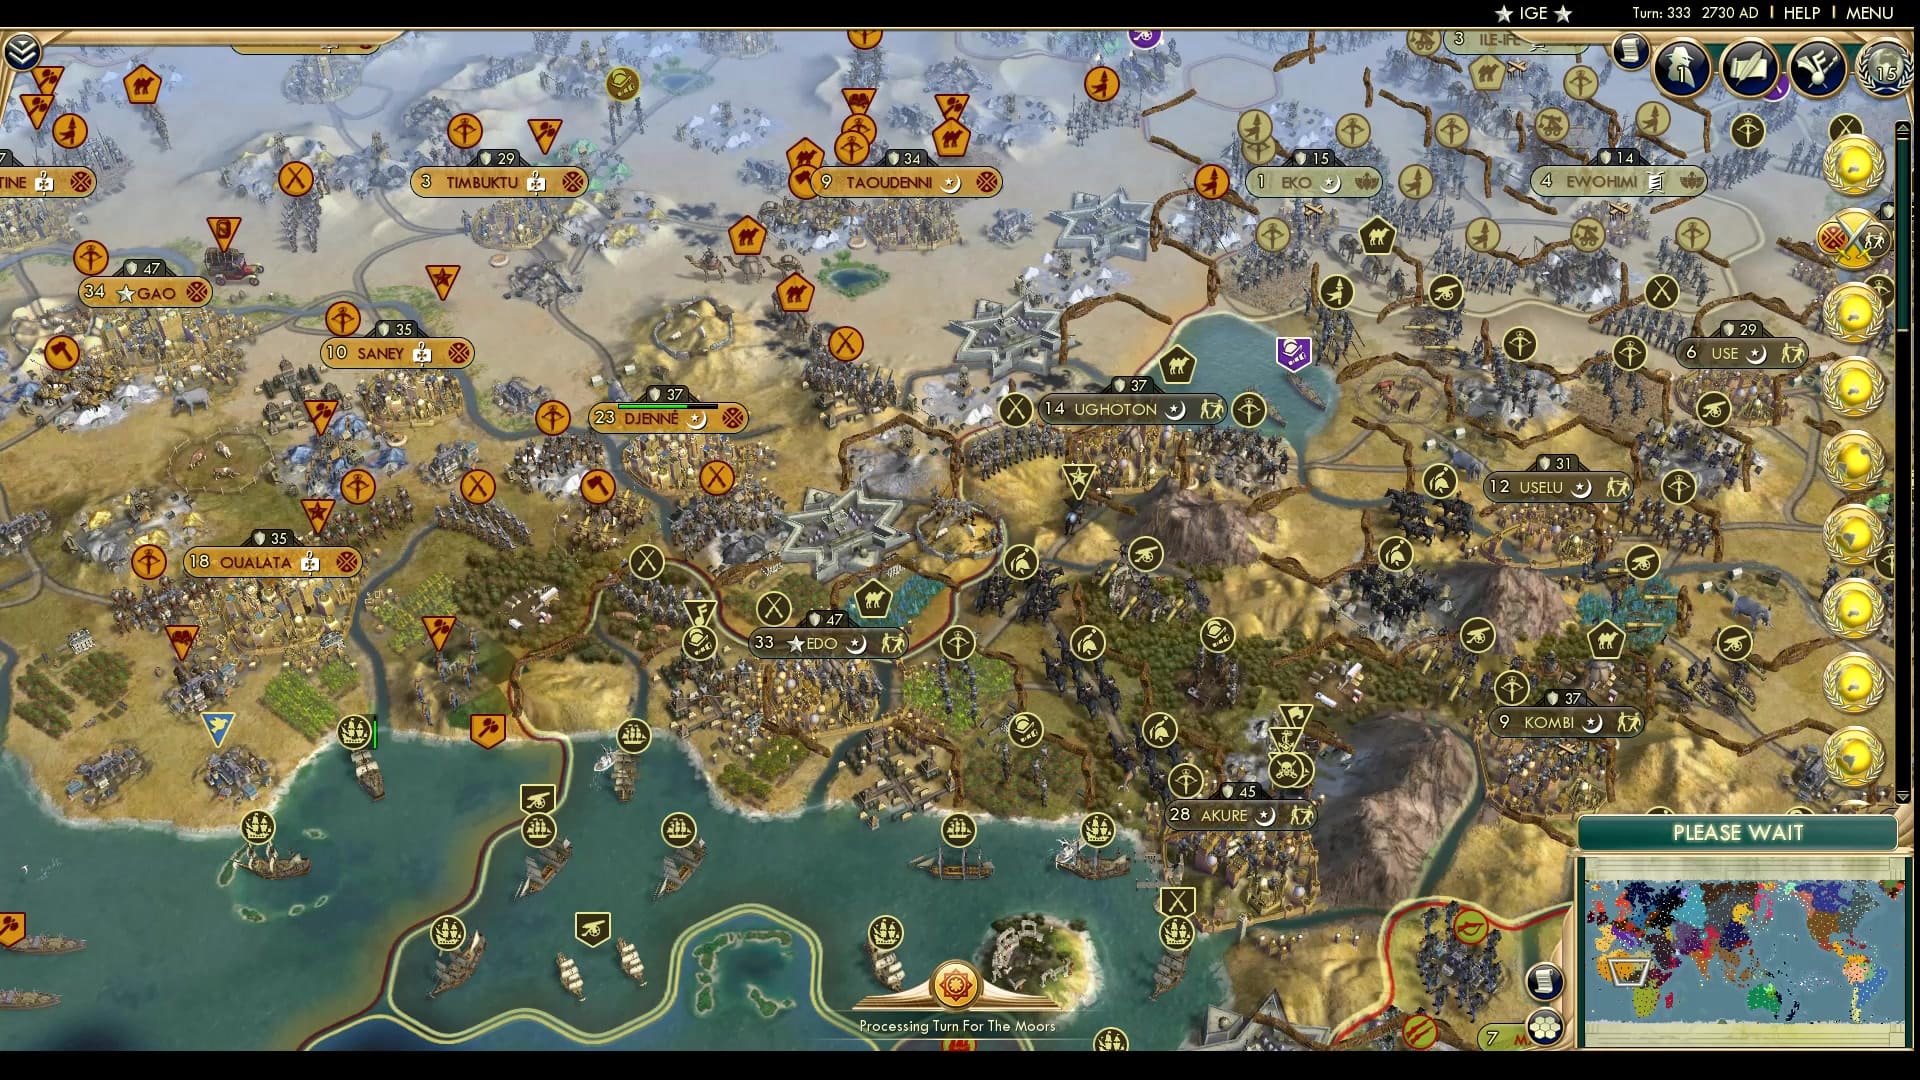
Benin declares on Songhai, finally reigniting the dearth of relevant African wars. Ewuare might be overly confident from his dissection of Ndongo as the army he has is only mildly better than the larger Songhai. Their navy is superior, but it seems like it would be useless against Songhai, at least initially. Perhaps Benin can secure the lands around Edo.
The Moors also take the opportunity to attack Songhai, attacking their island colonies off the coast of Morocco quickly and swiftly. The Songhai navy is no match for anything and there are already Moorish troops landed to take Niani. Will Songhai be disassembled like Kongo with all these wars?
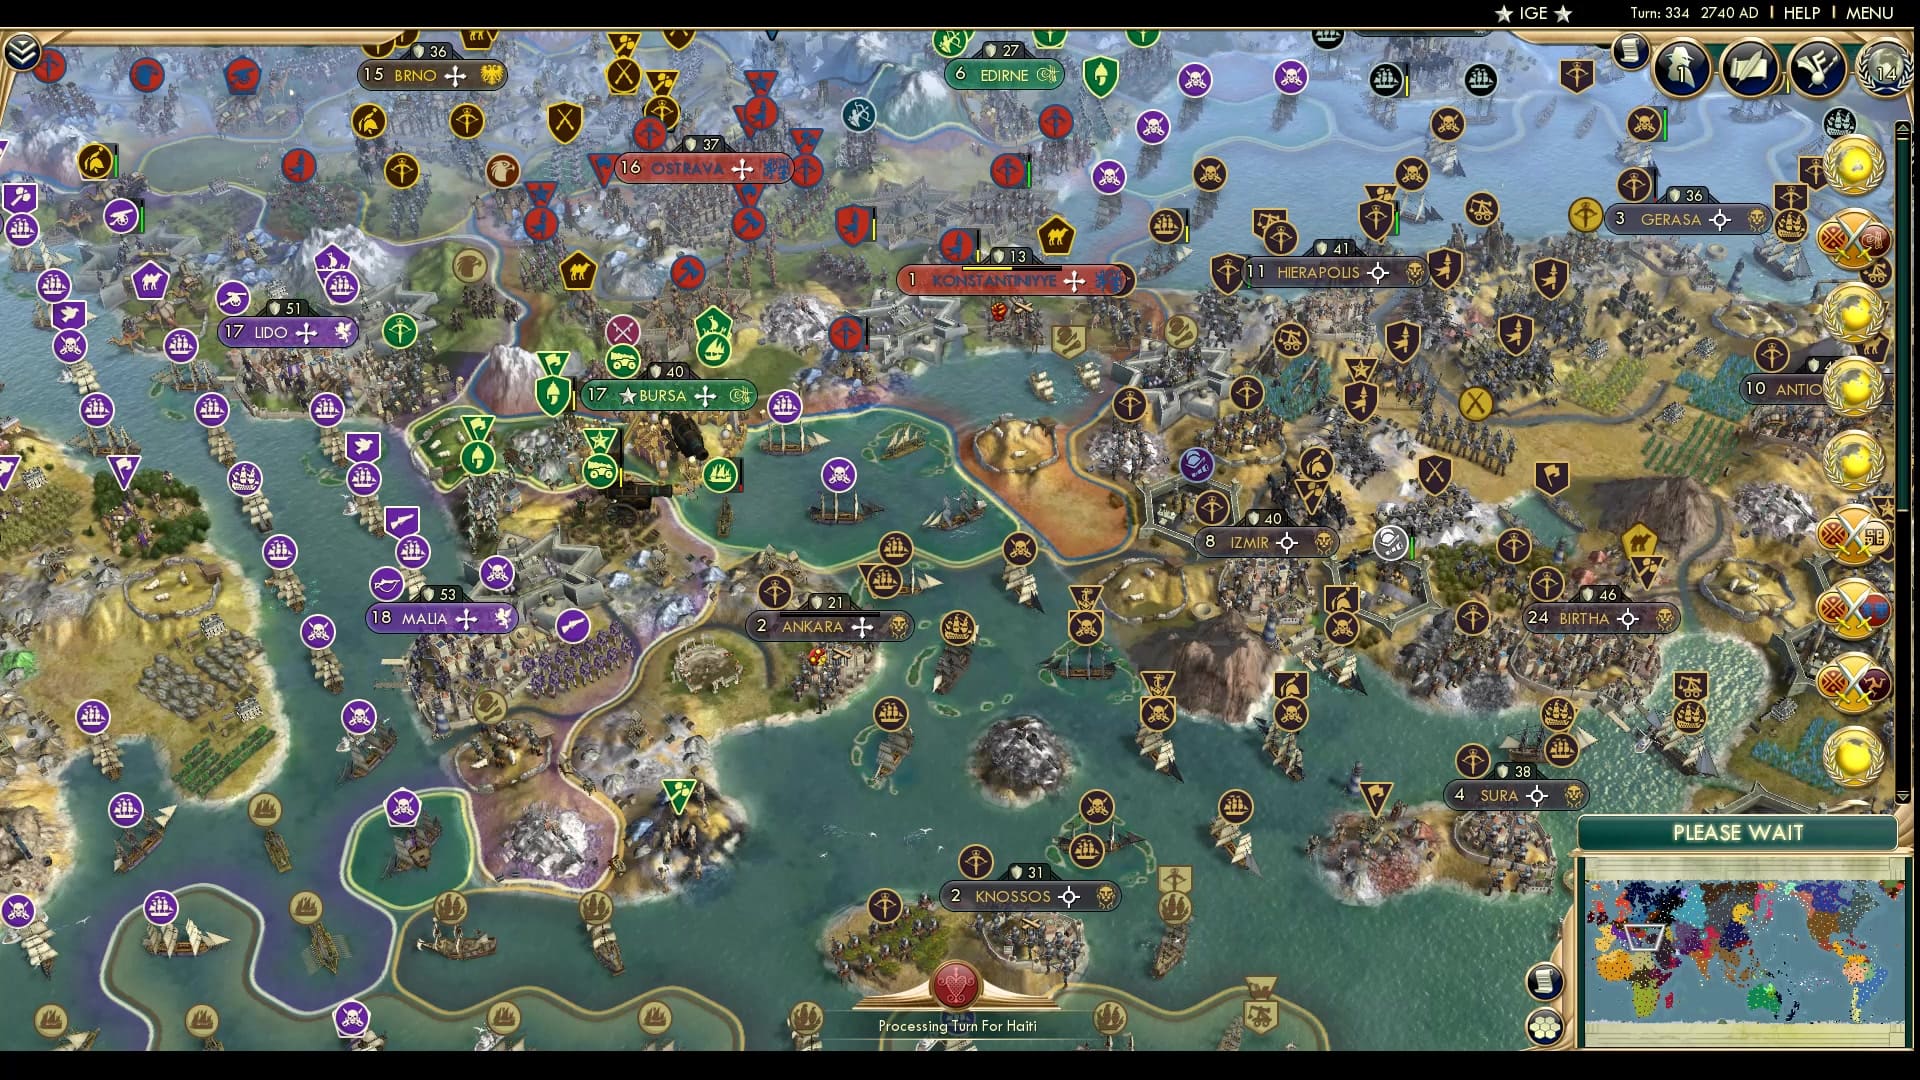
Perhaps Songhai is definitely doomed to fall, the Turks have declared war on them after all. In more relevant news, Czechia has found the energy to get out of bed and move their units to the frontline, taking Konstantiniyye and with a few units behind them to spare. Palmyran forces seem to have a harder time accessing the city to take it back this time around.
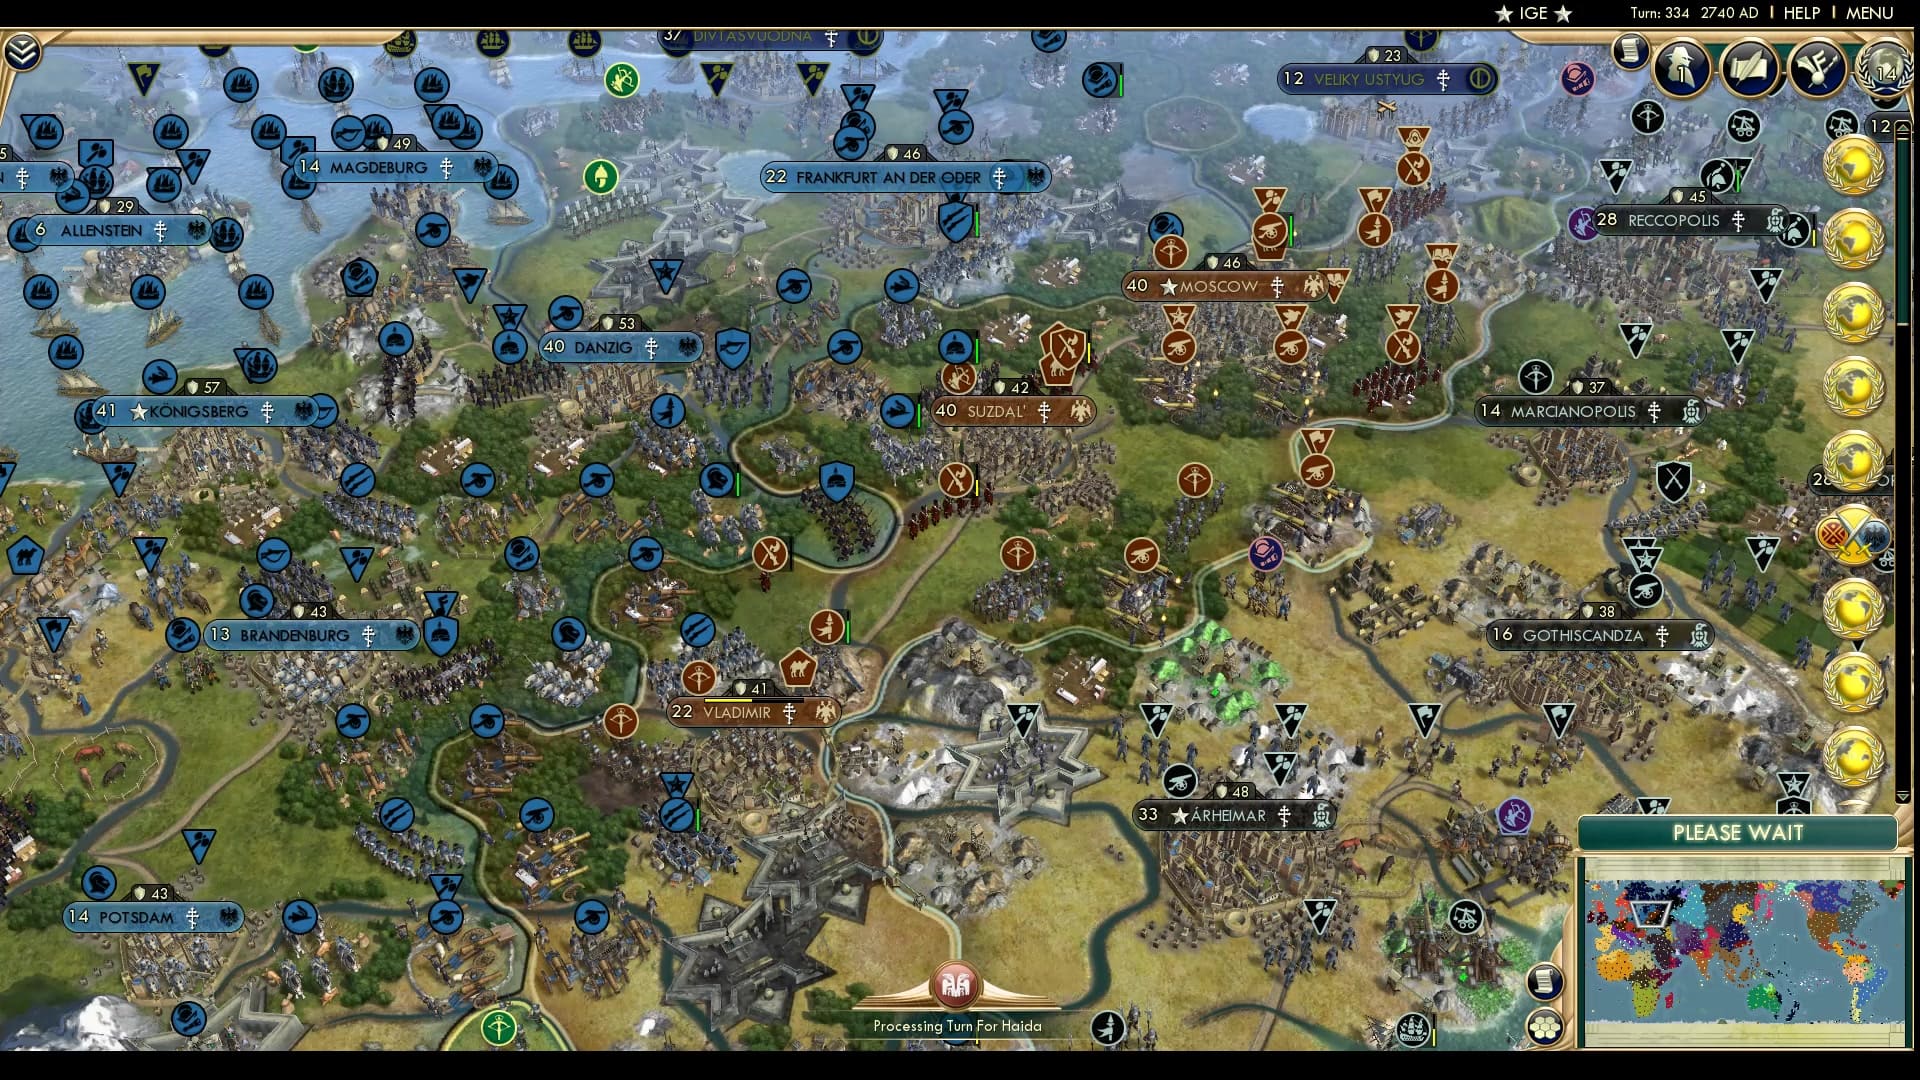
The Prussians who had been excellent at moving an army to the front, seem to have engaged in a World War 1 impasse. Their armies have moved at most one tile since we started this part quite a while ago. The good news for Frederick is that they are at least doing significant damage to the Moscovite city of Vladimir. But if they can’t take anything, perhaps they too will get a slice out of Songhai?
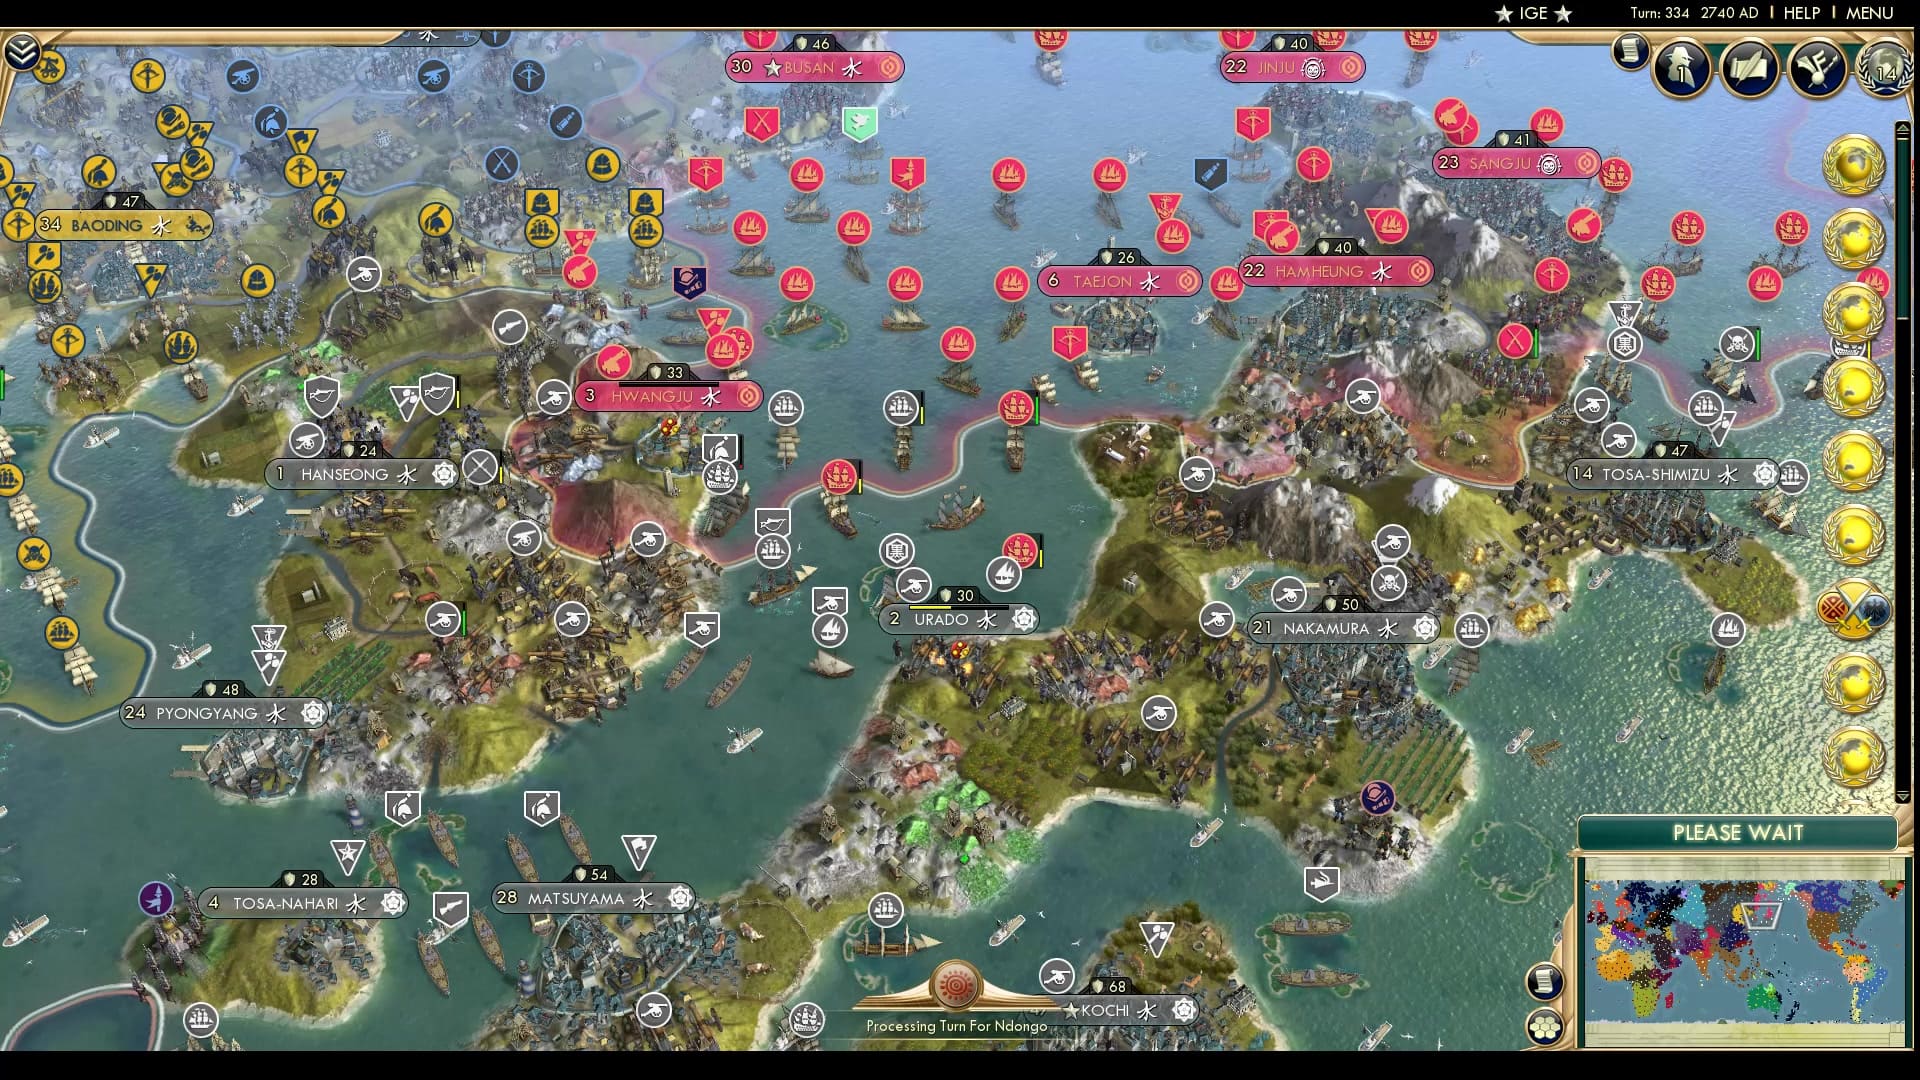
Seonjo looks upon what might be the final Korean presence on Korea before they are kicked out. Even if they have a core left, it just won’t be the same to not have Korea. The Koreans, seem to have used some of their defensive forces on an attack on Urado as some sort of failed distraction.
Uruguay also look to take a bite out of Songhai, but first they must have a quick naval fight in the Atlantic. The Venezuelan city on Bermuda gets attacked by Haiti, in what might become an unexpectedly early gain for Haitians in the War of Two Capitals.
The prior war between the Iroquois and the Metis continue as Hiawatha finally uses their advantageous position to push into Metis lands. As predicted when they last peaced, this war is looking to only increase the strength of Iroquois and their autocratic confederacy. The Metis attack on the Northern cities has also diminished.

Benin starts moving their units to take Djenne in an orderly and disciplined front west. A Songhai defence has materialized but so has a proper Beninese offensive army. Djenne looks like it might fall, although Benin has been pushed back from the city by just a tad bit.

On the Other side of Songhai, the two defenceless islands seem better defended than Niani, which looks like it could fall any second now. Of course, the Songhai army marching up seem to have competent amounts of units to flip it back. The same cannot be said of the islands.

And we end on a New Zealander navy having materialised to attack Perth. New Zealand has properly burned away any Papuan hopes of getting a foothold to save their original capital or their wartime capital. Perth looks dangerously close to falling, especially with those advanced Kiwi ships and little defenses. Will we see an elimination next part?
One thing we know is that Palmyra has given up on taking more Turkish cities, but a minimap check keeps Konstantiniyye in Czech hands.